ORION®Field Application Meter Reading Software 2.
Page ii ORION® Field Application for Trimble® Ranger 3 April 2014
CONTENTS INTRODUCTION . . . . . . . . . . . . . . . . . . . . . . . . . . . . . . . . . . . . . . . . . . . . . . . . . . . . . . . . . 5 USER GUIDE SOFTWARE SECURITY MODES . . . . . . . . . . . . . . . . . . . . . . . . . . . . . . . . . . . . . . . . . . . . . . . 8 PROGRAM STARTUP AND EXIT . . . . . . . . . . . . . . . . . . . . . . . . . . . . . . . . . . . . . .
ROUTE INFO . . . . . . . . . . . . . . . . . . . . . . . . . . . . . . . . . . . . . . . . . . . . . . . . . . . . . . . . . . 54 PROGRAM & QUICK READ . . . . . . . . . . . . . . . . . . . . . . . . . . . . . . . . . . . . . . . . . . . . . . . . . . 55 VersaProbe . . . . . . . . . . . . . . . . . . . . . . . . . . . . . . . . . . . . . . . . . . . . . . .
Introduction INTRODUCTION The ORION® Field Application 2.5.x s oftware application is designed for use with the Trimble® Ranger 3 handheld computer for utility meter route reading This manual is the guide for using the software application Instructions for operating the handheld are also included Audience and Purpose This manual is intended to be used by field technicians for collecting accurate utility meter readings from residential and commercial locations using the handheld.
Introduction Typographic Conventions • Items on the software screens that you need to select or choose by clicking a button, highlighting, checking a box or another similar means are in bold text and capitalized in the manual. Example: Click once on the View Report button. • Names of options, boxes, columns and fields are italicized. In most cases, first letters will be capitalized. Example: The value displays in the Status Information field.
User guide USER GUIDE April 2014 ORION® Field Application for Trimble® Ranger 3 Page 7
Software security modes SOFTWARE SECURITY MODES The Trimble Ranger 3 handheld can operate in one of two modes: • Admin mode gives full-use access to all the software loaded on the handheld. In this mode, battery life may be affected if applications such as Internet services and email are running. • Kiosk mode gives access to Badger Meter software, with date and time changes only.
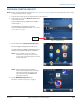
Program startup and exit PROGRAM STARTUP AND EXIT NNOTE: Before using the handheld for the first time, see "Initial Setup" on page 60 in Part II to ensure that the device is set up correctly and the battery is charged. 1. Press the green power key on the keypad to turn on the handheld. 2. At the home screen, tap the Windows® Start button in the lower left corner. Result: In Admin mode, the program icons display as shown in Figure 3. If the handheld is in Kiosk mode, skip to step 5.
Program startup and exit 5. Tap ORION Field Application to start the software. Result: The Clock Verification screen opens as shown in Figure 6. Figure 5: ORION Field Application 6. Verify that the date and time shown on the screen are correct. If the date and time are correct, tap Ok and continue with Step 8. IIMPORTAN The date and time on the handheld must be accurate to ensure communication with ORION endpoints. If the date or time need to be adjusted, tap the time shown in the top tool bar.
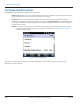
Program startup and exit NNOTE: When the software is accessed for the first time, the License Agreement screen opens automatically, after the Clock verification screen. Read the software license agreement and tap I Accept. The License Agreement must be accepted by an authorized representative of the customer/licensee. The License Agreement screen closes automatically. To see the License Agreement at any time, tap the License button on the Copyright screen. Figure 9: Accept license agreement 8.
Copyright screen COPYRIGHT SCREEN The Copyright screen displays the following information. • Program name, software version and copyright • Device name (handheld "friendly name") • Route information summary (when a route is loaded) • Trademark information • Software license information Title Bar In addition to displaying the name of the software, the title bar changes to show the selected function or the type of endpoint being read.
Main menu MAIN MENU The Main Menu is the starting point for all meter reading operations. There are four options on the Main Menu. Figure 13: Main Menu Read Route Displays the login screen to begin reading meters. This selection does not display if a route is not loaded. Route Info Provides data and time stamps for the meter reading route load and unload files. Program & Quick Read Displays shortcuts to the Program & Quick Read application of the ORION Endpoint Utility and to VersaProbe Quick Read.
Reading a route READING A ROUTE Read Route Login 1. Tap Read Route on the Main Menu. A route must be loaded. Result: The Pin/User ID Entry login screen displays. 2. Enter a three to five character personal identification number (PIN) using the keypad. NNOTE: The PIN/User ID must be entered by an authorized representative of the customer/ licensee. The PIN is user defined and can be a name, initials, an ID number or other information.
Reading a route Account Read Screen The account read screen is the main reading screen on the handheld. The information available on the screen is shown in Figures 16, 17 and 18 on the next three pages.
Reading a route Reading display field Data entry direction Meter type Service number Alert field Work Items Figure 17: Account read screen – meter information Meter Information Reading display field The meter reading displays in this field. In manual and touch reading mode, the field is blank until the meter reader manually enters the reading or performs a touch read. In Auto mode, the field fills automatically when a read is received for accounts with an ORION endpoint.
Reading a route Navigate to previous account Navigate to next account Code and/or text message Reading mode Reading hardware (CE, ME, VP) Handheld battery indicator Windows Start Read menu Account menu Figure 18: Account read screen – status and navigation Status and Navigation Reading mode The selected reading mode is displayed on the upper left side of the screen. Depending on the reading mode, accounts advance manually (Manual) or automatically (Auto). See "Changing Read Mode" on page 18.
Reading a route Changing Read Mode Choose Manual or Auto mode when reading routes with the handheld to advance to the next account manually or automatically. Manual Mode Auto Mode • Advances to the next account in the reading sequence once a meter reading is entered/received. • The Prev and Next buttons are used to navigate through the accounts in the route. • When an account appears that already has an ORION reading entered, the read is displayed. Advance manually to the next account.
Reading a route Bookmark an Account The software has a feature which allows you to bookmark an account. Bookmarks make accounts easier to find later. To bookmark an account, press the B key twice (BB) or press Fn + B on the keypad while on the account read screen. A bookmark label (BkMk) displays at the top left of the screen as shown in Figure 20. NNOTE: Pressing BB on the keypad again while on the account read screen clears a bookmark.
Reading a route Manual and Touch Pad Reads The handheld can read ORION endpoints and touch pads, and collect manual reads. If the route contains a mix of meters, the handheld always stops at a manual or touch account to allow a meter reading. To enter a manual read 1. Tap in the reading field to activate it. 2. Use the keypad to type the reading. 3. Press ENTER to store the reading.
Reading a route Work Items The account read screen for an ORION Migratable endpoint provides access to the two-way communication functionality of the endpoint through which work items are collected. Work items are used to collect extended status, historical interval data and/or endpoint firmware version of the ORION Migratable endpoints on the route.
Reading a route Tap the Work Items button on the ORION ME account read screen to display the Work Items screen. The screen has three selections: Extended Status, Firmware Version and Historical Interval Data. Figure 27: Work Items assigned and unassigned Assigned "Assigned" is shown next to the work item if the work item is set in ReadCenter Analytics or Analytics Mobile to be performed automatically. When a work item is assigned, the field is inactive.
Reading a route Requesting Extended Status Manually Extended status includes additional information which has been programmed into an endpoint, including meter type and size, unit of measure and encoder type, as well as exception statuses, such as tamper and no usage.
Reading a route 3. Tap View. Result: The Extended Status screen displays with the details of the selected account. 4. Tap Close to return to the Work Items screen. 5. Tap Close to return to the account read screen.
Reading a route Requesting Firmware Version Manually If a work item was not assigned by the reading data management operator, you can manually initiate a request for the firmware version from the current ORION Migratable (or Fixed Network in mobile mode) endpoint by performing the following steps. 1. Tap the Work Items button on the account read screen for an ORION ME account. Result: The Work Items screen opens.
Reading a route 3. Tap View. Result: The Firmware Version screen displays with the endpoint firmware version of the selected account. 4. Tap Ok to return to the Work Items screen. 5. Tap Close to return to the account read screen.
Reading a route Historical Interval Data Whether initiated automatically or manually, the ORION field application software is capable of extracting historical profile data from an ORION Migratable endpoint at the following intervals: 7 days (Week) 14 days (Two weeks) 30 days (One month) 60 days (Two months) (Shorter months include extra days of readings, up to 30) All readings stored in the endpoint (Up to 90 days of hourly readings or 2160 reads) This chart shows the number of readings collected for m
Reading a route 2. Tap Historical Interval Data. Result: The Select Days to Collect screen opens. 3. Tap the number of days of historical interval data to collect: 7, 14, 30, 60 or All. Then tap Select. Figure 37: Days to Collect 4.
Reading a route As the data is requested and extracted from the endpoint, a progress bar displays as shown in Figure 41. ”Complete“ displays when the historical interval data collection is finished and the View button becomes active. See Figure 42. NNOTE: If you receive an error before the process completes, change your position and try collecting the data again. Figure 41: Data collection ”In Process“ Figure 42: Data collection ”Complete“ 7. Tap View.
Read menu READ MENU To access the Read Menu, tap the Menu button on the account read screen. The Read Menu has several functions which are associated with the account that was last displayed. Scroll down to see the entire list. NNOTE: Keypad shortcuts can also be used to access the Read Menu options. See "Hot Keys, Quick Keys, Read Keys" on page 76 for more information. Search Displays the Search screen to find accounts using different criteria. Select Route Displays the routes loaded on the handheld.
Read menu Search The Search screen provides multiple ways to search accounts in the route file(s) loaded on the handheld. Change View Type Clear information on the screen Save a search Delete ”search by“ criteria Change ”search by“ criteria Add ”search by“ criteria Initiate a search Return to Read Menu Access Windows Start menu Figure 45: Search screen To access the Search screen, tap Menu> Search from the account read screen. To return to the account read screen, tap Close on the Search screen.
Read menu Search View Type On the Search screen, tap the view type (button between Save and Reset) to select Grid, List or Paged. This selection determines how the search results will display. Choose the view you prefer, or change the view type to see your search results in different views. Pictured below are examples of the same results in the three view types for a search of Last Name that contain the letters "ri.
Read menu Search Criteria Tap the Search Criteria button on the Search screen to see a list of search criteria. Figure 50: Criteria to search by The criteria listed below are included in the Search feature. Account field labels sent from ReadCenter and displayed on the account read screen will also display in the Search By criteria. For example, if the Endpoint Serial # is shown on the account read screen, ”Endpoint Serial #“ will display as a searchable field in the Search By list.
Read menu How to Search You can search for a account in the route using any of the criteria in the Search By field and display the results in three different ways. All accounts loaded on the handheld are searchable. 1. From the account read screen, press the S key twice (SS) or tap Menu> Search. Result: The Search screen displays as shown in Figure 51. Figure 51: Search 2. Tap the view type button and select Grid, List or Paged view for the search results.
Read menu Depending on the search criteria, additional fields display as in the example shown in Figure 54. 4. Operator: Tap to select an option: Contains, Starts With or Ends With. Value: Enter a valid value for the search criteria selected. Invalid Value: If you do not enter a valid value and you tap Search, a message displays to alert you that the Search ”contains invalid entries.“ Tap Ok on the message screen to return to the Search screen.
Read menu Figure 57: Selected account read screen Figure 58: Account menu 7. On the account read screen, tap Account. Then tap Search in the menu that displays to return to the Search screen. NNOTE: If there are no results for your search, the No Services Found screen displays with a message showing no search results were found for your search criteria. Click Ok, change your criteria and search again. Figure 59: No results 8.
Read menu Exception Search Using the Search feature, you can find accounts with certain exception conditions. Symbols/icons used to indicate the exception conditions that display in a Search are shown in the table below. The definition of each exception condition depends on the meter and encoder/endpoint type. Encoder error Programmed Potential leak Reverse Flow Low battery Tamper No usage 1. From the Search screen, tap the view type button and select List view for the search results.
Read menu Multiple Criteria Search You can add Search Criteria to narrow your search and get to the results you need quickly. This option is useful when looking for a specific account when there are multiple routes with multiple accounts loaded on the handheld. 1. Tap the plus sign to add a Search By field. Add up to three fields, as needed, as shown in Figure 64. Figure 63: Search Criteria 2. Select the view type for the search results: Grid, List, Paged. 3.
Read menu Saving a Search The software allows you to save a search. This option saves time for a search you perform frequently. 1. From the Read Menu , tap Search. Figure 65: Search screen 2. Select the view type for the search results: Grid, List, Paged. 3. Choose the criteria. Enter valid values for the criteria. See Step 4 in "How to Search" on page 34 for more information. 4. Tap the Save button. 5. You will be prompted to enter a name for the search. Enter a descriptive name and tap Ok.
Read menu 6. To search using a saved search, tap the Select Saved button. Result: The Select Saved Search screen opens and displays a list of saved searches. 7. Tap the saved search you need. Result: The saved search displays on the Search screen as shown in Figure 70. Figure 69: Saved search list Figure 70: Search screen 8. Tap Search. NNOTE: The Select Saved button will display each time you search unless the saved searches are deleted.
Read menu Select Route When there is more than one route loaded, the Select Route option displays on the Read Menu. From the customer account read screen, tap Menu to open the Read Menu screen. Then tap Select Route. Tap to select a route and then tap Select to go to the first account in the selected route. To mark the entire route complete, tap the Mark As Complete button. Tap Close to return to the Read Menu. Tap Close again to return to the account read screen.
Read menu View High/Low 1. Tap View High/Low on the Read Menu to see the high and low values for the account that was displayed before selecting the Read Menu. Result: This screen displays the account number, the high and low values set by the billing program and the previous reading that was stored in the reading data management software. NNOTE: This information can be blocked by the reading data management operator and may not be available to view. 2. Tap Close to return to the Read Menu.
Read menu Reader Codes Reader Codes are predefined by the reading data management software operator. The codes are often used to describe typical, non-emergency account information such as, “make an appointment” or “left a notice card.” Up to three Reader Codes may be set for an account. 1. Tap Reader Codes on the Comments Menu. Result: The Reader Codes screen displays with the customer name and address shown. 2. Tap 1, 2 or 3 to enter the 1st, 2nd and/or 3rd code, respectively.
Read menu Text Messages Text Messages can be created when appropriate Trouble or Reader Codes are not available. Text messages are alphanumeric, with up to 140 characters for each message. Create a Message 1. From the Comments Menu, tap Text Messages or press Fn+N on the keypad from an account read screen to open the Text Message screen. Result: The Text Message screen opens with the customer name and address as shown in Figure 79. 2.
Read menu Edit a Message 1. From an account read screen with a text message, tap Menu > Comments > Text Messages or press Fn+N on the keypad from an account read screen to open the Text Message screen. NNOTE: As shown in Figure 81, a displays next to Text Messages on the Comments Menu if the account has a text message. 2. Tap in the Message field to activate it. Tap within the text to position the cursor or drag across all or part of the current message to select it.
Read menu Erase Read NNOTE: If a reading is not stored in the customer record, the Erase Read option does not display on the Read Menu. 1. Tap Erase Read on the Read Menu. Result: The Erase Reading? screen displays the current account and asks for confirmation to erase the reading. This action returns the account record to an unread status. 2. Tap Yes to erase the current reading. Result: The customer account displays with a blank reading field.
Utilities UTILITIES The Utilities Menu can be accessed either from the ORION Field Application Main Menu or from Read Menu> Utilities. The Utilities Menu has three options: • Progress • Battery Info • Settings Figure 84: Utilities Menu Progress 1. Tap Progress on the Utilities Menu to see a summary of the number of meters loaded, number of meters read and other information about the routes loaded on the handheld. Progress does not display if a route is not loaded. 2.
Utilities Battery Info The second option on the Utilities Menu is Battery Info. 1. Tap Battery Info to display information about the battery charge and life. 2. Tap Close to return to the Utilities Menu. Figure 87: Battery and charging status Settings The third option on the Utilities Menu is Settings. Tap Settings to display the Settings Menu for the handheld.
Utilities Hardware The Hardware Settings screen displays the communication (COM) ports for the hardware attached to the handheld. The COM ports will be set during training. Changes should only be made under the direction of Badger Meter Technical Support. If the COM ports must be adjusted, follow these steps. 1. Tap Hardware on the Settings Menu to display the Hardware tab on the Hardware Settings screen. 2. Tap a technology button. For example, ORION CE Radio.
Utilities Program Options 1. Tap Program Options on the Settings Menu to display the first of three Program Options screens. 2. On the Options 1 of 3 screen, tap in the box next to one or more of the settings that tell the handheld how to handle certain operations and conditions. 3. Tap Save to save the settings. 4. To advance to the next screen of Program Options tap 2 of 3. Figure 92: Program options 1 of 3 On the Options 2 of 3 screen, choose the settings for route alerts. 1.
Utilities High/Low Options Tap High/Low Options on the Settings Menu to display the settings for high or low readings. Advance on High/Low: A high reading (higher than previous readings) could indicate a leak or unusual consumption. A low reading (lower than previous readings) might indicate a tamper or meter malfunction. Beep on High/Low: An audible alert sounds for a high or low reading. Show High/Low Values: Displays the high and low values on the screen.
Utilities Displayable Field Settings Tap Displayable Field Settings on the Settings Menu to see the User Defined Fields screen. This screen displays the predefined fields that display on the account read screen. The first five field settings are determined by the reading data management software operator and cannot be changed. The sixth (Custom) field may be changed by the meter reader. The Custom field displays on the account read screen below the predefined display fields and above the Reading field.
Utilities Customizations Tap Customizations on the Settings Menu to access the two customization screens. The meter reader has complete control of these screens. The Customization 1 of 2 screen is used to determine what information is displayed when a bookmark is set or a hot key is used. This aids the meter reader in finding a bookmark in the Search mode. Tap Bookmark Display Using Field or Search Hot Key to display the selection screen. Tap the desired option. Then tap Select.
Route info ROUTE INFO Figure 102: Route summary information The Route Transfer Info screen can be accessed from the Main Menu. The screen provides date and time stamps for the meter reading route load and unload file. The information is read only. Tap Done to close the Route Transfer Info screen and return to the Main Menu.
Program & quick read PROGRAM & QUICK READ Program & Quick Read provides access to VersaProbe quick read functions and to the ORION Endpoint Utility software. 1. Access the ORION Field Application and navigate to the Main Menu. If you need help, see "Program Startup and Exit" on page 9 and follow the steps to access the Main Menu. NNOTE: You do not need to have a route loaded to access the Program & Quick Read software. 2. Tap Program & Quick Read. Result: The Main Menu opens as shown in Figure 104.
Program & quick read VersaProbe Quick Read A VersaProbe wand is used for close proximity touch pad meter reading. The wand can be connected to the handheld serial port or via a wireless Bluetooth connection. Setting the VersaProbe COM Port Check the COM port settings before performing a VersaProbe touch pad reading. For instructions, see "VersaProbe Reads" on page 20. Performing a VersaProbe Quick Read To perform a Quick Read using the VersaProbe wand, follow these steps. 1.
Handheld operation HANDHELD OPERATION April 2014 ORION® Field Application for Trimble® Ranger 3 Page 57
Trimble ranger 3 handheld overview TRIMBLE RANGER 3 HANDHELD OVERVIEW The Trimble Ranger 3 is a handheld computer designed for fully automated data collection along a route for meters equipped with ORION endpoints. The handheld can also accept manual reads to support utilities as they transition from manual read to AMR technology. In retrofit installations where matching existing readings is required, the handheld functions as a programming device for initial endpoint setup.
Trimble ranger 3 handheld overview Handheld Top View Handheld Bottom View General Care of the Handheld Use a mild detergent and a clean soft cloth to clean the body of the handheld. Do not use solvents, such as paint thinners. Use only a lint free cloth to clean the infrared port. Do not use detergents or solvents to clean the infrared port or display window. The Trimble Ranger 3 handheld has a wide operating range of –5...
Trimble ranger 3 handheld overview Initial Setup 1. Install the battery. The Lithium-Ion (Li-Ion) battery is shipped detached from the unit. Insert the battery at the bottom of the compartment first so the connector on the battery makes contact with the pins in the battery compartment. Using the flat end of the stylus or a coin, turn the latch located above the battery clockwise until tightened. As the latch is turned, the battery levels in the case. 2. Attach the hand strap, starting at the bottom.
Trimble ranger 3 handheld overview IIMPORTAN Fully charge the battery at least 4 hours before use. The battery LED (left LED) will turn green when fully charged. Always use the chargers intended for the handheld. Using other chargers will void the warranty. 5. Attach the I/O dust cover (optional) as shown. The unit is completely sealed, however, the dust cover can be used to protect the connectors from foreign objects. NNOTE: The dust cover must be removed when using the docking station for charging. 6.
Trimble ranger 3 handheld overview Working with the Handheld Battery Charging the Battery The AC charger that ships with the unit has adapters to fit almost every electrical outlet. Connect the appropriate outlet adapter to the AC charger. To charge the battery, plug the AC charger into the charging port on the bottom of the handheld and plug the charger into an electrical outlet. The handheld is fully charged in approximately 4.5 Left LED Center LED Right LED hours using the AC charger.
Trimble ranger 3 handheld overview Conserving the Battery The handheld conserves battery power by turning itself off when not in use. Press and release the green power key on the keypad to turn the unit back on. The display shows the same screen that was displayed when the unit turned off. NNOTE: When the Read or Quick Read screen is in use, the handheld will NOT turn off automatically because the ORION reading functions are active.
Trimble ranger 3 handheld overview Handheld Basic Operations Turning the Handheld On To turn on the handheld, press the green power key on the keypad. An audible beep sounds and the “booting” message appears. Power Menu Hold down the green power key for about three seconds to display a countdown timer. Release the power key to display the Power Menu. NNOTE: If you continue to hold down the power key, the handheld resets when the countdown reaches zero. See “Restarting the Handheld” below.
Trimble ranger 3 handheld overview Using the Touch Screen NNOTE: This manual provides instructions for touch screen navigation and operation of the handheld. Quick Keys and Hot Keys are keypad shortcuts which also can be used for performing mobile read functions. See "Hot Keys, Quick Keys, Read Keys" on page 76 for details about using these keypad shortcuts. In addition to the keyboard, the handheld is equipped with a touch screen to facilitate function selection and promote ease of use.
Trimble ranger 3 handheld overview Changing the Handheld Date and Time IIMPORTAN The date and time on the Trimble Ranger 3 handheld must be accurate to ensure communication with the ORION endpoints. Check the date and time and adjust if necessary before reading a route. To change the time and /or date, follow these steps: Tap the Windows Start button at the lower left of the screen. Tap Settings. Tap Clocks & Alarms.
Trimble ranger 3 handheld overview Barcode Scanner Depending on the configuration, the handheld may include an integrated laser ID barcode scanner. NNOTE: To be able to use the barcode scanner while the handheld is in Kiosk mode, a shortcut button for using the scanner must be set while in Admin mode before changing to Kiosk mode. Activating the Scanner 1. Tap Windows Start> Settings > System > Scanner Setup. 2.
Trimble ranger 3 handheld overview 4. Tap to select the Circle Shortcut button. You may need to scroll to find it. 5. Tap in the Assign a program field and select Scan Agent. You may need to scroll to find it. 6. Tap OK. Result: The circle shortcut button on the handheld keypad is now programmed to scan a barcode when pressed. NNOTE: The scanner can be used to capture ORION endpoint serial numbers.
Trimble ranger 3 handheld overview Flashlight Depending on the configuration, the handheld may include a camera. The dual LEDs for the camera flash can also be used as a flashlight. Tap Windows Start> Flashlight to toggle the Flashlight on and off. Programming a Keypad Button for Flashlight Any of the buttons on the top row of the handheld keypad (Windows Start, LEFT, RIGHT, CLEAR) or the circle shortcut button can be programmed to act as the flashlight button.
Trimble ranger 3 handheld overview Working with Bluetooth The handheld has been designed to operate with the internal Bluetooth®—a short-range wireless communication technology that exchanges information (beam) over a distance of up to 30 feet (10 meters), without requiring a physical connection. Tap Windows Start> Settings> Bluetooth.
Trimble ranger 3 handheld overview Power: • Tap if you want to select "Maintain Bluetooth connections when device is turned off." • Tap if you want to select "Allow Bluetooth activity to turn the device on." When this check box is selected, another Bluetooth device can send data and your unit will turn on and reply if necessary. IIMPORTAN Leaving wireless options on reduces battery life. It is recommended that your handheld be configured to automatically turn off when not in use.
Trimble ranger 3 handheld overview Working with GPS Tap Windows Start> Settings> System> System Information. Then select Wireless from the selections that display across the top of the screen to verify that GPS is installed and is using COM 2. The GPS is compatible with applications that accept the NMEA position information using a default baud rate of 9600. GPS Settings If you are using only one GPS-aware application, these settings do not need to be changed.
Trimble ranger 3 handheld overview Working with the Speaker/Microphone The handheld comes with an integrated speaker and a microphone. It also has a 3.5 mm audio jack that is wired for a headset with a stereo speaker and microphone combination. Recording 1. To record, tap Windows Start> Notes. 2. If you do not see the Recording tool bar, tap the Menu icon at the bottom of the screen and select "View Recording Toolbar." 3. Tap the round Record symbol on the screen.
Trimble ranger 3 handheld overview Factory Reset/Clean Boot THIS PROCEDURE RESETS THE TRIMBLE RANGER TO "FACTORY FRESH" CONDITION AND REMOVES ALL PREVIOUSLY ADDED SOFTWARE, INCLUDING ANY BADGER METER SOFTWARE APPLICATIONS. Start the factory reset procedure with the handheld powered on. 1. Press and hold the green power key. When the countdown timer starts, release the green power key. Result: The Power Menu displays. 2.
Using the handheld keypad USING THE HANDHELD KEYPAD Windows® Start Left = Bottom left screen command Right = Bottom right screen command Clear contents of the selected field Circle shortcut - Can be programmed as barcode scanner button APP MENU and COMM MODE buttons are programmable Navigate fields on screen with right/left/up/down arrows Center key = select or enter Numeric keys Dash/Hyphen Fn (Function) key + Yellow label key = Hot Key function Yellow label denotes Hot Key Alpha keys On/Off pow
Hot keys, quick keys, read keys HOT KEYS, QUICK KEYS, READ KEYS The handheld software includes a number of Hot Keys and Quick Keys that provide meter reading shortcuts. Hot Key Press and hold the Fn key – then quickly press and release the hot key to perform the desired function. Release the Fn key after releasing the hot key. Example: Press and hold Fn, then press B to bookmark an account. Quick Key Double or single press the alpha key (depending on Settings) for the desired function to perform.
Configuration options CONFIGURATION OPTIONS The Trimble Ranger 3 handheld is available in three configuration options: • Handheld with an internal ORION ME transceiver and built in GPS, WiFi, camera, flashlight and bar code scanner • Handheld with an internal ORION CE receiver and built in GPS, WiFi, camera, flashlight and bar code scanner • Handheld for manual reads only (no radio) with built in GPS and WiFi Config 1: Handheld back view with internal ORION ME transceiver Config 2: Handheld back vie
Configuration options Connecting an External Mobile Transceiver or Receiver For handhelds configured with an internal transceiver or receiver (Config 1 and Config 2 on previous page), one external ORION ME mobile transceiver or ORION CE mobile receiver can be connected to read ORION endpoints. 1. Place the magnetic mount antenna on the vehicle roof. Ensure that the free area around the base of the antenna equals the antenna height.
Appendix APPENDIX April 2014 ORION® Field Application for Trimble® Ranger 3 Page 79
Glossary GLOSSARY TERM DESCRIPTION ADE Absolute digital encoder (ADE) is a position-based encoder that senses the position of each number wheel to determine the reading for touch and AMR/AMI systems. The encoder displays as ”ENC“ on the software screens. AMI Advanced metering infrastructure (AMI). AMR Automated meter reading (AMR) system that uses radio frequency technology to transmit meter readings between an endpoint and a data collection device.
Glossary TERM DESCRIPTION ORION Endpoint Utility The programming and quick read software application for ORION Cellular, Migratable (ME), Fixed Network (SE) and Classic (CE) endpoints. ORION Field Application The route meter reading software application for the handheld. ORION ME, ORION SE The ORION Migratable and ORION Fixed Network endpoints are two-way utility management solutions.
Status codes STATUS CODES Status codes are displayed on several of the screens within the software. The following is a list of status codes and their descriptions. Status Code Description CR Cover Removal (gas only) EE Encoder/Register Error IR Programmed via IR – endpoint was programmed using the infrared cable LB Low Battery LK Leak MMI Mobile Mode Indicator NU No Usage REV Reverse Flow (encoder or gas only) T Tamper VALID COM PORTS The following is a list of valid COM ports.
Gas meter drive rotation GAS METER DRIVE ROTATION The table below displays the drive gear rotation direction for common gas meter makes/models.
Gas meter drive rotation HANDHELD STATUS INDICATORS Status Indicators Status indicators may display at the top of the screen. The status indicator icons are shown here with a description of what they indicate. Icon Description Battery power is low Icon Description Other networks are detected.
Route memory stick ROUTE MEMORY STICK Initializing the Memory Stick The memory stick must be initially matched to the handheld before a route can be loaded. NNOTE: If you need to change the handheld Device Name, change the Device Name before you initialize the memory stick for the handheld. 1. Insert a blank memory stick into the USB port at the bottom of the handheld. 2. A message displays asking if you want to "initialize" the memory stick. Tap Yes to initialize the memory stick.
Route memory stick LOADING A ROUTE 1. Start at the Copyright screen. If you need help, see "Copyright Screen" on page 12. 2. Insert the memory stick with the route account information into the USB port on the bottom of the handheld. NNOTE: The USB port on the front of the charging cradle can also be used while the handheld is charging. The memory stick with the route file information must be initially matched to the handheld before a route is loaded.
Unloading a route UNLOADING A ROUTE 1. Start at the Copyright screen. If you need help, see "Copyright Screen" on page 12. 2. Insert the memory stick into the USB port on the bottom of the handheld. Result: Inserting the memory stick triggers the Load & Unload button to display next to the Trademarks and License buttons on the Copyright screen. 3. Tap the Load & Unload button. Result: The Load & Unload Routes screen opens and displays the route to unload. 4.
Using versaprobe with bluetooth USING VERSAPROBE WITH BLUETOOTH IIMPORTAN The VersaProbe should physically be within 10 feet of the handheld to set up a successful wireless connection and the battery should be fully charged. Place the VersaProbe in Discovery Mode This step places the VersaProbe in discovery mode so it can be recognized with the Bluetooth connection. If performed correctly, this step only needs to done once. 1. Squeeze and hold the trigger of the VersaProbe.
Using versaprobe with bluetooth Set the VersaProbe COM Port on the Handheld 1. Access the Main Menu in the ORION Field Application software on the handheld. If you need help, go to "Program Startup and Exit" on page 9. 2. Select Utilities> Settings> Hardware. For additional information, see "VersaProbe Reads" on page 20. 3. Check the box "Versa Probe is Bluetooth" on the Hardware Settings screen. 4. Tap the VersaProbe button to display the COM port selection screen. 5.
Troubleshooting TROUBLESHOOTING Communications Error The correct COM port must be set for any hardware attached to the handheld. See "Hardware" on page 49 and "Valid COM Ports" on page 82 for additional information.
Troubleshooting Recovering a Backup Route Unload File Once a route file is unloaded, a backup route file can only be accessed using a security code and the following steps. IIMPORTAN A route must be loaded on the handheld before starting this process. Use an expendable route file because the loaded route will be lost during the recovery process. 1. 2. 3. 4. 5. 6. 7. 8. Go to Windows Start> Badger Field Applications> ORION Field Application. Tap to open ORION Field Application.
Technical support TECHNICAL SUPPORT Errors do not normally occur, so it is important to report all occurrences of error windows to Badger Meter Technical Support. NNOTE: Trouble Codes and/or information from any notes created in Comments Codes/Messages can be useful when reporting a problem to Technical Support.
INTENTIONAL BLANK PAGE April 2014 ORION® Field Application for Trimble® Ranger 3 Page 93
INTENTIONAL BLANK PAGE Page 94 ORION® Field Application for Trimble® Ranger 3 April 2014
INTENTIONAL BLANK PAGE April 2014 ORION® Field Application for Trimble® Ranger 3 Page 95
ORION® FIELD APPLICATION FOR TRIMBLE® RANGER 3 Making Water Visible® ADE, ORION, ReadCenter and RTR are registered trademarks of Badger Meter, Inc. Other trademarks appearing in this document are the property of their respective entities. Due to continuous research, product improvements and enhancements, Badger Meter reserves the right to change product or system specifications without notice, except to the extent an outstanding contractual obligation exists. © 2014 Badger Meter, Inc. All rights reserved.