
User`s guide


Transducers
Transducer Troubleshooting
2-6 Revision D.0
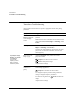
Transducer Troubleshooting
Always make sure that the active preset is appropriate for the study being
performed.
Symptoms Suggestions
No Probe or ??
Probe is displayed
on the imaging
screen.
Place the transducer connector lock in the horizontal
position.
Make sure the correct transducer slot is selected on the
touch panel (Left, Center, Right, or Nonimage, under
Probe).
No image. Select the transducer on the touch panel (Left, Center,
Right, or Nonimage, under Probe).
Check to see if the transducer connector has any bent
pins; if not, reconnect the transducer to ensure it is
seated properly.
Image is too soft,
hazy, or gray.
Adjust the Postproc rotary control to increase
grayscale contrast.
Compress to reduce low-level echoes.
Persist to sharpen the image.
Adjust monitor settings.
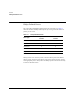
Image has too much
contrast or is
grainy.
Adjust the Postproc rotary control to obtain the
desired image appearance.
Compress to increase low-level echoes.
Use a higher Frequency Fusion setting. Otherwise,
change to a higher frequency transducer.
For slow-moving structures, Persist to soften the
image.
Adjust monitor settings.
Tip: Postproc, Edge
Enhance, and Persist
are 2D/BMode
controls. After
adjusting controls,
always check the
transducer position.