
User`s guide


Disk
Storing Images to Disk
12-28 Revision D.0
3. Press and enter the patient information. (See “Setting up the Exam”
on page 6-2 for more information.)
4. Acquire the desired loops, frames, or report pages.
5. Bookmark specific loops, if desired. (See Chapter 11 for details on
bookmarking.)
6. Touch Disk.
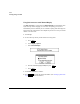
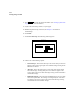
7. Touch Store All Loops. The following window appears.
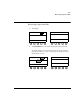
8. Choose one of the following options:
• Unstored loops—Stores all of the loops to the current study. A disk icon
appears in the screen’s upper right corner while the image is being stored.
Patient ID is retained.
• All Loops—Stores all of the loops to a new study with current patient
data. The message “Creating Study for” and a disk icon appear in the
screen’s upper right corner while the image is being stored. Patient ID is
cleared after storage.
• Bookmarked Loops—Stores all of the bookmarked loops to a new study
with current patient data. The message “Creating Study for” and a disk
icon appear in the screen’s upper right corner while the image is being
stored. Patient ID is cleared after storage.
Patient ID
Store All Loops
SN10
To current study: To new Study:
Unstored Loops
All Loops
Bookmarked Loops
Cancel