
User`s guide


Disk
Controls
Revision D.0 12-7
ssn February 10, 1999 C:\WINNT\Profiles\dapowell\Desktop\D.0 Books\CD FILES SONOS
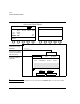
Enable Optical Lets you select the optical disk as the target device
when both a hard disk and an optical disk are installed.
When Enable Optical is on, all system data is stored to
the optical disk. When Enable Optical is off, all
system data is stored to the hard disk.
This control is off by default. It is a system-wide
control that, when set, remains set until you change it.
The Enable Optical window appears before every disk
retrieval or utility operation, and also before the first
disk storage operation in a study.
When Study Mode is off and Enable Optical is on,
every disk storage operation goes to the optical disk
without the window prompt. However, retrieval and
utility operations still require the window prompt.
If Enable Optical is off, all disk operations go to the
hard disk.
Network
Autosend
Available under the Disk controls when you press
. Sending a complete study to a network can take
some time. When you enable Network Autosend, as
soon as an image is stored to the local disk, IDI begins
sending the image to the network server. When
Network Autosend is not enabled, the IDI system does
not start sending the study to the network server until
you touch End Study.
Delete Options Lets you choose whether or not to automatically delete
an acquired loop from loop memory after it is stored to
disk. Also lets you choose whether to automatically
delete files from the disk when they are manually
deleted from loop memory.
Maximize
Transfer/Frames
Works in conjunction with the Acquire 120Hz/300Hz
control in 2D imaging Setup. Maximize Frames
acquires images up to 300 Hz. Maximize Transfer
acquires images up to 120 Hz.
Tip: For details on how
to use Enable Optical
with the IDI hard disk,
see the Using Integrated
Digital Interface (IDI)
User’s Guide.
Note: Before viewing
files on the optical disk,
Philips recommends that
you write-protect the
optical disk on both the
A and B sides before
inserting it into a viewing
station such as a
Windows NT computer
Setup