Dynamis User Guide 1
Dynamis User Guide Contents Introduction 3 Hardware overview Handset 4 Command station 5 Handset screen overview 6 Action key icons 7 Getting Started 8 How to use the joystick 9 How to configure the locomotive roster 9 How to manage consists 13 How to operate turnouts and accessories 15 How to program locomotive decoder CVs 16 How to configure using the System menu 17 How to make the best of Dynamis on your layout 19 Safety and care of your Dynamis 21 Fault finding 22 Other Ba
Dynamis User Guide Introduction Thank you for your choice of the Bachmann E-Z Command® Dynamis® DCC model train control system. You have chosen an easy to use yet highly sophisticated product. Please take a few moments to become familiar with the product by reading this manual before proceeding. Using the Dynamis DCC system is simple as all actions are guided by the screen icons with four Action Keys beneath.
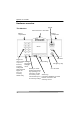
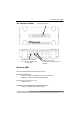
Dynamis User Guide Hardware overview Joystick The Handset infra-red receiver / transmitter Battery compartment Battery compartment Screen Direction Keypad for direct control Headlights Lanyard fixing of up to 21 Locomotive Emergency stop functions, headlights accessory on/off hotkeys and On / off switch Shift key to switch alpha numerical between the function keypad for keys operating F1 to loco and F10 and F11 to F20.
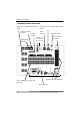
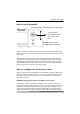
Dynamis User Guide The Command Station DC power pack connector Use only the supplied wall transformer Receiver connection Output connectors, 3.
Dynamis User Guide Handset screen overview Indicators for decoder function status on/off Shift key pressed indicator Consist indicator Headlights on indicator Text, including loco details and menus etc Track short circuit reported by Command station STOP indicator Low battery power infra-red signal condition Used only when the Dynamis Pro Box is also used Speed and direction indicators Action Key icons 6
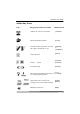
Dynamis User Guide Action key icons Icon Key purpose when icon shown Referred to as Add loco to / remove from Consist [CONSIST] Select locomotive by address [LOCO] Turnout / accessory operation - turnouts left / right or accessories on / off [DIVERGE] or [STRAIGHT] Access the menu [MENU] Accept [ACCEPT] [CANCEL] Cancel Scroll left or right Move between CV selection and value for CV in the programming menus [SCROLL] [CV<>] [<>VALUE] (reading CV values requires Dynamis ProBox) [READ] [PROG
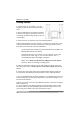
Dynamis User Guide Getting Started 1. Attach lanyard to the handset. To avoid dropping the unit use the lanyard around neck or wrist. 2. Insert 4 AAA batteries into handset orientating as shown on the diagram. The battery covers are removed by carefully releasing the clips at the rear of the handset 3. Connect receiver to terminal on top of the Command Station. 4. Place Command Station by layout, locating in a position with a good angle of view to the Command Station infra-red receiver.
Dynamis User Guide How to use the joystick Increase speed, scroll through menus, text input Scroll through locomotives roster and menus, text input Decrease speed, scroll through menus, text input 9. Push the joystick upwards to move the locomotive, bring it downwards to bring the locomotive to a stop. Change direction by pressing the direction button beneath the joystick. 10. Leaving the first train running, select a second locomotive address using the joystick or the [LOCO] key. Set the train running.
Dynamis User Guide the decoder allows (please check with decoder instructions: for example Bachmann 36-553 and 36-554 decoders will allow this) whilst other locomotives are on the track.
Dynamis User Guide [BKSP] to delete existing address Use alphanumeric keys or joystick to enter new address up to 127 CHANGE ADDR 0003 WRITE ADDR 68 Press [PROG] to write the new address Both decoder and roster database are updated.
Dynamis User Guide [BKSP] to delete ‘LOCOMOTIVE 3‘ Use alphanumeric keys or joystick to enter new name MALLARD [ACCEPT] 3. Changing the locomotive icon Each entry in the roster can be given an indicative icon for the type of locomotive, or none. [MENU] scroll to EDIT SYMBOL 4468 MALLARD [ACCEPT] SET SYMBOL Scroll through the icons for DIESEL, STEAM, ELECTRIC or none Choose STEAM [ACCEPT] 4. Changing locomotive decoder speed steps Most decoders operate on 28 or 128 speed steps.
Dynamis User Guide The control of each function on the decoder locomotive can be set to latch or trigger Latch – once pressed the function output is activated until the key is pressed again to turn off Trigger – the function is only activated for the duration of the press Example: The headlights of a locomotive would have a latch setting so that the are left on until turned off again. A coupling sound would have a trigger setting so that it can be played when required with a key press.
Dynamis User Guide ‘Consist’ is a term used to describe more than one locomotive or railcar each with its own decoder address being run at the same time as a single entity. ‘Double header’ or ‘multiple unit’ might also be used, but for simplicity the term ‘consist’ will be used here. 1. To add current loco to a consist: NOTE a locomotive in a consist may have to run ‘backwards’ when the consist is running forwards – for example a pair of diesel locos with their cabs outwards.
Dynamis User Guide eg PAIR OF 20s or UP DASH 8s or TWO BR 218s The consist can be controlled by: Either consist address or any of the individual locomotive addresses Locomotive functions are controlled from the locomotive address. 2. Removing a loco from a consist Scroll through the roster to the locomotive. Press [CONSIST]. The locomotive is removed and the consist indicator no longer shows. 3.
Dynamis User Guide A ‘hotkey’ shortcut from the numeric keypad can be set. The actual address of any particular accessory can be assigned to any of the 10 hotkeys available. By default, the hotkeys are accessory addresses 1 to 10. For example, the 10 most important turnouts on the layout can be given the shortcut.
Dynamis User Guide removed from the track if using this method, or the locomotive programmed on an isolated Service Track. Decoders that do not accept Operations Mode programming should be programmed on a Service Track. Service mode also allows decoder CV values to be read: this is possible using the Dynamis ProBox.
Dynamis User Guide How to configure using the System menu Please refer to the full menu breakdown at page 24. Joystick speed delay Determines time before the speed repeat action is in effect. Joystick speed repeat Determines the rate of increase of speed on joystick movement. Adjustment to these two settings changes the way the Handset actions speed increases in response to joystick movements Joystick menu delay Determines time before move to the next menu item when the joystick is held to left or right.
Dynamis User Guide Edit track timeout The Dynamis Handset and Command Station stay in contact. If the line of sight is lost the Command Station cuts track power. Use this setting to adjust the length of time before power is cut when contact is lost. Edit Service Track Programing Selects the modes used for Service Track programming. Select a combination of the programming methods according to the requirements of the decoder being programmed.
Dynamis User Guide For best results on a DCC layout, turnouts that do not self isolate are required. (Self isolating turnouts are those that enable a train to be parked in a siding on a DC layout when the turnout is closed against it.) Ideally the whole layout should be live so that trains stationary in sidings can have lights on and make sound. If using Bachmann track products: E-Z Track ® can be used without modification because the turnouts do not self isolate. Branchline track does self isolate.
Dynamis User Guide - remove all other locomotives from the track whilst programming Or: create an isolated section of track to be a separate Service Track. Either disconnect your Dynamis Command station from the layout and connect to short length of track, or create separate block section on the main layout that can be separated from the remainder with a switch. What is the rating of the track power? The voltage is stabilised at 15.5v ± 5%, with 2.3 amps of power.
Dynamis User Guide Use only for the control of model trains. Wipe only with a damp cloth - do not immerse in water or use any other cleaning agents. For indoor use only - don’t allow to become wet. The handset is a precision item and should be treated with care - always use the lanyard to avoid dropping.
Dynamis User Guide Other Bachmann E-Z Command® DCC products that can be used with Dynamis 36-507 Dynamis ProBox Upgrade your Dynamis system to operate with up to 4 wireless handsets, plus a programming track, a bus connector for wired throttles and devices, and more. 36-561 E-Z Command® accessory decoder for turnouts etc 36-520 E-Z Command® 5 Amp Power Booster 36-525 E-Z Command® Reversing Loop Module Bachmann E-Z Command® decoders and DCC Onboard models are also available from your retailer.
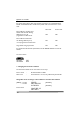
1 EDIT NAME | | | EDIT SYMBOL | | EDIT SPEED | | EDIT FX MODE | | | | | DELETE LOCO or CONSIST | | PROGRAM | | | | Choices to accept to cancel to accept to cancel to accept to cancel SET SPEEDSTEPS SCROLL: 14 / 28 / 128 Sets speed steps decoder is operating at SET FUNCTIONS TO LATCHING SELECT: F0 / F1 / F2 / F3 / F4 / F5 F6 / F7 F8 / F9 / F10 / F11 / F12 /F13 F14 / F15 / F16 / F17 / F18 / F19 / F20 Sets individual functions to latch or trigger CONFIRM DELETE Deletes locomotive or consist
2 | READ ADDR ON SERVICETRACK | Reads address using Service Track | (Function operates with DYNAMIS PRO box only) | | | PROGRAM ON SERVICE TRACK POS CV number | VAL value | | | PROGRAM [CURRENT LOCO]ON MAINTRACK POM CV number | VAL value | | SYSTEM MENU | EDIT BASE ID SET BASE ID Enter number | Default = 0 Range 0-3 | EDIT REMOTE ID SET REMOTE ID Enter number | (Feature set with DYNAMIS PRO box only) | SYSTEM INFO -------| | EDIT BASE NAME SET BASE NAME Enter name | | | | | | BASE SERIAL NUMBER U00000000 |
| | | REMOTE INFO | EDIT JOYSTICK SPEED DELAY | | EDIT JOYSTICK SPEED REPEAT | | EDIT JOYSTICK MENU DELAY | | EDIT JOYSTICK MENU REPEAT | | EDIT BACKLIGHT BRIGHTNESS | | EDIT BACKLIGHT DURATION | | EDIT STOPMODE | | | EDIT SRV TRK PROG | | | | | Dynamis Menu Reference 3 to accept to cancel to accept to cancel to accept to cancel to accept to cancel SET JOYSTICK MENU REPEAT Enter value Default = 63 Range 0 - 63 SET BACKLIGHT BRIGHTNESS Enter value Default = 6 Range 0 - 8 SET BACKLIGHT
| | | | | | | | | | EDIT TRK TIMEOUT | | | FACTORY RESET Dynamis Menu Reference 4 ARE YOU SURE ? Reset the default values to accept to cancel SET TRK TIMEOUT SCROLL: No timeout / 7.
Dynamis User Guide Visit the Dynamis website www.dynamisdcc.