
User Guide

Calibration and Maintenance Fyrite
InTech
Manual
54 0024-9486 Rev 4
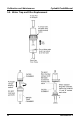
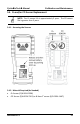
5.4.3. O
2
Sensor Replacement Procedure
Follow the procedure below for O
2
sensors.
Step
O
2
Sensor Replacement
1
Remove battery door and connector
tubing from both sensors.
2
Pull O
2
sensor from its socket.
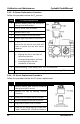
3
Remove the O
2
cap.
4
Properly dispose of the old sensor.
5
Note 3-digit date code on new sensor.
6
Engage the nub on the new sensor
within the slot on the cap's side and
twist to secure the cap and sensor
together.
7
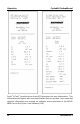
Install the cap and sensor unit by:
Aligning the ribs on the sides of
the sensor with the
corresponding shape in the base.
Inserting the pins into the
connectors in the base.
8
Reattach tubing. Close battery door. Turn on instrument.
9
After warm-up completes, enter the 3-digit date code (see page 36).
5.4.4. CO Sensor Replacement Procedure
Follow the procedure below for CO sensor replacement.
Step
CO Sensor Replacement Procedure
1
Remove battery door and the connector
tubing from the CO sensor.
2
Remove CO cap by twisting counter
clockwise.
3
Gently pull CO sensor out of its socket.
4
Properly dispose of the old CO sensor.
5
Plug new CO sensor into its socket.
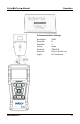
6
Install the CO cap by aligning it toward the
“open” position (12 o’clock) as shown in