Read all instructions BEFORE assembly and USE of product. KEEP INSTRUCTIONS FOR FUTURE USE. Model #8136BCC DELUXE TREND NURSERY CENTER Instruction Manual Convenience through Innovation and thoughtful design 12.
Trend Nursery Center 12.04 BEFORE assembly and USE of Playard. KEEP INSTRUCTIONS FOR FUTURE USE. Read all instructions WARNING: FAILURE TO FOLLOW THESE WARNINGS AND THE ASSEMBLY INSTRUCTIONS COULD RESULT IN SERIOUS INJURY OR DEATH FROM ENTRAPMENT, STRANGULATION, SUFFOCATION, ETC. WARNING: INFANTS CAN SUFFOCATE: IN GAPS BETWEEN A MATTRESS TOO SMALL OR TOO THICK AND PRODUCT SIDES, ON SOFT BEDDING. NEVER ADD A MATTRESS, PILLOW, COMFORTER, OR PADDING. USE ONLY THE MATTRESS PROVIDED BY MANUFACTURER.
FOR THE SAFETY OF YOUR CHILD, PLEASE READ THE INSTRUCTIONS COMPLETELY BEFORE ASSEMBLING THE PLAYARD, BASSINET AND CHANGING AREA TO ASSEMBLE PLAYARD CONTENTS (Fig. 1-1): 1 1 1 2 2 1 Playard Mattress Organizer Leg extensions (1 Left,1 Right) Leg extensions with wheels (1 Left, 1 Right) Travel or Storage bag BEFORE YOU BEGIN: The Baby Trend Playard is designed so that, when properly setup, the fabric of the playard places pressure on the 4 top rails making them nearly impossible to unlock.
WARNING: All top rails MUST be straight and locked in position or child may become entrapped and suffocate. See figure 9 and 10. 5. Place mattress in Playard with padded side up (Fig. 11). NOTE: DO NOT insert mattress if using bassinet feature. Go to bassinet instructions. 6. Left Figure 5 Right Feed the 6 Velcro straps (found underneath the mattress), 3 on each end of the mattress pad, through the slots on the bottom of the sides of the Playard.
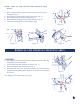
FOLDING PLAYARD 1. Undo the 6 Velcro straps holding mattress from underneath Playard floor. (If mattress is not used in the bassinet). Remove mattress and set aside. 2. Grasp the center floor lock handle pushing down . Rotate the handle counter-clockwise about 90 degrees and lift upward until handle is as high as the top rails. Gather the four feet of the playard together so that they nearly touch each other. See figure 1 and 2.
PLAYARD BASSINET/CHANGING AREA 12.04 WARNING:FAILURE TO FOLLOW THESE WARNINGS AND THE ASSEMBLY INSTRUCTIONS COULD RESULT IN SERIOUS INJURY OR DEATH FROM ENTRAPMENT, STRANGULATION, SUFFOCATION, ETC. • To reduce the risk of SIDS, pediatricians recommend healthy infants be placed on their back to sleep, unless otherwise advised by your physician. • Always provide the supervision necessary for the continued safety of your child. When used for playing, never leave child unattended.
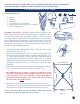
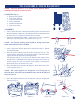
TO ASSEMBLE YOUR BASSINET NOTE: Playard MUST be in a locked set-up position before installing and using the bassinet feature. CONTENTS (Fig. 1): 2 Right corner supports 2 Left corner supports 1 Nylon bassinet insert 2 Long metal tubes 2 Medium metal tubes 2 Short metal tubes ASSEMBLY 1. Insert 1 short tube into a medium tube lining up the snap button and the hole opening. Make sure the snap buttons are exactly fitted into the holes (Fig. 2). Repeat for the second set of tubes. 2.
TO ASSEMBLE CHANGING AREA CONTENTS (Fig. 1): • • • 2 Long curved bars 2 Short bars with connector knobs 1 Changing area fabric WARNING: • • • • Figure 1 Avoid serious injury or death: Always use restraint belt to prevent falls (Fig. 1-1). Use changer with infant who’s weight is less than 18 lbs (8.2 kg ) and is less than 25 inches (63.5 cm) tall. Discontinue use of changer if infant can push up on hands and knees or sit unassisted. DO NOT carry changer with infant in it.
NOTE: Short bar with connector knobs should be facing inward. 5. Place connector knob prongs into holes located on corner pieces of Playard (Fig. 5). 6. Turn connector knobs counter clockwise to lock (Fig. 6). 7. Flip changing area to inside of Playard (Fig.7). 8. Snap flap from changing area to side of Playard (Fig. 8). 9 Check that changing area is secure before using. Figure 5. Figure 6. Figure 7. Figure 8. REMOVAL AND FOLDING CHANGING AREA ASSEMBLY 1.
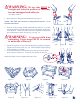
REMOVAL OF BASSINET ASSEMBLY 1. Remove mattress from bassinet (Fig.1). 2. Lift bassinet out of Playard (Fig. 2). 3. Remove corner pieces and slide metal tubes from fabric sleeves (Fig. 3). 4. Separate tubes by pressing on snap buttons and pull apart. The bassinet is now ready for storage. NOTE: Store bassinet and changing area with folded Play yard in carry bag.