
Specifications

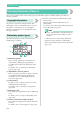

Attaching the Embroidery Frame 143
4
— — — — — — — — — — — — — — — — — — — — — — — — — — — — — — — — — — — — — — — — — — — — — — — — — — — —
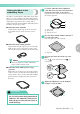
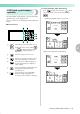
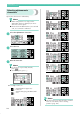
Removing the embroidery
frame
Make sure that the sewing machine is completely
stopped and follow the instructions below.
a
Raise the presser foot lever.
a Presser foot lever
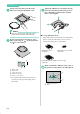
b
Press (Needle position button) once or
twice to raise the needle.
a Needle position button
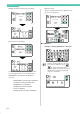
c
Press the tab of the embroidery frame holder
to the left side, and raise the embroidery
frame.
a Press here to remove.
X The embroidery frame will separate from the
embroidery frame holder.
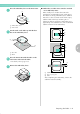
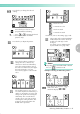
d
Pass the embroidery frame under the presser
foot while raising the presser foot lever even
further.
e
Remove the embroidery frame.
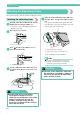
CAUTION
a
a
● Do not touch the start/stop button,
needle position button or reverse/
reinforcement stitch button. If one of the
buttons is accidentally pressed, the
machine will begin sewing and your
finger may be pricked with the needle or
the needle may break.