
User manual


Pro-Stcher User Manual Sengs Menu | 8.3
Control how Pro-Stcher performs e-os
By eing o at the beginning and ending of stching, the stches will be secure and will not come undone.
The Tie O feature enables you to select your preferred method for how and when Pro-Stcher performs
e-os.
• Select Sengs, Tie O.
To have Pro-Stcher perform a e-o at the beginning of stching
• Select Tie-O Start.
To have Pro-Stcher perform a e-o at the end of stching
• Select Tie-O End.
To indicate how many e-o stches Pro-Stcher will perform
• Press the Tie-O # Plus Sign (+) to increase or Minus Sign (–) to decrease the number of e-o
stches Pro-Stcher performs. Alternately, touch the number box and type a value directly and
press Enter.
NOTE: The number you specify is the number of full stches that are formed, not the number of
mes the needles cycles. For example, if the e-o number is set to 2 and you selected the Micro
method, the needle cycles three mes before beginning to stch the design. Alternately, if you se-
lected the Tack method, the needle cycles ve mes to form two stches forward and two stches
back.
To set the length of each e-o stch
• Press the Distance Plus Sign (+) to increase or Minus Sign (–) to decrease the distance in inches for
each e-o stch. Alternately, touch the number box and type a value directly and press Enter.
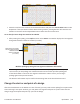
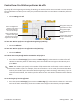
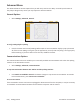
Specify how many e-
o stches are done.
Specify the length
of e-o stches in
inches.
Choose either the Tack
or Micro method of
e-o.
Select Tie-O End to
perform a e-o at
the end of each seg-
ment in the design.
Select Tie-O Start to
perform a e-o at
the beginning of each
segment in the design.
!