
Troubleshooting guide


Page 27
Page 48
HQ Pro-Stitcher User Manual
3. Within the Rotate menu is the ability to
identify two points by which to create an angle. For
example, assume a quilt is loaded and it happens
to be at a slight angle. The pattern that is loaded
is a pantograph that extends the width of the quilt.
Rather than try to get the quilt straightened or try to
guess what the actual angle is that the pattern would
need to be rotated to compensate, the user can iden-
tify a point on the left and then a point on the right
(by moving the machine to those points) and the pat-
tern will be rotated to the angle between those two
points. Likewise, if there is an odd angle (such as a
sashing on an angle or a block on point) that needs
to be matched on the quilt, use the same process to
identify two points on the line and rotate the pattern
to match that angle.
• Identifytheleft-handsideofthelineonthe
quilt that the pattern should follow and press start
point button.
• Identifytheright-handsideofthatsameline
and press end point button.
• Pressroatebutton.
• Thepatternshouldnowberotatedtomatch
the line.
• Tomakethepatternfollowthesamelinebut
upside down, simply identify the right-hand side as
the “Start Point” and the left-hand side as the “End
Point” and the pattern will be upside down.
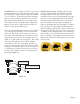
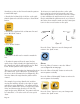
This process can be thought of as drawing a line from
the “Start Point” to the “End Point” as indicated by
the arrows in the illustration below (Figure 17) the
line then defines the angle that the pattern will be
rotated. For example, by pressing “Start Point” and
then moving the machine directly to the right (0°
angle) and then pressing “End Point,” the pattern
will not have been rotated at all. However, by press-
ing “Start Point” and then moving directly to the left
(180° angle) and pressing “End Point,” the pattern
will now be rotated 180°, or in other words it is now
upside down. Don’t worry too much about where on
the quilt these points are selected, as long as they are
somewhere along the line to be followed, since the
computer just calculates the angle between the two
points. Keep in mind that the pattern must be re-
positioned after it has been rotated to make sure the
rotated pattern is in the correct location on the quilt.
is now upside down. Don’t worry too much about where on the quilt these points are selected,
as long as they are somewhere along the line to be followed, since the computer just calculates
the angle between the two points. Keep in mind that the pattern must be re-positioned after it
has been rotated to make sure the rotated pattern is in the correct location on the quilt.
0° (360°) 180°
45° 270°
Press the (Done.jpg) button to save the changes and return to the “Quilt” menu.
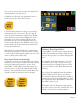
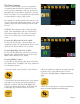
(Mirror Icon.jpg) Press the “Mirror” button to enter the “Mirror” screen (figure 18).
(Mirror Vertical.jpg) Press this button to mirror the current pattern vertically.
(Mirror Horizontal.jpg) Press this button to mirror the current pattern horizontally.
Press the (Done.jpg) button to save your changes and return to the “Quilt” menu.
(Crop Icon.jpg)
The Crop function can be used to cut off portions of a pattern that should not be stitched. For
example, if a pantograph is being repeated down the length of the quilt and only half the height
of the last row will fit, position the row where it should start and then crop the bottom portion
off so the Pro-Stitcher does not stitch beyond the end of the quilt. It is possible to crop the top,
bottom, left or right edges of the pattern (or any combination of those).
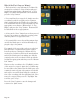
• From the Quilt Menu select the “Crop” button.
• Identify the bottom left-hand corner of the pattern area that is to be kept by moving the
machine to align the crosshairs with that point.
• Press the (Bottom Left.jpg) button (figure 19). The button will briefly light up to indicate it
has been pressed.
• Move the machine to align the crosshairs with the top right corner of the pattern area to be
kept.
• Press the (Top Right.jpg) button (figure 20).
• Press the (Crop.jpg) button to crop the area that has just been defined (figure 21).
Figure 17
• Move the machine to align the crosshairs with the
top right corner of the pattern area to be kept.
• Press the “Top Right Button” (Figure 21 on next
page).
• Press the “Crop” button to crop the area that has
just been defined (Figure 22 on next page).
Two-Point Cropping
The Crop function can be used to cut off portions
of a pattern that should not be stitched. It is possi-
ble to crop any combination of the top, bottom, left
and right edges of any pattern, whether it is a single
block or an entire row of repeated blocks (also known
as a pantograph or edge-to-edge design).
For example, if only the top half of the last row of an
edge-to-edge design will fit at the bottom of the quilt,
it can be cropped to avoid stitching below the quilt
bottom.
CAUTION: The perimeter of the cropped area will
stitch out as a straight line. Be sure to plan this to
fall just beyond the edge of the quilt or in a place
where it is not likely to be noticed (such as in a
seam).
Cropping Left Edge and/or Bottom of Quilt
To crop only the left edge, only the bottom, or a
combination of the left edge and the bottom, use the
“Bottom Left” button and the “Crop” button.
Cropping Right Edge and/or Top of Quilt
To crop only the right edge, only the top, or a com-
binatin of the right edge and the top, use the “Top
Right” button and the “Crop” button.
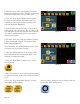
Cropping All Edges at Once
It is possible to crop all four edges at once, by using
the “Bottom Left”, “Top Right” and “Crop” buttons in
the following sequence:
• From the “Quilt” menu select the “Crop” button.
• Identify the bottom left-hand corner of the pattern
area that is to be kept by moving the machine to
align the crosshairs with that point (Figure 20).
• Press the “Bottom Left” button. The button will
briefly light up to indicate it has been pressed.
Figure 19
Figure 20