Table of Contents 2 Congratulations Baby Lock Contact Information Baby Lock Crown Jewel 3 Parts List 4 X-Rack Installation 6 Y-Rack Installation 7 Setting up the New Carriage 10 Computer/Touch Screen Monitor Assembly 13 Powering Up and Shutting Down Carriage Quick Release Levers Getting Started 14 15 Setting Up the Pro-Stitcher USB Flash Drive Powering up the Pro-Stitcher Navigating the Pro-Stitcher Screens Step-by-Step Instructions 16 1: Loading a Pattern 18 2: Viewing the Patt
Congratulations on your Pro-Stitcher Purchase! Baby Lock is proud to offer you user-friendly quilting machines and computer-guided machines with the latest technology and the best value for your money. In addition, we provide inspiration and education to help enhance your transition into computer-guided machine quilting. Because the world of computer-guided quilting is constantly changing, we invite you to keep up with us by checking our website frequently for news, software updates and tutorials.
Pro-Stitcher Parts List for Baby Lock Crown Jewel A Item A. B. C. D. E. F. G. H. I. J. K. L. M. N.
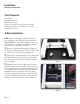
Installation Baby Lock Crown Jewel Tools Required Power drill 4mm Allen wrench 5mm Allen wrench Slotted screwdriver (one large and one small) Phillips screwdriver (one large and one small) Knife and/or scissors X-Rack Installation NOTE: Owners of the Majestic Frame should also have purchased a Pro-Stitcher shim kit (Item No. (BLPS-GMFKIT) for the Majestic Frame. Please follow instructions included in that kit for shimming the track prior to installing the X-rack. 1.
4. Make adjustments to the placement of the blue flexirack as necessary to align the blue flexirack with the front white gear on the Pro-Stitcher carriage (Figure 3). 5. Trim the flexirack to length using a knife or wire cutters if necessary (the blue flexirack does not necessarily need to extend the full width of the table and can actually be a couple of inches shorter on either end, if desired). 6.
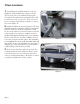
Y-Rack Installation 1. Carefully lay the quilting machine on its side (Figure 6). Underneath the base plates, near the wheels on the side of the machine facing up (the side with the thread tensioner and guides) there will be either two screws or two holes. If the screws are there, use a large slotted (flat) screwdriver to remove the screws (Figure 5). 2. Attach the Y-Rack as shown in Figure 6.
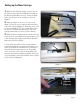
Setting up the New Carriage 1. With the Pro-Stitcher carriage set properly on the frame system, untie the black twist ties that are binding the black cables in a loop. Drape the black cables over the back of the carriage as shown in Figure 7. “Y” power cord 2. Plug one branch of the new “Y” power cord Back of Carriage (Page 3, I) into the power supply located toward the rear of the carriage (Figure 8). Route the power cord as shown in Figure 7.
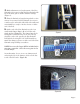
4. Carefully lift the quilting machine and place it on the carriage so the wheels engage the white carriage tracks, making sure not to set the wheels on top of the stitch regulator cable (this is easier to do with two people – one at each end of the quilting machine). 5. With one end of the stitch-regulator cable plugged into the machine’s C-Pod and the middle connector plugged into the quilting machine’s “Y” encoder, plug the other end of the cable into the carriage “X” encoder (Figure 10).
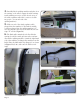
7. The small black cable with the black 3-connector clip should be routed underneath the P-Pod (Figure 12) and snapped into the quilting machine’s “Y” encoder (Figure 13). C-Pod The two black cables that run from the carriage up to the computer should be clipped into the cable clip under the rear handlebar as shown in Figure 12 to help prevent these cables from getting caught on the edges of the carriage. P-Pod 8. Verify that the Y-axis gear engages the blue flexirack for the Y-axis. a.
Computer/Touch Screen Monitor Assembly 1. Remove the front handlebar from the front of the quilting machine, making sure to first disconnect the handlebar cable from the side of the head and then remove the three hex-head bolts with a 5mm Allen wrench. If it is difficult to remove the cable on the quilting machine, first remove two of the hex-head bolts and then loosen the third. Next, rotate the handlebar slightly to allow easier access to the handlebar cable. 2.
5. The black cable has three connections – two 9-pin serial connectors and one barrel connector for power (Figure 16). Insert the barrel connector into the center jack (Figure 20, B on next page) located on the bottom edge of the black box that is mounted to the back of the computer bracket (Figure 17). Attach the two 9-pin serial cables to the appropriate ports on the back of the same box, making sure the cable connectors are plugged into their corresponding ports on the black box.
6. Remove the computer from its packaging. Lift open the screen and rotate the display clockwise so the display covers the keyboard. Install the computer battery into the back of the computer. Install the computer into the computer bracket by sliding it into the black bracket from the top downward (Figure 18).
Powering Up and Shutting Down 1. Make sure power is reaching the computer by checking that the power cord is plugged into the power supply located at the back of the carriage. The barrel-shaped power connector should then be plugged into the bottom of the black box behind the computer, and the short power cord connects the black box to the computer. The computer will run on AC power as long as this connection is made.
Getting Started Setting up the Pro-Stitcher The Pro-Stitcher should be installed as outlined in the installation instructions on the previous pages. USB Flash Drive A USB flash memory stick is included with the Pro-Stitcher and is pre-loaded with more than 200 designs. Plug this flash drive into one of the USB ports located on the left-hand side or the bottom of the Pro-Stitcher computer (Figure 1). The computer may need to be tilted back to access the lower USB port.
Navigating the Pro-Stitcher Screens The Pro-Stitcher has five menu buttons located on the right-hand side of most screens (Figure 3). These buttons will aid in navigating quickly through the menu screens. The button that is dark blue indicates the screen that is currently active. Here is a brief description of these screens: • Main Menu: This is the screen in which the system starts.
Pro-Stitcher Step-by-Step Instructions Step 1: Loading a Pattern The following pattern file formats can be loaded into the Pro-Stitcher using the USB flash memory stick: *.hqf This is the “Handi Quilter” format as generated by Art & Stitch and other software packages. the Baby Lock Pro-Stitcher will read all patterns in this format. *.qli This format is generated for Statler Stitcher® systems. The Pro-Stitcher will read most patterns of this format. However, patterns that are encrypted cannot be read. *.
The Design Library lists folders on the lower lefthand side and the actual patterns within those folders on the right-hand side. A preview of the selected pattern is shown in the upper left-hand block. To browse through the USB flash drive, the following functions must be understood (Figure 7). Current Path: The line just below the “Back” and “Options” tabs on the lower left-hand section shows the current path the Pro-Stitcher is looking at to find the patterns (Figure 7).
Step 2: Viewing the Pattern and Moving the Quilting Machine The pattern should now be loaded and visible in the black pattern window (Figure 9). The button at the top right-hand corner of most screens indicates the current state of the motors. If the button is green (Motors Enabled), then the motors are locked in position.
The Refresh button re-sets the zoom and pan back to their original settings so the entire pattern can be viewed in the pattern window. The Half Stitch button will cycle the quilting machine needle one half stitch. The Full Stitch button will cycle the needle one full stitch if the needle is currently in the “up” position. If the needle is in the “down” position, it will just move the needle into the “up” position. The Pan button toggles between “Pan” and “Zoom.
Step 3: Setup Menu By pressing the “Follow” button, the button will turn green and the crosshairs will now be centered in the pattern window. Pushing the quilting machine around no longer moves the crosshairs, but appears to move the pattern in the opposite direction the machine is being pushed. In reality, the crosshairs are still moving and the pattern remains fixed in position relative to your quilt. It’s just an alternative way of looking at it.
Tie-Off Stitches: Tie-off stitches can be set to occur at the beginning and end of the pattern as well as start and end points of jump sections. Adjust the number of “tie-off stitches” using either the add or subtract buttons or by pressing the number in the “#” field and entering a value with the pop-up number pad. The length of the tie-off stitches can be adjusted by tapping on the “dist” box and entering a value (in inches) in the pop-up number pad.
Step 4: Manipulating the Pattern Quilt Press the “Quilt” button to access the pattern manipulation and positioning tools and to begin stitching. There are many options on this screen (Figure 11) to alter the pattern to fit the needs of the quilt and the user. The beginner may wish to try only one of these options rather than each one and then come back later to try some of the others.
the screen increase as they measure the distance the quilting machine is being moved. 4. With the needle in the top right-hand corner of the block, press the “Fit to Area” button. 5. Verify that the pattern is now the correct size by looking at the top of the screen. The “W” and “H” values should now match the “Width” and “Height” values that were just measured (Figure 13).
1. Enter the value of the desired pattern height by tapping the number box under “Height” and entering the desired height in the pop-up number pad. 2. Press the “Keep Aspect Height” button and the Pro-Stitcher will calculate the width required to maintain the current aspect ratio based upon the new height entered (Figure 14). 3. Verify that the pattern is now the correct size by looking at the top of the screen.
Rotate Press the “Rotate” button to enter the “Rotate” screen (Figure 16). There are three methods available to rotate a pattern. 1. Pressing the counter clock-wise 45 button will rotate the pattern counter clockwise by 45 degrees. Pressing the clock-wise 45 button will rotate the pattern clockwise by 45 degrees. Figure 16 2. By tapping the number box and entering a value in the pop-up number box, the user may directly enter a desired rotation angle (0 – 360).
identify two points by which to create an angle. For example, assume a quilt is loaded and it happens to be at a slight angle. The pattern that is loaded is a pantograph that extends the width of the quilt. Rather than try to get the quilt straightened or try to guess what the actual angle is that the pattern would need to two be rotated user idenidentify points to oncompensate, the line and the rotate thecan pattern tifymatch a point onangle.
Two-Point Cropping The Crop function can be used to cut off portions of a pattern that should not be stitched. It is possible to crop any combination of the top, bottom, left and right edges of any pattern, whether it is a single block or an entire row of repeated blocks (also known as a pantograph or edge-to-edge design).
What if the First Crop was Wrong? • The bottom left or top right may be re-defined by moving the crosshairs to a new location and pressing the appropriate button (“Bottom Left” or “Top Right”) to redefine that particular corner and then press the “Crop” button.
The Cropping “L” and “7” Think of the “Bottom Left” tool as an uppercase letter “L”. When you slide the “L” along the design, everything inside the “L” is saved. Everything to the left of and below the “L” goes away. Think of the “Top Right” tool as the number “7”. When you slide the “7” along the design, everything inside the “7” is saved. Everything to the right of and above the “7” goes away.
3. If the patterns should be overlapped, enter the overlap distance in the appropriate “Distance Apart” box followed by the “Overlap” button. The value in the “Distance Apart” box will turn to a negative number (Figure 26). 4. If the pattern is designed to be a “Point to Point” or “continuous” pattern, do not enter a value in the “Distance Apart” box for the width, and tap on the “Point to Point” box so a green check mark appears.
Skew to Fit “Skew to Fit” allows horizontal and vertical repeats, but it also allows the user to enter the width and height of an area to be filled. Figure 27 1. Determine the area that is to be filled in one of two ways. A. Enter the height and width (in inches) of the area to be filled in the appropriate boxes using the pop-up number pad (Figure 27). B. Use the quilting machine to measure the area to be filled.
• As with the previous “Repeat” function, the repeated pattern will now be treated by the HQ Pro-Stitcher as a single pattern. 1. the area to is beto filled in one of twoArea.jpg) This function allows the user to define the width and height of an area to be • Determine Determine the that area is that be filled in(Within one filled and the Pro-Stitcher determines how many repeats of the pattern will fit within that area. ways. of two ways. Thethe area must be larger than a single instance of the pattern.
6. If the user only wishes to repeat in width, there is no need to enter anything in the “Height” box. Simply enter the desired width in the “Width” box and press the “Repeat Width” button (Figure 30). The same can be done for repeating only height using the repeat height button. 7. If the size of the defined area is smaller than one instance of the loaded pattern, a message will pop up, instructing the user to enter a larger value (Figure 31).
Step 5: Positioning the Pattern After loading a pattern and manipulating the pattern as desired, the next step is to position the pattern on the quilt. Even though some of the previous steps require that the pattern be sized to a specific area, the pattern is not necessarily positioned within that area. For this reason, the user should always position the pattern prior to quilting it. From the “Quilt” menu screen, select the “Reposition Pattern” button.
Drag From Here 3. The third way to position a pattern on the quilt is to use the “Drag From Here” function. This function allows the user to position the pattern based upon any point within the pattern block. 1. If the crosshairs are not visible in the pattern window, press the “Reset Home” button at the top. This will position the crosshairs at the x=0, y=0 location of the pattern, which is usually within the extents of the pattern for most patterns. 2.
Step 6: Quilting the Pattern Save the Pattern First After all manipulations to the pattern have been performed, and prior to quilting the pattern, it is highly recommended that the user return to the “Library” screen (press the library button on the right-hand side of the screen) and SAVE the changes that have been made. If something happens to the Pro-Stitcher (such as a power cord coming unplugged, etc.), a failsafe has been put in place to allow the user to re-load their design to the last-known state.
2. After performing a quick manual check, the user can press the “Trace Outline” button to allow the Pro-Stitcher to “outline” the perimeter of the pattern block. “Trace Outline” starts by moving the machine to the lower left-hand corner of the pattern block. A message will pop up to have the user verify that the needle is not down in the fabric before it moves (Figure 36). The machine will then move to the lower right-hand corner, followed by the upper righthand corner, etc.
Start Quilting Press the “Start Quilting” button to select or adjust some final quilting settings prior to stitching the pattern. Settings If the user decides to make some changes at the last minute to the settings included in the “Setup” menu (Figure 38), some of those changes can be made on this screen by touching the number box and entering a new value on the pop-up number pad.
(a green check in the “Start” box) or for every manual jump within the pattern (a green check in the “Entire” box). With both boxes blank, there will be no pause for trimming thread. A green check mark in a box indicates that the option is turned on, while an empty box indicates that it is turned off (Figure 38 on previous page). Tie Off The “Tie-Off” stitches may be turned on or off for the start and end points of a pattern. A description of the tie-off stitches can be found under Step 3 on page 21.
Auto Turned Off If the “Auto” box is left blank (“Off”), the Pro-Stitcher performs the “Pull Up” in a manual mode and the following will occur at the beginning of the pattern (assuming the “On” option is selected): 1. The machine will move to the start point and take a full stitch. 2. The motors are then disabled so the user can manually push the machine aside and pull up the bobbin thread. 3. The user should hold both the bobbin and top threads and press the “Resume” button.
Step 7: Functions Available While Quilting At the top of the screen while the Pro-Stitcher is quilting, is a banner with left and right arrows leading to various functions (Figure 41). Press one of these arrows to cycle through the various function banners. The user can zoom and/or pan the view of the pattern while the Pro-Stitcher is quilting. Follow the instructions given previously in Step 2 on page 19 for zooming and panning. Pressing the “Zoom” or “Pan” button will toggle between “Zoom” and “Pan.
Press the right arrow from within the “Pause Delay” banner to get to the “Tie Off” banner (Figure 45). Adjustments can be made here relating to the length of the tie-off stitch, the number of tie-off stitches, and whether the tie-off stitch sequence is turned on at the beginning and end of a pattern. Emergency Stop The “Emergency Stop” button should be used if there is a situation in which the user, quilt, or machine may be harmed if it continues to attempt to stitch the pattern.
New Start Point The “New Start Point” option can be used to scroll through the pattern to a point the user wishes to start from, rather than starting from the beginning of a pattern. If the system has been paused because the thread broke, typically the user would use the “Back up” option to return to the position where the thread broke. However, if the back-up distance is significant, the “New Start Point” option may be quicker.
If the “Auto Find” option box is selected, the user just has to move the quilting machine back to the desired resume point on the quilt (i.e., where the thread broke). The Pro-Stitcher will locate the closest point on the pattern to the current position of the quilting machine (Figure 50). It may be necessary to toggle the “Enable Motors” button prior to moving the machine. It is also helpful to toggle back to lock the machine in position once the desired location is reached.
Back Up Pressing the “Back Up” button will bring the user to the “Back-up Screen” (Figure 51). Here the user is able to move backward or forward through the pattern with or without stitching. The speed at which the Pro-Stitcher moves forward or backward through the pattern defaults to 10. This speed may be adjusted by tapping on the speed number and entering a new value in the pop-up number pad or by pressing the “+” or “-” buttons.
Reset Current Resume Postion After locating the desired starting point in the pattern (either using the “New Start Point” feature or the “Back Up” feature), the user may notice that the quilt has shifted slightly so that the resume point in the pattern does not line up exactly with the correct point on the quilt. The simplest way to correct this is to disable the motors by toggling the “Enable Motors” button and move the needle to the precise desired point on the quilt.
Pro-Stitcher Additional Features and Functions Software updates are available on the Baby Lock website as they are released at www.babylock.com/quilting/Pro-Stitcher/. Updates are available free of charge. 1. Browse to the Pro-Stitcher software update page and download the latest update file. 2. Copy the file to a USB flash drive and plug the USB flash drive into the Pro-Stitcher. 3. Press the “Update” button. 4.
Close File Although closing a pattern file is not necessary, some users may want to clear out the pattern window. Pressing the “Close File” button will close the pattern file and clear the pattern window. Copyright Many pattern designers include copyright information as well as instructions on how to use their patterns within the pattern file itself. To view this information, load the pattern file and press the “Copyright” button.
1. Tapping the “Optimize” button opens a pop-up window with four optimizing options – Low, Med, High and Very High (Figure 54). Low will have the least effect on speed and Very High will have the greatest. Very High also has the greatest potential to alter the look of the pattern. Saving Files It is highly recommended that the user save all alterations prior to quilting the pattern. To save changes, press the “Save” button in the “Library” screen and use the new screen that will appear (Figure 55). 2.
1. The line at the top center of the screen shows the current path in which the file will be saved. The user can change the drive letter as well as the folder in which to save the pattern. 2. To change the drive letter, tap the small black triangle to the right of the current directory and select the appropriate drive letter. Remember “D:/” is the hard drive and “E:/” is usually the USB flash drive. 3. Select the appropriate folder by double-tapping on the desired folder name (if any).
Additional Library Functions Library Screen - Load Pattern Additional File and Folder options are made available by pressing the “Options” button by the file name (for file options) or above the folder section (for folder options) (Figures 57 & 58). File Options File Options (Press the “Options” button under the file name) To delete a file, press the “Delete” button under the file name. Figure 57 Press either “Accept” or “Cancel” when prompted. To copy a file to a new location, press the “Copy” button.
Folder Options Sort To delete a folder, tap once on the folder to be deleted. Press the “Sort z-a” or “Sort a-z” button to toggle between alphabetical and reverse-alphabetical sorting of the file names. Folder Options (Press the “Options” button above the “Current Path” box). Press the “Delete Folder” button. Press either “Accept” or “Cancel” when prompted. To copy a folder to a new location, tap once on the folder to be copied. Press the “Copy Folder” button.
Jog Speed This is the speed at which the Pro-Stitcher will move the quilting machine when a direction arrow is pressed. Tap the number box to enter a value or use the “Up” or “Down” arrows to adjust the speed accordingly. The machine must be stopped before changing the “jog speed.” Stitch With this button checked, the quilting machine will begin stitching when the Pro-Stitcher starts moving and stop stitching when it stops moving.
Manual/Channel This screen is intended to allow the user to quickly change between free motion quilting and ProStitcher quilting and provide them with access to the “Channel Lock” feature (Figure 60). Handlebar Control Channel Locks Press one of these buttons to activate the channel lock for the desired direction. The button will turn green to indicate it is active. Press the same button again to disable the channel lock.
Freehand “Freehand” allows the user to record the movement of the Pro-Stitcher and save the sequence of movements as a pattern file (Figures 61 & 62). Clear Press the “Clear” button to clear the pattern window before starting to record. Figure 61 Start Record Make sure the “Motors Enabled/Disabled” button in the top right-hand corner of the screen is in the “Motors Disabled” state. Press the “Start Record” button to begin recording the movements of the quilting machine.
Pause Record When finished, or if the user wishes to add a “Jump” to a recorded pattern, press “Pause Record” (Figure 63). Move the machine to a new position and press “Resume Record,” followed by the “Motors Enabled” button to begin recording again (which will add a dashed line representing a Jump) if desired. Figure 63 Press the “Save” button if the user is finished and wishes to save the pattern. Browse to the desired folder on the USB flash drive and enter a name in the “Save” screen (Figure 64).
Help “Help” buttons are located on most screens to aid the quilter in the use of the Pro-Stitcher. To use the “Help” feature, press the “Help” button. Question marks will appear on the buttons that have “Help” information associated with them (Figure 65). To receive instructions regarding a particular button, press that button. An information screen will pop up with scroll buttons at the bottom if the text is longer than a single screen (Figure 66).
Pro-Stitcher Advanced Features Advanced Features The Pro-Stitcher has some advanced features that may be used for trouble-shooting, diagnosing issues or simply making some advanced adjustments. These features can be accessed by pressing the “advanced” button from within the “Setup” screen (Figure 68). The “Advanced” screen includes buttons that will send certain commands to the quilting machine. These buttons may be used to verify proper communication from the Pro-Stitcher out to the quilting machine.
Needle Up Commands the needle to move to the “Up” position. Stop Regulation Stops the quilting machine’s motor. Go Key Regulation Start the quilting machine’s motor in Stitch Regulation mode. Reset Head Sends a command to the quilting machine to re-set and cut off the communication path. Needle Down Commands the needle to move to the “Down” position. To access further advanced features related to the Pro-Stitcher, press the “advanced machine” button from within the “Advanced” screen.
Pro-Stitcher Advanced Features (Continued) The “Scripts,” “Time in Driver,” and “Update Loop” boxes at the top are used by Baby Lock to diagnose certain software-related issues. The five buttons below these boxes can be used as follows: (Figure 69) 4. Close Pro-Stitcher This button shuts down the Pro-Stitcher software and leaves the user in the Windows desktop To start the Pro-Stitcher software from the Windows desktop, double-tap the “Pro-Stitcher” shortcut icon. 1.
Indicators & Information Boxes During the stitching process, there are several indicators and information boxes that can help the user understand what the Pro-Stitcher computer is doing (Figure 70). • “Processing” – lights up when the computer is processing the pattern file. • “Running” – indicates that the file is running (does not light up during tie-off or pull-up). • “Movement” – indicates when the Pro-Stitcher motors are physically moving.
Pro-Stitcher Troubleshooting Guide Problem/Symptom No Display on the Touch-Screen Monitor LED under the battery symbol at the bottom left corner of the screen is OFF. Corrective Measure The Pro-Stitcher computer is powered off. Make certain the power cord to the ProStitcher is plugged into a powered outlet on one end and the power supply under the carriage on one of the “Y” branch ends of the power cord.
Problem/Symptom The X and/or Y axis quick release levers are not engaged When the quilting machine is pushed by hand, the horizontal and/or vertical crosshair lines do not move. Lubrication required between white gears and blue rack When the Pro-Stitcher carriage levers are engaged squeaking can be heard as the machine is pushed or driven. A bad image was created for a pattern thumbnail.
Problem/Symptom Corrective Measure it. If the computer says it wants to “reformat” the flash drive then the flash drive has gone bad and will need to be replaced. If it opens but there are no files on the flash drive, the designs may have been inadvertently deleted. All designs that are preloaded on the USB Flash drive are also located on the Pro-Stitcher “D:\” drive for * convenience . *It is highly recommended to back up all design files on a home computer or another disk.
Procedure for Calibrating the Touch-Screen Monitor This procedure resolves the issue of the touch screen being activated at a point inconsistent with where the stylus is being pressed. It may be necessary to use a USB mouse if the calibration is too far off. 1. From the Pro-Stitcher “Main Menu”, press the “Setup” button. 2. Press the “Advanced” button at the bottom of the screen. 3. Press the “Advanced machine” button. 4. Press the “Touch Screen” button. 5.
6. Using the stylus, tap the crosshair each time it appears. 7. Press “Yes” to save the new calibration data or “No” to cancel.