
Installation Manual

Install Side Plates.
Locate the outer and if needed the inner
sideplates, see figure B1. Install the side plates as shown in
Figures B2 & B3, so that there is a side plate on the inside
and outside of each frame member. Attach the side plates to
the frame using 5/8" x 4" bolts, two flat washers, lock
washer, and nut, as shown in Figure B2. Fasten hardware
until the side plates are flush against frame.
Most trucks have fuel lines, brake lines, electrical
wires or other vehicle systems located along the
frame rails or in the general area where B&W
Turnoverball hitches install. Carefully examine the
locations of these systems before installation.
Make certain that these are not damaged during
positioning hitch components, drilling holes, or
tightening fasteners. Damage to these systems
may result in property damage, serious injury, or
death.
Turnoverball hitch components are heavy and
may be cumbersome to handle. Failure to use
proper lifting techniques and caution when
handling these items could result in serious
injury.
2.
Install Cross Member Brackets.
Locate the four
cross member brackets as shown in Figure B1, and
the eight, 1/2" bolts with an added thread locker.
Attach these brackets to the inner and outer side
plates using these bolts. If the bolts with thread locker
are cap screws without a flanged head, also add a flat
and lock washer, see Figures B4.
3.
Install Front Cross Member.
Locate the front cross
member shown in Figure B1. Attach the front cross
member, washer plate and two 5/8" X 4" bolts to the
passenger side cross member bracket, see Figure B6.
Next, attach the cross member to the driver side cross
member bracket with 5/8" x 4" bolt, rectangle washer,
lock washer and nut, see Figure B5.
4.
Side Plates.
Each hitch install will require a set of inner
side plates and a set of outer side plates. All 4−wheel drive
trucks and some 2−wheel drive trucks come with inner side
plates already welded to the frame. The hitch kit for
2−wheel drive trucks includes a set of inner side plates to
be installed if the truck is not equipped with them.
1.
INSTALL SIDE PLATES &
CROSS MEMBER BRACKETS.
Install Rear Cross Member.
Locate the rear cross
member shown in Figure B1. Attach the rear cross
member to the cross member brackets as shown in
Figure B6 with 5/8" x 1−1/2" bolts, flat washers, and nuts.
5.
Note, steps 1−5.
Install hardware so it is snug, but do
not fully tighten hardware connections at this time.
PAGE 3 of 6
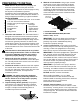
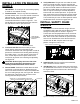
Figure B1: Sideplates and Mounting Kit Exploded View
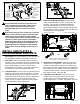
Figure B3: Passenger Side Sideplates
Figure B2: Driver Side Sideplates
CAB DIRECTION
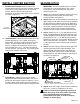
Figure B4: Bottom of truck frame looking up
from the back of truck towards the cab
Figure B5: Bottom of truck frame looking up
from the back of truck towards the cab
OUTER DRIVER
SIDEPLATE
OUTER
PASSENGER
SIDEPLATE
INNER
PASSENGER
SIDEPLATE
INNER DRIVER
SIDEPLATE
CROSS MEMBER
BRACKET
FRONT DRIVER
CROSS MEMBER
BRACKET
FRONT
PASSENGER
CROSS MEMBER
BRACKET
REAR
PASSENGER
REAR
CROSS MEMBER
CROSS MEMBER
BRACKET
REAR DRIVER
RECTANGLE
WASHER
WASHER PLATE
FRONT
CROSS MEMBER
REAR CROSS MEMBER
WASHER PLATE
FRONT CROSS MEMBER
RECTANGLE WASHER
1/2" BOLT LOCATIONS
1/2" BOLT LOCATIONS
< OR >