
User's Manual
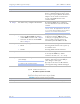
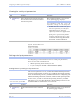

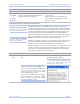
Table Of Contents
- T
- Table of contents
- I
- Introduction
- M
- Making connections
- E
- Enabling Wi-Fi Device Servers
- Installing the device drivers
- C
- Configuring the SDS using the Web interface
- T
- Troubleshooting and Maintaining an SDS
- Appendix A
- Appendix B
- Appendix C

Configuring the SDS using a We b inte rface Quate ch SDS Use r’s Manual
Page 50 Re v 1 .5 0 (3/1 3 /20 0 5)
Figure 48 - SNMP Setup screen
Step Procedure Description
# Step 1 Enable or disable SNMP in the SDS.
! Select the Enable SNMP checkbox to
enable SNMP. Continue with
□ Step 2.
! Clear the checkbox to disable SNMP.
Go to
□ Step 5.
By default, SNMP is disabled and the
checkbox is cleared.
# Step 2 Enter the System Group information.
! Contact:
! Location:
The Contact should be the person
responsible for the operation of the SDS.
The Location could be as general as Italy
or as specific as the 3
rd
floor storage closet.
Note: The System Group Description is the
same as the SDS Descriptive Name, which
you can set on the Administration screen.
# Step 3
Enter the Management Host/Trap
Destination information.
! IP Address:
! Community Name:
The host IP address you set here is
where the SDS will send its traps.
A community name, which is similar to
a password, must always be provided.
To receive traps from an SDS, the host
must have the same community name.
Note: If you set a host address of 0.0.0.0,
then you must disable Security. The SDS
will not send any traps.
# Step 4 Enable or disable Security.
! Check to allow the SDS to accept
SNMP packets from any host in the
same community group.
By default, the SDS can accept SNMP
packets from any host with the same
community name.