XP High Performance Long Range Radar Detector User Manual © 2016 Radenso®
Radar Detector Radenso XP Foreword Congratulations on your new investment. The Radenso XP was designed to deliver class leading radar detection performance on all radar bands coupled with the best false alert filtering in the industry. The built-in GPS feature lets you lockout known false alerts or you can mark your own Points of Interest for future alerts. The world-class directional GPS database includes all known Redlight- and speed cameras in North America and is updated monthly.
Quick Start up Guide To start using your Radenso XP radar detector follow these easy steps: 1. Slide the windshield mounting bracket into the QuickMount slot at the front of the radar detector. 2. Plug the RJ11 plug of the power cord power jack on the Radenso XP on the left side and connect the large plug with the 12V power socket in your car. 3. Press the Power button (middle upper button on top of unit) for 2 seconds to turn on Radenso XP. Unit will power up with a brief start-up sequence.
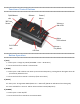
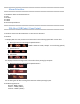
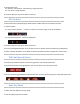
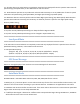
============================================================================= Function of Control Buttons ============================================================================= QuickMount slot Release Power / Menu 360º Laser Sensor Volume + Mark POI Mute GPS Lockout RJ11 Power Jack USB Port Volume – City Mode ============================================================================= Button Operation ============================================================================= 1.
============================================================================= Menu Mode ============================================================================= 1. Press and hold POWER button for 2 seconds to enter Menu Mode. 2.
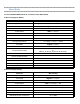
Ka5 Mode (34.592 - 34.808 Ghz) On <-> Off Ka6 Mode (34.806 - 35.166 Ghz) On <-> Off Ka7 Mode (35.143 - 35.383 Ghz) On <-> Off Ka8 Mode (35.378 - 35.618 Ghz) On <-> Off Ka9 Mode (35.595 - 35.835 Ghz) On <-> Off Ka10 Mode (35.830 - 35.
4. Menu Control buttons 4.1. [MARK] button: Toggle downward 4.2. [CITY] button: Toggle upward 4.3. [POWER] button : change Menu setting or execute Menu function forward 4.4. [MUTE] button : change Menu setting or execute Menu function backward 5. Exit Menu 5.1. Select “Exit” in Manu 5.2. Press and hold POWER button for 2 seconds 5.2. Automatically exit Menu If there is no button operation in Menu mode for 20seconds.
============================================================================= Alarm Priorities ============================================================================= 1. POI Detect Alarm and POI Pass Alarm 2. Laser 3. Ka Band 4. K Band 5. X Band 6. POI Limit Speed Alarm ============================================================================= POI Alert ( DB Point / User Point ) ============================================================================= 1.
4. POI Direction Type 4.1. DB Point : All-direction, Two-direction, Single-direction 4.2. User Point : Single-direction 5. POI alert operates only when GPS is connected. ============================================================================= GPS Lockout ============================================================================= 1. Mute audio alerts (Voice/Beep) for Radar within a 300m radius of the Lockout locations. 2. Lockout display 2.1.
2.1. All radar alerts on X and K bands are completely muted and only displayed if vehicle’s speed is lower than Left speed setting (Low Speed Mute). It does NOT mute Ka and Laser alerts. 2.2. Radar detector operates in City mode with reduced radar sensitivity set in City Mode Filter if vehicle’s speed is between Left speed setting (Low Speed Mute) and Right speed setting (City Mode Speed). 2.3. Maximum detector sensitivity will be achieved above Right speed setting (City Mode Speed).
============================================================================= Mute Mode ============================================================================= Pressing the MUTE button during an alert will temporarily mute the detected signal and will automatically unmute 20 seconds after the signal has passed or if a new and/or different signal has been detected.
============================================================================= Threat Display ============================================================================= If the detector detects more than one signal, the additional received signals will also be displayed. The display will show the three strongest signals with priority Ka>K>X.
Troubleshooting Problem The detector will not turn on Display is not turning on The detector alerts visually but there are no voice or audio alerts The windshield mount does not adhere to the windshield The detector alerts to a signal but no police radar trap can be located The unit suddenly alerts with high intensity while driving on the Interstate although there is no police in sight The detector starts alerting with low intensity following another vehicle Radenso XP did not alert to approaching police
Technical specification Detector type Technical parameters: Dual conversion super-heterodyne receiver Linear polarized self-contained antenna Scanning frequency discriminator Operating temperature: --30° - +185 ° F Power Requirement: 11V to 16V DC, 200mA Negative ground Dimensions: 72(W) x 116(L) x 34(H)mm 2.83 x 4.57 x 1.34 inch Weight: 8.2 oz. (200 g) Operating frequency: Ka Wide: 33.4 GHz - 36.0 GHz K wide: 24.100 GHz ± 150 MHz K narrow: 24.100 GHz ± 70 MHz X band: 10.
One (1) year limited warranty RADENSO warrants, for one year, to the original retail owner, this RADENSO product to be free from defects in materials and craftsmanship with only the limitations or exclusions set out below. WARRANTY DURATION: This warranty to the original user is valid for 12 months after the date of original retail sale.