User Manual
Manuals
Brands
B&K Precision Manuals
Power suppliers
1737 - Manual
11
12
13
14
15
16
17
18
19
20
10
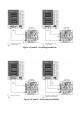
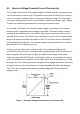
Fig
ure
3
(A and B)
-
Gro
und
ing Possib
il
ities
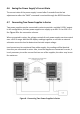
Figure 3 (C and D)
-
Ground
ing Possibilities
1
...
...
10
11
12
13
14
...
...
36