Diamond PD - Power Drive Rolling Door Opener Instruction Manual Technical Document Installation Manual 1.00 v 20 June 2012 N1854 English Part # 79083 (Manual) B&D Doors is a Division of B&D Australia Pty Ltd ABN 25 010 473 971 www.bnd.com.
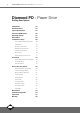
Controll-A-Door ® Diamond PD - Power Drive Instruction Manual Diamond PD - Power Drive Rolling Door Opener Safety Rules 03 Risk Assessment 04 System Specification 05 About Your B&D Opener 06 Operating Controls 07 Kit Contents 08 Installation & Setup 08 Pre-Installation Requirements 09 Installation 10 Setting Travel Limits 13 Resetting Travel Limits 13 Coding Transmitters 14 Safety Test 16 Safety Obstruction Forces 17 Accessories 18 Wired Safety Beams Installation 18 Termi
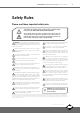
Controll-A-Door ® Diamond PD - Power Drive Instruction Manual Safety Rules Please read these important safety rules These safety alert symbols indicate a personal safety or property damage instruction exists. READ THESE INSTRUCTIONS CAREFULLY. This automatic garage door opener is designed and tested to offer safe service provided it is installed and operated in strict accordance with the following safety rules.
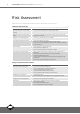
Controll-A-Door ® Diamond PD - Power Drive Instruction Manual Risk Assessment Please refer to the risk assessment table below and ensure all the necessary controls are in place.
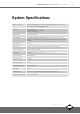
Controll-A-Door ® Diamond PD - Power Drive Instruction Manual System Specifications Maximum Door Size 3000mm high 5500mm wide (16.5m2) residential rolling garage door, or 2400mm high wind lock residential rolling garage door Door Load Rated Load: 550N Recommended Load: 200N (20kgs). Ideal Load: 70N (7kgs) Supply Voltage 230 - 240 V AC 50Hz Courtesy Light LED (Light Emitting Diode) lighting. Light comes on when door starts, turns off approx.
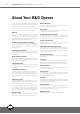
Controll-A-Door ® Diamond PD - Power Drive Instruction Manual About Your B&D Opener Thank you for choosing a B&D automatic garage door opener. This automatic garage door opener has been designed and developed in Australia by B&D Doors. Memory Retention The technically advanced construction of this B&D opener ensures you enjoy the following benefits: Self Locking Warranty In case of a power failure the opener does not lose the transmitter codes or limits settings.
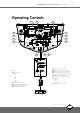
Controll-A-Door ® Diamond PD - Power Drive Instruction Manual Operating Controls 01 14 15 02 13 03 12 04 11 05 10 08 06 09 07. 08. 09. 10. 11. 12. 13. 14. Manual release handle CODE SET LED indicator (red) MINUS (-) and code set button (red) CLOSE LIMIT LED indicator (red) OPEN LIMIT LED indicator (green) PLUS (+) button (green) Universal programmer connector Jumpers: OPT 1 OPT 2 AUTO-CLS 15. Battery back up connector 01. Fuse 02. Terminal block: V+ EB1 0V EB2 0V O/S/C AUX 03.
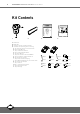
Controll-A-Door ® Diamond PD - Power Drive Instruction Manual Kit Contents $IAMOND 0$ 0OWER $RIVE )NSTRUCTION -ANUAL N1854 0 . XXXX 1. 1. 2. 3. 4. 2. Powerhead Weight Bar Instruction manual and warning labels Installation and Operating Items, including: a. Qty 2 Keyring remote control transmitters b. Qty 2 Screw M4 x 50 c. Qty 2 3/16x1/2 flat washers d. Qty 2 5/32 shakeproof washer e. Qty 2 Nut M4 hex f. Qty 2 Hex serration head screw M6x45 g. Qty 2 Flat washer 107D 6.4x20.5x1.6 h.
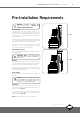
Controll-A-Door ® Diamond PD - Power Drive Instruction Manual 9 Pre-Installation Requirements WARNING! Incorrect installation can lead to severe injury - FOLLOW ALL INSTALLATION INSTRUCTIONS. Door Operation The door must be in good operating condition. The maximum effort to move the door up or down, from stationary, should not exceed 200 Newtons (20kg force) at the bottom rail. The recommended force is 70N (7kg) for manual operation. Fig.01 Lift the door to about halfway.
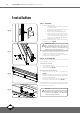
Controll-A-Door ® Diamond PD - Power Drive Instruction Manual Installation Step 1 - Preparation a. Fig.03 b. Check the door’s operation: The door must travel smoothly and be easy i. to operate by hand. ii. Operating force on the bottom rail should be approximately 70N (7kgs) force. iii. Adjust any tight or twisted guides/tracks iv. Clean the guides if there is any oil or wax present using a suitable white spirit. The only lubricant suitable for use on door guides is silicon spray.
Controll-A-Door ® Diamond PD - Power Drive Instruction Manual 11 Installation Step 3 - Pin the Door Curtain Pinning the door curtain to the door drum maintains security when the opener closes and locks. a. b. c. d. Fully close the door. Mark drill holes at both ends of the drum (Fig. 07). Drill holes using 3.2mm (1/8”) drill bit. Open the door slightly for easier access, if necessary. Fit a 10 x 32mm screw and washer to each end.
Controll-A-Door ® Diamond PD - Power Drive Instruction Manual 12 Installation WARNING! The opener should not be installed where the door opens over a public footpath or roadway. M6 x 45 Hex Screw Washer 6.4 x 20 x 1.6 Extension Fork Step 5 - Assemble the Internal Gear a. b. Fig.09 Insert the two forks into the ring gear (Fig. 09). Secure with M6x45 hex serration head screw and washer. Step 6 - Mounting the Opener a. b. c. d. Fig.
Controll-A-Door ® Diamond PD - Power Drive Instruction Manual 13 Setting Travel Limits Step 7.1 - Setting Travel Limits NOTE: If Safety Beams are to be used they must be installed before setting the travel limits. Fig.12 WARNING! Use caution when operating the manual release with the door open since it may fall rapidly due to weak or broken springs, or an improperly balanced door.
Controll-A-Door ® Diamond PD - Power Drive Instruction Manual Coding Transmitters Step 8.1 - Storing the Transmitter Code The opener can only operated from remote control transmitters that have been programmed into its memory. Up to fourteen (14) codes can be stored in the memory. Fig.13 Press CODE SET button once Select one of the four buttons (not programmed yet ) you wish to use to control the door a. b. c. d. e. Ensure that the battery is inserted in the transmitter.
Controll-A-Door ® Diamond PD - Power Drive Instruction Manual 15 Coding Transmitters Step 8.4 - Setting the Transmitter to Operate the Auxiliary Output It is possible to operate other devices (e.g. alarm systems) using one of the spare buttons of a multi-channel transmitter coded into the Auxiliary Output feature. a. b. c. Press CODE SET button four times. The CODE SET LED will illuminate and the courtesy light will flash quickly (Fig. 16).
Controll-A-Door ® Diamond PD - Power Drive Instruction Manual 16 Safety Test NOTE: Ensure the door opens and closes properly. Step 9.1 - Door Closing Test a. b. c. d. Fig.20 Ensure that the door is open. Place a 40mm obstacle flat on the floor under the middle of the garage door (Fig. 20). Operate the door in the close direction; the door must reverse on hitting the obstruction. The CLOSE LIMIT LED flashes to indicate an obstruction while closing.
Controll-A-Door ® Diamond PD - Power Drive Instruction Manual 17 Safety Obstruction Forces Adjusting Safety Obstruction Force The Safety Obstruction Force is calculated automatically during setup. Adjusting this is normally only necessitated by environmental conditions such as windy or dusty areas, and areas with extreme temperature changes. Fig.21 Step 10.1 - To Increase Force Pressure a. b. c. d. e. Hold down FORCE MARGIN SET button (Fig.
Controll-A-Door ® Diamond PD - Power Drive Instruction Manual 18 Wired Safety Beams Installation WARNING: Safety beams must be installed if the closing force at the bottom edge of the door exceeds 400N (40kg force). This is in compliance with AS/NZS 60335-2-95 6 4 3 Step 11 - Safety Beams (optional) Fig. 22 Safety Beams extend across the garage door opening.
Controll-A-Door ® Diamond PD - Power Drive Instruction Manual 19 Accessories Terminal Block A variety of wired accessory items can be connected to the terminal block such as Safety Beams, electric key switch, and more (Fig. 25). Terminal connections from top down are as follows: 1. V+ 2. EB1 (Safety Beam input) 3. 0V (0V for Safety Beam) 4. EB2 (Safety Beam input) 5. OSC (Open/Stop/Close trigger) 6. AUX OUT (Auxiliary output trigger) Remote Aerial (Part No 062177) Some sites cause poor radio reception.
Controll-A-Door ® Diamond PD - Power Drive Instruction Manual 20 How To Use Your Opener For maximum efficiency of your opener, your garage door must be in good operating condition. An annual service of your garage door by an Approved Dealer is recommended. CAUTION - Activate the opener only when the door is in full view, free of obstructions and with the opener properly adjusted. No one should enter or leave the garage while the door is in motion. Do not allow children to play with or near the door. Fig.
Controll-A-Door ® Diamond PD - Power Drive Instruction Manual 21 How To Use Your Opener Inbuilt Locking Facility DO NOT lock your door with the locking bars when your opener is engaged. This opener has an inbuilt locking facility. With the opener engaged your door will be locked whether the power is on or off. Manual Door Operation CAUTION! When operating the manual release while the door is open it may fall rapidly due to weak or broken springs, or due to it being improperly balanced. Fig.
Controll-A-Door ® Diamond PD - Power Drive Instruction Manual How To Use Your Opener Safety Beam Option A wired or wireless Safety Beam Kit may be fitted to this opener. • When this option is fitted, the operation of this device is such that if an object (i.e. car, child, etc) blocks the safety beam, then the garage door opener will not close the door automatically. • If the Safety Beam is fitted but not operating correctly, then the door once opened automatically, will not close automatically.
Controll-A-Door ® Diamond PD - Power Drive Instruction Manual Maintenance Maintenance Whilst your opener does not require any periodic maintenance, the door that it is fitted to, does. Your garage door is a large, heavy, moving object and should be tested regularly to ensure it is in good condition. A poorly maintained door could cause fatal or serious injuries or serious damage to property. RDO-1v3 has a built in maintenance counter. From factory this is loaded with 3000 cycles.
Controll-A-Door ® Diamond PD - Power Drive Instruction Manual Troubleshooting guide Symptom Possible cause Remedy The opener does not work from the hand remote control transmitter Garage door in poor condition e.g. springs may be broken Check the door for normal operation – see monthly maintenance. Manual door lock engaged Disengage door locks The opener does not have power Plug a device e.g. a lamp, into the power point and check that it is OK.
Controll-A-Door ® Diamond PD - Power Drive Instruction Manual Spare Parts © Copyright June 2012 B&D Doors Diamond PD Power Drive : Instruction Manual 25
Controll-A-Door ® Diamond PD - Power Drive Instruction Manual Warranty Product: CAD Diamond PD Purchased from:______________________________Purchaser:___________________________________ (described as “you” below) Address:_____________________________________Installed by:__________________________________ Installed on (date):____________________________Invoice No:__________________________________ 1 Making a claim - To make a warranty claim you must: (a) produce a copy of the receipt of purchase, togeth
Controll-A-Door ® Diamond PD - Power Drive Instruction Manual Warranty (b) instructions - failure to observe any instructions or directions (including “warning” notifications in the Instruction Manual), provided with the Product or given to you; (c) other devices - the Product being fitted to any door or other closing device which is not of the type or condition defined in the Instruction Manual as suitable for installation of the Product; (d) installation or adjustment - faulty installation or adjustment
QLD Office: 17 Oasis Court, Clontarf 4019. Ph: (07) 3883 0200 NSW Office: 34-36 Marigold St, Revesby 2212. Ph: (02) 9722 5555 VIC/TAS Office: 147-153 Canterbury Road, Kilsyth 3137. Ph: (03) 9237 7766 SA Office: 23 Frederick Road, Royal Park 5014. Ph: (08) 8440 4747 WA Office: 96 Mulgul Drive, Malaga 6062. www.bnd.com.au Ph: (08) 9247 8777 NZ Office: 70 Allens Road, East Tamaki, Auckland. www.bnd.co.