
Server User Manual
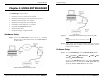

Using ESP Manager
Manual Documentation Number: ESP901-902_4105m Chapter 4 27
B&B Electronics Mfg Co Inc – 707 Dayton Rd - PO Box 1040 - Ottawa IL 61350 - Ph 815-433-5100 - Fax 815-433-5104 – www.bb-elec.com
B&B Electronics Ltd – Westlink Commercial Pk – Oranmore, Galway, Ireland – Ph +353 91-792444 – Fax +353 91-792445 – www.bb-europe.com
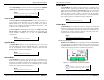
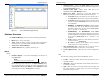
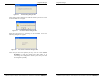
Step 5: Enter the IP Address assigned to the desired Serial Server or
click Search all reachable servers, then OK. IP Address is
used to find Serial Server units that are not on the same
subnet. (Routers on the network will block the standard
broadcast used to find servers if
Search all reachable servers
is selected.) The user must set an IP address that conforms to
the LAN addressing scheme.
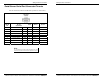
The Searching window is shown until all active
Serial
Servers on the LAN are listed in the Serial Server List
window.
Figure 23. The Search VLINX ESP Dialogue Box
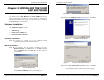
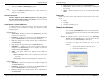
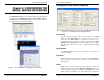
Configure Server Properties
The Server Properties window displays the current
configuration properties for the currently selected server.
Step 6: To open the Server Properties window, highlight the Serial
Server in the Serial Server List window, double-click to
open.
The
Server Properties window is used to configure and store
the Server configuration settings. Details for setting Properties
are described in the next chapter.
Using ESP Manager
28 Chapter 4 Manual Documentation Number: ESP901-902_4105m
B&B Electronics Mfg Co Inc – 707 Dayton Rd - PO Box 1040 - Ottawa IL 61350 - Ph 815-433-5100 - Fax 815-433-5104 – www.bb-elec.com
B&B Electronics Ltd – Westlink Commercial Pk – Oranmore, Galway, Ireland – Ph +353 91-792444 – Fax +353 91-792445 – www.bb-europe.com
Figure 24. The Server Properties Window
N
N
o
o
t
t
e
e
:
:
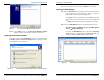
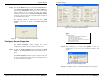
ESP Manager Navigation:
- Use the mouse to select the property and parameters or
- Tab to move to the next property
- Tab+Shift to move back to previous property
- Arrows to move between properties or change values or
contents of the current property
- Enter to select update or cancel
Step 7: After configuring as needed, click Update to store the
configuration in the server. The following window will
appear:
Figure 25. The Restart Dialogue Box
Step 8:
Click Yes to restart. The following dialogue box will appear: