
Computer Hardware User Manual


Configuring the IP Address
Manual Documentation Number: PES1A/PESV1A-4905m 13
B&B Electronics Mfg Co Inc – 707 Dayton Rd - PO Box 1040 - Ottawa IL 61350 - Ph 815-433-5100 - Fax 815-433-5104 – www.bb-elec.com
B&B Electronics Ltd – Westlink Commercial Park – Oranmore, Galway, Ireland – Ph +353 91-792444 – Fax +353 91-792445 – www.bb-europe.com
C
C
h
h
a
a
p
p
t
t
e
e
r
r
4
4
:
:
C
C
o
o
n
n
f
f
i
i
g
g
u
u
r
r
i
i
n
n
g
g
t
t
h
h
e
e
I
I
P
P
A
A
d
d
d
d
r
r
e
e
s
s
s
s
Before you can begin the configuration of your PES1A/PESV1A you must
know its IP address to access it with a web browser. Once you have access to
the Configuration and Management Interface via a web browser you can
reset the IP address using static IP addressing, if necessary.
Your PES1A/PESV1A comes from the factory configured to obtain an IP
address dynamically, or failing that, to generate its own IP address using the
APIPA protocol. You can determine the current IP address using the
discovery software included on the CD with your PES1A/PESV1A
Using the Discovery Software
1. Connect the PES1A/PESV1A to your network (with PoE supply
installed and operating). When it starts it will obtain an IP address.
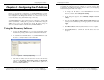
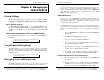
2. To determine the initial IP address of your PES1A/PESV1A, start
the finder.exe utility included on the included CD.
Figure 9. Discovery Utility Dialog
3. The finder.exe utility scans the network for devices and then lists
each device’s IP Address, MAC Address, Name and Product ID.
Identify your PES1A/PESV1A by its MAC address (printed on a
label on the PES1A/PESV1A).
Configuring the IP Address
14 Manual Documentation Number: PES1A/PESV1A-4905m
B&B Electronics Mfg Co Inc – 707 Dayton Rd - PO Box 1040 - Ottawa IL 61350 - Ph 815-433-5100 - Fax 815-433-5104 – www.bb-elec.com
B&B Electronics Ltd – Westlink Commercial Park – Oranmore, Galway, Ireland – Ph +353 91-792444 – Fax +353 91-792445 – www.bb-europe.com
If you need to change the IP address of the PES1A/PESV1A, you can
accomplish this using the discovery software, or you can open the Web
Configuration and Management Interface and do it there. (See Configuring
Network Settings later in the next chapter.)
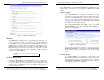
1. To change the IP address of the PES1A/PESV1A from the
discovery software, click Configure IP Settings.
2. In the dialog that appears, select Manually configure network
settings.
3. Type the new IP Address, Subnet Mask, Default Gateway and
system password (initially dbps) in the appropriate boxes, then click
Apply.
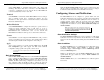
4. Click Reboot Device. This may take a minute or more to complete.
5. Click Refresh List to confirm the new IP address has been
accepted.