
Manual
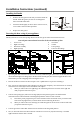

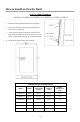


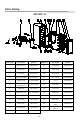

Table Of Contents
- Use & Care Manual
- Refrigerators Beverage Centers Wine Centers
- Table of Contents
- Page
- For your safety, read all instructions carefully before operating the appliance.
- DANGER: When using an electrical appliance, basic precautions should always be followed to reduce the risk of fire, electric shock, and injury to persons.
- Locate the unit away from direct sunlight and sources of heat (stove, heater, radiator, etc.).
- Save These Instructions
- Disposal of Old Appliance
- Dispose of your appliance packaging properly.
- Refrigeration equipment must be properly disposed of in a way which protects the environment. This applies to your old appliance and to your new unit once it has reached the end of its service life.
- Limited Warranty
- Limited Warranty (continued)
- IMPROPER USE: Azure assumes no liability for component failure or other damages resulting from improper usage or installation or failure to clean and/or maintain the product as set forth in the warranty packet provided with the product. This limited w...
- Installation Instructions
- Before Using Your Azure Appliance
- Installation of Your Appliance
- Installation Instructions (continued)
- Built-in Cabinet Instructions
- Installation Instructions (continued)
- Attention
- Check that the voltage marked on the product corresponds with your supply voltage.
- This appliance requires a standard 115/120 Volt AC~60Hz electrical ground outlet with three pins. Have the wall outlet and circuit checked by a qualified electrician to make sure the outlet is properly grounded. When a standard two-pin wall outlet is ...
- To prevent accidental injury, the cord should be secured behind the appliance and not left exposed or dangling.
- Installation Instructions (continued)
- Note: All parts removed must be saved to do the reinstallation of door
- How to Install and Adjust the Bottom Vent
- How to Install an Overlay Panel
- Setting a Temperature
- Setting the Temperature Control for your Wine Center
- Model Numbers: A115WC-S; A115WC-O; A124WC-S; A124WC-O
- Setting the Temperature Control for your Beverage Center and Refrigerator
- Model Numbers: A115BEV-S; A115BEV-O; A115R-S; A115R-O; A124BEV-S; A124BEV-O; A124R-S; A124R-O
- Key Lock
- Shelves
- Defrosting
- Storage
- Many bottles may differ in size and dimensions. As such the actual number of bottles you may be able to store may vary.
- Care and Maintenance
- Cleaning Your Azure Appliance
- Power Failure
- Vacation Time
- Moving Your Wine Center
- Energy Saving Tips
- Troubleshooting Guide
- Parts Listing
- A115WC-O
- Parts Listing
- Parts Listing
- Parts Listing
- Parts Listing
- Parts Listing
- Parts Listing
- Parts Listing
14
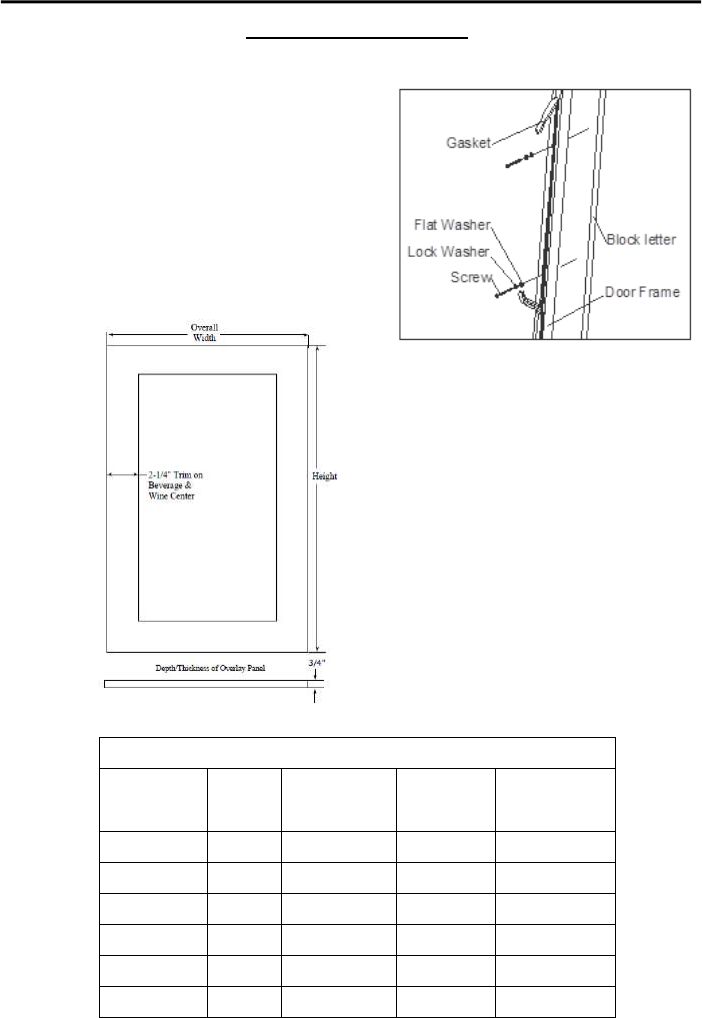
How to Install an Overlay Panel
Only for Model Numbers:
A115WC-O; A124WC-O; A115BEV-O; A124BEV-O; A115R-O; A124R-O
1. Remove the door gasket from the interior of the door.
2. The screws that come with the unit are intended to be
used with a ¾” front panel.
3. Clamp your front panels to the frame of the door and
then anchor the panel to the door, using the screw, lock
washer and flat washer provided for each mounting hole.
4.
Re-install the gasket into the door assembly.
Dimensions for Overlay Panels
Model Height
Total Width
of Door
Width of
Trim
Depth /
Thickness of
Trim
A115WC-O 28-3/8” 14-1/2” 2-1/4" 3/4"
A124WC-O 28-1/8” 23-1/8” 2-1/4" 3/4"
A115BEV-O 28-3/8” 14-1/2” 2-1/4" 3/4"
A124BEV-O 28-1/8” 23-1/8” 2-1/4" 3/4"
A115R-O 28-3/8” 14-1/2” N/A 3/4"
A124R-O 28-1/8” 23-1/8” N/A 3/4"