User Manual WL635USB Wireless B/G USB 2.0 Adaptor User Manual Version 1.1 CONTENTS 1 INTRODUCTION TO WL635USB WIRELESS B/G USB 2.0 ADAPTOR ................................3 1.1 PACKAGE CONTENTS ....................................................................................................................3 1.2 FEATURES .....................................................................................................................................3 1.3 LED INDICATORS ..............................
User Manual Declaration of Conformity FCC Certification The United States Federal Communication Commission (FCC) and the Canadian Department of Communications have established certain rules governing the use of electronic equipment. Part15, Class B This device complies with Part 15 of FCC rules. Operation is subject to the following two conditions: 1) This device may not cause harmful interface, and 2) This device must accept any interface received, including interface that may cause undesired operation.
User Manual 1 Introduction to WL635USB Wireless B/G USB 2.0 Adaptor The WL635USB Wireless B/G USB 2.0 Adaptor is designed for creating a wireless workstation for notebook or desktop computer. It is compatible with any USB-equipped computers. The WL 635USB Wireless B/G USB 2.0 Adaptor is compliant with both WirelessG (802.11g) and Wireless-B (802.11b). WL635USB is based on Texas Instruments’ (TI) G++ Turbo mode (125Mbps equivalent) performance enhancing technology and by incorporating USB 2.
User Manual 1.3 LED Indicators Power Indicator (Green LED): The LED will light up when the device is connected to a network (an AP or Peer-to-Peer). The LED will blink when the device is scanning for all available networks. Act Indicator (Green LED): The LED will flicker when there is transmitting/receiving of wireless data.
User Manual 2 Installation 2.1 System Requirements • • • • • • • Desktop PC or Notebook PC Pentium® 233 processor or higher 128MB RAM 20MB hard disk space (system files and modem driver only) A free USB Port CD-ROM drive Windows® 98 SE / Windows® Me / Windows® XP / Windows® 2000 2.2 Step 1: Install the Driver & Utility Caution!!! Do not insert the wireless LAN card into your computer until the procedures in “ Install the Device & Utility ” have been performed. Important Note: Connect to an USB 2.
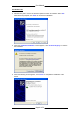
User Manual 3. The below screen will be shown. Click “Next” to continue. 4. The below screen will be shown. Click “Next” to continue and the installation program will start running automatically. 5. For Windows 2000 and Windows XP, you may be prompted for Digital Signature not found. Just click “Yes” or “Continue Anyway” to continue with the installation. 6. When the below screen is shown, click “Finish” to restart the system.
User Manual 2.3 Step 2: Install the Device Note: Before you install the device to your computer, make sure you have installed the driver and utility as described in the previous section. 1. Locate your USB host and insert the USB 2.0 Adaptor. 2. Once the device has been inserted to your computer, Windows will detect the new hardware. 3. Windows will begin copying the files to your computer. For Windows 98SE/ME 4.
User Manual For Windows XP 4. Windows may ask to connect to Windows Update to search for software. Select “No”. When below is prompted, click “Next” to continue the installation. 5. When the “Hardware Installation” screen appears, click “Continue Anyway” to continue the installation. 6. When the following screen appears, click “Finish” to complete the installation of the device.
User Manual 2.4 Verify Installation To verify if the device exists in your computer and works, go to Start Æ Settings Æ Control Panel Æ System Æ Hardware Æ Device Manager. Expand the Network Adaptors category. If the WL635USB Wireless B/G USB Adapter is listed here, it means that your device is properly installed and enabled. 2.5 Uninstallation 1. To uninstall the driver and utility, go to the Control Panel of your system. 2. Open the Add/Remove Programs. 3.
User Manual 3 Network Connection Once the device driver is well installed, a network setting described in the following should be also established. 3.1 In Windows 98SE/ME 1. Go to Start Æ Settings Æ Control Panel Æ Network. Make sure that all the required components are installed. If any components are missing, click on the “Add” button to add them in. 2. For making your computer visible on the network, enable the “File and Print Sharing…” and check on the boxes as shown. 3.
User Manual 4. Click the “Access Control” tab. Make sure that “Share-level access control” is selected. If connecting to a Netware server, share level can be set to “User-level access control”. 5. When finished, restart your computer to activate the new device. 3.2 In Windows 2000/XP 1. For Windows 2000, go to Start Æ Settings Æ Control Panel Æ Network and Dial-up Connections Æ Local Area Connection Æ Properties.
User Manual 4 IP Address 1. To configure a dynamic IP address check the “Obtain an IP Address Automatically” option. 2. To configure a fixed IP, check the “Use the following IP address” option. Then enter an IP address into the empty field. For example, enter 192.168.1.1 in the IP address field and 255.255.255.0 for the Subnet Mask. Note: When assigning IP Addresses to the computers on the network, remember to have the IP address for each computer set on the same subnet mask.
User Manual 5 Configuration Utility After the wireless USB 2.0 adaptor has been successfully installed, users can use the included Configuration Utility to set their preference. To activate the Configuration Utility, you may go to Start J Program J WL635USB Wireless B+G J WL635USB Wireless B+G Utility. There is also a Configuration Utility icon created on the desktop. You can also open the Configuration Utility by clicking the icon.
User Manual 5.1 Main Tab Open up the Configuration Utility and the below screen will display the current status of the WL635USB Wireless B/G USB 2.0 Adaptor. Item Description External Configuration Checkbox (Windows XP only): A checkbox that Configure using Windows enables you to disable the WLAN Station Configuration Utility and Zero Config. indicates that the station driver is to be configured with Windows XP’s built-in Windows Zero Configuration Utility (WZC).
User Manual Item Description Tx Rate /Rx The actual instantaneous transmit and receive rates, in Mbps. Rate Signal quality The signal strength from the network Access Point or station. The strength is displayed in three formats: a signal quality level (one of five levels, from Bad to Best), a numerical value in dBm, and a signal quality bar graph with a scale of –82 to –10. Highlight one of the devices from the list area and then press the Connect Connect button to access it.
User Manual Item Description Select Hexadecimal (Hex) if you are using hexadecimal numbers (0-9, or A-F). Select ASCII if you are using ASCII characters (case-sensitive). ASCII characters are: 0,1,2,...8,9 and a,b,c,d,...x,y,z. 10 Hexadecimal digits or 5 ASCII characters are needed if 64-bit WEP is used; 26 Hexadecimal digits or 13 ASCII characters are needed if 128-bit WEP is used; 58 Hexadecimal digits or 29 ASCII characters are needed if 256-bit WEP is used.
User Manual Item Description To supply a Personal Certificate: In the User Name field, type in the user name assigned to the certificate. Select a certificate by clicking Browse. The standard Windows Select Certificate window is displayed: Select a certificate from the list, and click OK. The name of the certificate is displayed in the textbox in the middle of the Personal Certificate window. To view the certificate, click View.
User Manual Item Description You are supplying a user name and password now. The utility prompts you for them each time you try to connect to a network. 2. To provide a user name and password now, enter them in the fields provided. Not all values for Authentication Mode are available for all Security settings. Enable CCX mode: Enables connections in CCX mode. When checked, additional authentication modes are available. This checkbox is only enabled when Super Profile is set to Enterprise.
User Manual 5.2 Profile Manager Tab The Profile Manager enables you to create, modify and delete the profiles that the station uses to connect to WLAN networks, to activate and de-activate profiles, and to raise and lower a profile’s priority. All profiles are displayed in one of the following lists: Profiles Pool: A list of inactive profiles, that is, profiles that cannot currently be used for making a connection.
User Manual 5.3 Information Tab The Information tab displays information maintained by the driver, such as the number of packet errors and the total number of bytes received or transmitted. The tab also displays information about the current connection, as well as network information about the station. The statistics are for the period starting when you last connected to a network. The statistics are refreshed at least twice a second.
User Manual 6 Example of connection to an Access Point 1. At the Main tab, highlight one of the devices from the list area that you wish to connect and then press the Connect button to access it. 2. The Profile Configuration window will be displayed so that you can create a profile. 3. The SSID name will appear on the Profile Name. You can change the Profile Name if you wish to. 4. Select Personal for Super Profile and select Open for the Authentication Mode. 5.
User Manual 7. The WEP Configuration screen will be shown. 8. Select Hexadecimal (Hex) if you are using hexadecimal numbers (0-9, or A-F). 10 Hexadecimal digits are needed if 64-bit WEP is used; 26 Hexadecimal digits are needed if 128-bit WEP is used; 58 Hexadecimal digits are needed if 256-bit WEP is used. For example, the characters “1122aabbcc” are in 10 Hexadecimal digits. 9. Select ASCII if you are using ASCII characters (case-sensitive). ASCII characters are: 0,1,2,...8,9 and a,b,c,d,...x,y,z.