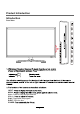
61cm (24") FULL HD LED TV with DVB-T/-C & CI+ Slot & DVD-Player Model No.: ADVL-2458 BLACK / ADVL 2458 WHITE Please read and follow these instructions before using your unit. www.axxion-electronics.
Contents Caution Safety Information 1 2 Accessories Technical Specification 3 3 Product Introduction Front View 4 4 Connections 5 Remote Control 6-7 Basic Operation 8 OSD Menu 1. Picture menu 2. Sound menu 3. Channel menu 4. Feature menu 5.
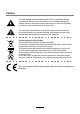
Caution The lightning flash with arrowhead symbol, within an equilateral triangle is intended to alert the user to the presence of un-insulated “dangerous voltage” within the products enclosure that may be of sufficient magnitude to constitute a risk of electric shock to the persons. The exclamation point within an equilateral triangle is intend to alert the user to the presence of important operating and maintenance (servicing) instructions in the literature accompanying the appliance.
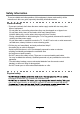
Safety Information To ensure reliable and safe operation of this equipment, please read carefully all the instructions in this user guide, especially the safety information below. Electrical safety To prevent overload, don't share the same mains supply socket with too many other items of equipment. -Do not place any connecting wires where they may be stepped on or tripped over. -Do not place heavy items on the leads, which may damage them.
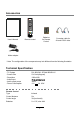
Accessories POWER PICTURE MUTE SOUND ASPECT SUBTITLE CH.LIST SLEEP FAV TV/RADIO INPUT OK MENU EXIT 1 2 3 5 6 7 4 8 DISPLAY 9 0 REC REC.LIST VOL TV/TXT User’s Manual CH CANCEL REVEAL NICAM/A2 D.SET D.MENU D.SUB D.
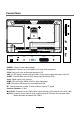
Product Introduction Introduction Front View POWER to turn on and off. Blue off Null INPUT: MENU: CH+/-: Press to scan through channels. VOL+/-: PLAY: Play/pause the program. EJECT: Eject the disc.
Mini AV Mini YPbPr HDMI USB RF Common Interface Connections Headphone POWER PC-IN VGA SCART Coax POWER: Connect to the mains adaptor. Headphone: Connect it to your headphone or other audio equipment. PC-IN: Connect it to the audio output terminal of PC. VGA: For PC display.Connect it to the D-Sub 15 pins analog output connector of the PC. SCART: Connect them to the SCART video output terminal of DVD. Coax: Digital output to AV receiver. HDMI: Connect it to the HDMI of DVD or other equipment.
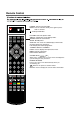
Remote Control POWER PICTURE MUTE SOUND ASPECT SUBTITLE CH.LIST SLEEP FAV TV/RADIO INPUT OK MENU EXIT 1 2 3 4 5 6 7 8 POWER: Turn the TV on/standby. MUTE: Press to mute the sound, press again or press VOL+ to unmute. : Load/eject DVD disc. PICTURE: Select the picture mode. ASPECT: Change the screen display mode. SOUND: Select the sound mode. SLEEP: Standby timer. SUBTITLE: Turn on/off the subtitle display in DTV mode. CH.LIST: Display the channel list.
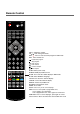
Remote Control POWER PICTURE MUTE SOUND ASPECT SUBTITLE CH.LIST SLEEP FAV TV/RADIO INPUT OK MENU 1 EXIT 2 3 4 VOL+/-: Adjust the volume. CH / : Scan through channels. REC : Press to start record the program in DVB mode. REC . LIST: Record List. : Play/Pause program. : Stop program. 5 6 9 0 7 8 DISPLAY : Fast reverse. : Fast forward. : Previous chapter. : Next chapter. REC REC.LIST VOL CH TV/TXT CANCEL REVEAL D.SET D.MENU D.SUB NICAM/A2 D.LAN INDEX HOLD SIZE SUBPAGE D.
Basic Operation Power on/off 1. Connect to the power supply with the adaptor. 2. -To turn on the TV Press POWER button on the TV or remote control. -To turn off the TV Press POWER button on the TV or remote control. Input Source select Press INPUT button on the TV set or remote control to display the input source menu, and use CH+/- button on the TV set or Ĥ0ĥ!button on remote control to select the input source, press OK button on the remote control to enter.
OSD Menu 1. Picture menu Picture Mode: Select your desired picture mode from Dynamic, Standard, Mild and User. Brightness: Adjust image black level. Contrast: Adjust image contrast. Sharpness: Adjust the sharpness(Gray and invalid in VGA/PC mode). Colour: Adjust image colour from black and white. Tint: Control the tint ( NTSC mode only). Colour Temp.: Select an optimum color temperature mode to suit your eyes for viewing from Warm, Cool, Standard.
OSD Menu 2. Sound menu Sound Mode: Select your desired sound mode from Standard, Movie, Music, Speech and User. Bass: Adjust the level of the lower-pitched sounds. Treble: Adjust the level of the higherpitched sounds. Balance: Adjust the audio output between left and right speakers. Surround: Turn on/off the surround sound function. Auto Volume Level (AVL): The volumes of all sources will be maintained when the function’s on. SPDIF: Select the spdif mode for the TV from off, PCM and Auto.
OSD Menu 3. Channel menu(In ATV/DTV mode) Channel Management: Enter the Channel management menu to edit the channels. Delete: Press RED button to sign the channels you want to delete, it will hint you when you exit. Lock: User must set the “Lock enable”(Feature-Lock- Lock enable) at ON to active this function. Press GREEN button to sign(lock) or cancel(unlock) the channel. And you have to enter the password to view the program.
OSD Menu Country: Select the country. Auto Search: Press OK button to enter the Auto Search menu, select search mode, and press OK button to start auto search. Note: 1. ALL: Auto search channels for DTV, ATV and Radio. DTV: Auto search channels for DTV and radio. ATV: Auto search channels for ATV. 2. When the TV is auto tunning, you could press MENU button to stop auto tunning and return to preview menu. DTV Manual Search : Enter the DTV Manual Search menu.
OSD Menu 4. Feature menu Lock: This menu allows you to lock certain features of the television so that they can not be used or viewed. For example if you don’t want certain channels viewed by children or if the television is to be used in a hotel and you want certain channels be locked. When you enter the system lock menu you will be asked for a password. As default it is 0000. Lock Enable - Turn on/off the Lock functions.
OSD Menu Hotel Mode - Enter the Hotel Setting menu. Hotel Lock: Turn on/off the Hotel Lock function. Channel Lock: Disable the Channel menu in OSD. Picture Lock: Disable the Picture menu in OSD. Sound Lock: Disable the Sound menu in OSD. Feature Lock: Disable the Feature menu in OSD. Setup Lock: Disable the Setup menu in OSD. Key Lock: Disable the buttons on the TV set. Source Lock: Disable the input source you desired. Set Source: Select the default source when you turn on the TV.
OSD Menu 5. SETUP menu OSD Timer: Lets you adjust the amount of time the On Screen Menu stays on the screen before disappearing. Auto SCART: The TV will be changed to SCART source automatically when you connect the TV to the SCART device. PC Setup: Change the PC Settings in PC mode. Auto Adjust: Setup the parameter of the screen automatically. H/V-Position: Adjust the transverse/vertical position of the screen.
Multimedia Operation Basic Operation 1). Press the INPUT button on the remote control to display the input source menu, select Media source by the / buttons, and press OK button to enter the Multimedia menu as shown below. 2). Insert USB device, and select the Media mode form Photo, Music, Movie and eBook, then you will find the name of the device display on the screen as shown below. 3). Press / button to select the USB device and press OK button to enter the file list as shown below.
Multimedia Operation 1. Photo Play the photo Press / button to select the option on the table, and press OK button to change. Note: You could press OK button to display the option table when it disappears. Play/Pause the photo playing. Stop and exit the full screen program. Play the previous or next file directly. Ratate the picture(0, 90, 180, 270). Zoom in/out the picture, you could move the picture by Cursor left/right/up/down button in Zoom mode. Display the information of the current file.
Multimedia Operation 3. Movie Play the movie Press / button to select the option on the table, and press OK button to change. Note: You could press OK button to display the option table when it disappears. AB Play/Pause the movie playing. Stop and exit the full screen program. Play fast backword or forword. Play the movie in slow mode. Play the movie in step mode. Set the A-B repeat playing mode. Play the previous or next file directly. Display the playing list.
Recording Operation PVR settings Press the MENU button select Feature-PVR/Timeshift menu, press OK button to enter the menu as below. 1). Record File Format Select Record File Format mode from TS and PS for storing in the USB device. 2). Partition Select USB device informations Format: Press RED button to format the selected USB device. Set Default Partition: Press GREEN button to set the focus partition as the default partition .The recorders are stored in the default partition.
Recording Operation 5). Record List Display the Record list menu. Delete: Press RED button to delete the selected record plan. 6). Recorder Start Press OK button to start recording, as the function of the REC button on the remote control.
Recording Operation Recording Press REC button on the remote control to start recording in DTV mode, and the TV will give you a hint. Select “OK” item, and press OK to start recording, there will be a sign on the screen. Note: a. Please make sure the USB device is on the TV. b. Please mke sure the speed and free space of the USB is enough. c. Press STOP button to exit the recording mode. d. Press Recording list button to display the Recorder list, and you could play the program you selected.
DVD Operation Press the Power button on the TV or the remote control, then press the INPUT button to select DVD mode. If there is no disc in the DVD player the screen will show "NO DISC". Insert Disc according to picture next to disc slot. Do not touch the playing surface. Hold the disc around the outside with your fingers and place the disc into the slot. The player will automatically draw the disc into the player.
DVD Operation 23
DVD Operation 24
DVD Operation Spdif Setup 25
DVD Operation or NO disc 26
DVD Operation 27
DVD Operation 28
DVD Operation 29
ADVL-2458 BLACK AXXION 30 B B 44 44 24 61 2011 ADVL-2458 WHITE AXXION 30 24 61 2011
Service and support For information: http://www.axxion-electronics.com/ For support: http://axxionsupport.zendesk.com Axxion helpdesk: Germany 0900-1520530 (Local charges) The Netherlands 0900-23553626 (Local charges + 1ct P/min) Belgium 02-6200115 (Local charges) France 0170480005 (Local charges) The helpdesk is accessible from Monday to Friday from 9 AM till 6 PM. In case your device needs repair, our helpdesk will redirect you to your local dealer.