AXXESS STEERING WHEEL CONTROL INTERFACE INSTALLATION MANUAL
The ASWC is a universal steering wheel control interface that can be used on most any vehicle with steering wheel controls. Designed to be used with today’s top aftermarket radio manufactures like Pioneer, Sony, Alpine, Kenwood, Eclipse, JVC, and others, the ASWC is all you’ll need to retain the OEM steering wheel controls.
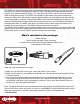
A brief overview of the ASWC interface and wire harness: On the top of the ASWC interface there are three points of interest: 1) The Programming led – this will flash rapidly when in auto detect mode, flashes slowly in manual programming mode 2) The Reset button – Hold down button more then 2 seconds but less then 10 seconds to start auto detect mode; hold down longer then 10 seconds to start manual programming mode 3) The slide cover for the USB update port – open this up to reveal the USB update port.
The Installation Once you have collected the information or printed out the information sheet on your particular vehicle from the Axxess website (www.axxessinterface.com) you’re ready to install the ASWC. So here we go: 1) Connect the Black wire of the ASWC (pin 6) to ground. You may use the same grounding point as the aftermarket radio. 2) Connect the Red wire of the ASWC (pin 12) to a 12 volt accessory wire, one that turns on and off with the ignition key.
For the Auto Detect feature to work there are 3 possible actions, however only one action will be required by you depending on your vehicle: 1) Turn the ignition on and no other action is required. 2) Turn the ignition on, press and hold down the Volume Up button on the steering wheel. Or 3) Turn the ignition on, press and release the Volume Up button repeatedly on the steering wheel.
* If the ASWC was installed in a vehicle before: 2) Turn the ignition on, the led will flash slowly 3) Hold down the reset button for more then 2 seconds but less then 10 seconds, the led will start flashing rapidly 4) Perform action required for your particular vehicle as noted in the vehicle info sheet 5) After a couple of seconds the led should stop flashing and not light up for 2 seconds. At this point do not push any buttons.
Once all the information above has been verified and correct, refer back to the 2 sets of led flashes during the auto detect sequence. Here is what the flashes stand for: LED Feedback The 1st series of led flashes represent the wire(s) that are connected to the vehicle from the ASWC.
Manual Programming/SWC Button Reassignment: If your vehicle is not listed for auto detection by the ASWC on the Axxess website most vehicles can still be manually programmed to the ASWC by following these steps: * Note: Not every radio will have all the possible swc commands on the steering wheel. Aftermarket radios that do not have Bluetooth will not recognize the PTT (Push To Talk) or On Hook / Off Hook commands, however those buttons can be manually programmed to do other commands.
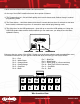
1. Volume Up 2. Volume Down 3. Seek Up/Next 4. Seek Down/Prev 5. Source/Mode 6. Mute 7. Preset Up 8. Preset Down 9. Power 10. Band 11. Play/Enter 12. PTT (Push To Talk) 13. On Hook 14. Off Hook 15. Fan Up 16. Fan Down 17. Temp Up 18. Temp Down * Note: Remember not all radios will have all these commands. Please refer to the radios’ owners manual for specific commands recognized by the radio.
) After 4 seconds of the led flashing quickly the led will go out for 2 seconds. 11) Then the led will flash, up to 9 times, depending on what radio the ASWC thinks it’s connected to.
4) If you have a different radio then Eclipse, press the Volume Up button again till the led goes solid red, then release Volume Up. You have now programmed Kenwood.
So let’s begin the remapping process: 1) Ideally having the ASWC visible is recommended since you can see the led flashes to confirm button recognition. 2) Turning off the radio is recommended 3) Within the first 20 seconds of turning the ignition on, press and hold down the Volume Up button for at least 25 seconds. 4) The led will light up solid red. Release Volume Up and the led will go out. Volume Up has now been programmed.
6) After the last button is programmed on your steering wheel (you do not have to go through the whole list), hold down the Volume Up button for at least 10 seconds then the led will go out. Or After the 18th button is programmed or skipped the led will go out and the remapping is completed. If for any reason after remapping the steering wheel controls you want to go back to the original steering wheel control settings, follow these steps: 1) Within the first 20 seconds of turning the ignition on.