Axxess ® Model 8690 User Guide Inter-Tel Protocol (ITP) Mode
NOTICE This Inter-Tel® Axxess® User Guide is released by INTER-TEL, INC. as a guide for endusers. It provides information necessary to use the Model 8690 endpoint. The contents of this user guide, which reflect current Inter-Tel standards, are subject to revision or change without notice. Some features or applications mentioned may require a future release and are not available in the initial release. Future product features and applications are subject to availability and cost.
CONTENTS PAGE FINDING YOUR WAY . . . . . . . . . . . . . . . . . . . . . . . . . . . . . . . . . . . . . . . . . . . . . . . . . . . 1 Welcome . . . . . . . . . . . . . . . . . . . . . . . . . . . . . . . . . . . . . . . . . . . . . . . . . . . . . . . . . . . . . . . . 2 About Your endpoint . . . . . . . . . . . . . . . . . . . . . . . . . . . . . . . . . . . . . . . . . . . . . . . . . . . . . . 3 Telephone Interface . . . . . . . . . . . . . . . . . . . . . . . . . . . . . . . . . . . . . . . . . . . .
CONTENTS PAGE Using Account Codes . . . . . . . . . . . . . . . . . . . . . . . . . . . . . . . . . . . . . . . . . . . . . . . . . . . . . 71 Screening Calls . . . . . . . . . . . . . . . . . . . . . . . . . . . . . . . . . . . . . . . . . . . . . . . . . . . . . . . . . 72 Using the Directories . . . . . . . . . . . . . . . . . . . . . . . . . . . . . . . . . . . . . . . . . . . . . . . . . . . . . 72 Programming Remote Feature Access . . . . . . . . . . . . . . . . . . . . . . . . . . . . . . . . . . .
FINDING YOUR WAY Finding Your Way SECTION CONTENTS PAGE Welcome . . . . . . . . . . . . . . . . . . . . . . . . . . . . . . . . . . . . . . . . . . . . . . . . . . About This Guide . . . . . . . . . . . . . . . . . . . . . . . . . . . . . . . . . . . . . . . . . . . About Your endpoint. . . . . . . . . . . . . . . . . . . . . . . . . . . . . . . . . . . . . . . . . Ports and Connectors. . . . . . . . . . . . . . . . . . . . . . . . . . . . . . . . . . . . . Optional USB Devices . . . . . . . . . . . . .
FINDING YOUR WAY WELCOME Your new Model 8690 is a network endpoint (telephone or other communication device) that provides communications services to your desktop. The Model 8690 supports two different modes of network protocols, and can operate in either Inter-Tel Protocol (ITP) mode or Session Initiation Protocol (SIP) mode. The operating mode determines which features and options are enabled on the endpoint. This guide is for endpoints operating in ITP mode.
Your Model 8690 is a desktop endpoint that uses the technology available with a Personal Data Assistant (PDA). The operating system on the endpoint is a customized version of Microsoft® Windows® CE .NET 4.2. The Model 8690 has a Liquid Crystal Display (LCD) touch screen that displays an interface with traditional telephone elements that include a display, dialpad, feature buttons, and menu buttons. A stylus pen provides access to elements on the interface.
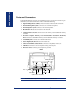
FINDING YOUR WAY Ports and Connectors Your Model 8690 also provides several different types of ports and connectors (pictured below) for advanced functions. These include the following: • Light Emitting Diodes (LEDs): Shows the status of the network connection. • External Microphone Jack: Connects to an external microphone. • External Speaker Jack: Connects to an external speaker. • Reset Button: Resets the connection to the network.
You can connect a standard USB keyboard to your Model 8690 endpoint using the USB client port on the back of the endpoint (see page 4). The operating system will automatically detect the device when the endpoint is powered on. You can configure the keyboard properties under Start - Settings - Control Panel - Keyboard. Instead of connecting an external keyboard, you can use the USB client port to connect a mouse.
FINDING YOUR WAY Power Requirements The Model 8690 should remain powered on at all times. The endpoint receives power from an individual power supply unit. It is important to use a power supply unit that is compatible with the endpoint. The Inter-Tel Universal Power Supply (part number 806.1119) is compatible with the Model 8690 and is available through Inter-Tel’s CommSource® division. It is recommended that you plug your endpoint’s power supply unit into an Uninterruptible Power Supply (UPS).
The Model 8690 user interface contains elements that simulate a traditional Inter-Tel six-line display endpoint. These elements allow you to place and receive calls and access endpoint and voice mail features from the Model 8690 just like a conventional Inter-Tel endpoint. The interface includes the following elements: • Navigation buttons: Provide access to UC views (see page 10). • Six-line display: Provides extension and system information and a menu for accessing additional options or features.
FINDING YOUR WAY Feature Buttons The feature buttons are designed to automate some of the commonly used functions, such as dialing an outside number. Each of these is described in the table below. BUTTON IF YOU... YOU CAN... PG. Mute Press Mute Mute the microphone. 19 Fwd Press Fwd Forward your calls. 48 Answer Press Answer Answer a call. Speaker Press Speaker Put a call on the speaker. 19 Press Outgoing and dial the number Place an outgoing call. 43 Press Hold Put a call on hold.
The six-line display area of the interface provides basic system information as well as a menu to access more advanced endpoint features. The first two lines of the display contain user and system information. The lower four lines of the display contain menu options that change according to the feature that you are currently using. To select an option on the menu, press the menu button closest to it. If there is only one option on a line, you can press the button on either side.
FINDING YOUR WAY Unified Communicator Elements Unified Communicator (UC) is a productivity tool designed to help you manage your communication effectively. UC allows you to interact with the software through personal computers, desktop phones, cell phones, handheld organizers, and speech. With multiple interfaces, you can access features and functionality, no matter where you are.
You can customize your endpoint’s appearance by selecting a “skin” and applying it to the interface. All skin options include navigation buttons, a display, a dialpad, and feature buttons. Skin options for the interface are shown below. Facets Retro Globe (Default Skin) Heavy Metal Flower Power To select a skin for the interface: 1. Press the system tray icon (see page 10), then select Options from the menu. The Options dialog box opens to the Session tab. 2.
FINDING YOUR WAY ABOUT THE OPERATING SYSTEM The operating system on the Model 8690 is a customized version of Microsoft Windows CE .NET V4.2. When you first power up your endpoint, the screen remains blank for approximately 10 seconds. After this period, the Windows CE .NET desktop appears, followed by the Loading Application Appearance dialog box. This dialog box signals that the telephone application is launching.
The operating system includes an on-screen keyboard function called the Input Panel. When a feature requires you to enter characters, the Input Panel pops to the front of the screen. To access the Input Panel, press the Input Panel icon ( ) located in the far-right corner of the taskbar. Then select LargeKB (large keyboard). You can relocate the Input Panel by pressing the title bar with the stylus and dragging it to another area of the screen.
FINDING YOUR WAY System Registry The information stored in the Windows CE .NET registry is not accessible. The registry contains a number of settings and preferences that are saved in two separate locations for backup purposes. To safeguard registry settings, it is recommended that you save the registry after you make changes to operating system preferences using the Control Panel, and to UC preferences using the system tray menu.
Voice mail is an application that is part of the Inter-Tel Voice Processor. With the voice mail application, you and other callers can send and receive recorded messages from any digital endpoint, multi-protocol endpoint, or other device on the telephone system. To use voice mail, each user is assigned a voice mailbox, which usually corresponds to a valid extension number. You can, however, have an “unassociated” mailbox that does not correspond to an extension.
FINDING YOUR WAY WHAT YOU SEE AND HEAR Your Model 8690 and the telephone system come equipped with many features. To help you understand what everything means, it is recommended that you read the following information before you use your endpoint: 16 • The endpoint has a 640x480 pixel LCD touch screen. To access the elements on the screen, use the stylus that is shipped with the endpoint.
It is recommended that you read the following guidelines before using your Model 8690 endpoint: • Consult your system administrator and your local Inter-Tel servicing company for important information about dialing emergency services from your Model 8690 before you begin using it. • There can only be one memory card (PCMCIA or CF) inserted when you power on the endpoint. If you use both types of memory cards, remove one card before powering up the endpoint.
FINDING YOUR WAY ENDPOINT BASICS Before you begin using your endpoint, take a moment to learn how to complete basic tasks such as adjusting the angle of the endpoint, using the speaker and the microphone, and using a headset. Adjusting Your Endpoint’s Viewing Angle Your Model 8690 has an adjustable base that allows you to tilt your endpoint to enhance the viewing angle. To adjust the viewing angle of the endpoint: 1. Position the bottom of the endpoint’s base on a flat surface. 2.
If you are not using a headset, you can talk handsfree using your speakers and microphone. The microphone has a mute feature, which, when enabled, allows you to hear the other party but they cannot hear you. (This does not put the party on hold.) You can also use the speakerphone for on-hook dialing, call monitoring, and background music. Mute Button To mute the microphone: Press Mute or the MUTE menu button. To turn the mute feature off: Press Mute or the UNMUTE menu button.
FINDING YOUR WAY Using the Message Button In today’s busy world, it’s almost guaranteed that you will call someone that is on another call, does not answer, or is in DND. But, with the Message button, you can let the other person know you called. When you leave a message, you can: • Have the called party return your call. When the party you called responds to the message indication, a call is automatically placed to your endpoint.
To retrieve a message (Message Indicator lamp is flashing): Lift the handset and press Message. A call is automatically placed to the endpoint or message center that left the message. (See page 25 for information about accessing your mailbox.) To select the message you want to answer first: 1. With the handset in the cradle, press the VIEW MESSAGE menu button to view the waiting message.
FINDING YOUR WAY VOICE MAIL BASICS To begin using your voice mailbox, you need to complete a few basic setup procedures to initialize your mailbox, customize your personal greetings, record your voice mail directory name, and access your mailbox. For additional voice mail options, see page 62. NOTE: All of the menu options used for voice mail features are presented as numeric entries in the following instructions. You can, however, access these options using the menu selection buttons on the display.
You can store two different personal greetings in your voice mailbox: a primary and an alternate. You can then select which greeting you want played when a caller reaches your voice mailbox.
FINDING YOUR WAY Recording Your Voice Mail Directory Name Your recorded name is used to identify you in the voice mail directory and to verify your mailbox number when messages are addressed to you. To change your directory name: 1. Access your mailbox as described on page 25. 2. Press 4 to select the Personal Options Menu. 3. Press 2 . Your current name is played. (Press 1 to replay your recorded name.) 4. Press 3 to erase and re-record your name. 5.
If you have a message waiting in your mailbox, you must access your voice mailbox to retrieve it. TIP: Generally, pressing # during any voice mail operation will advance you to the next step. For example, when leaving a voice mail message for another voice mail user, you can press # to skip the person’s introductory message and proceed directly to the recording phase.
FINDING YOUR WAY 26 Axxess® Model 8690 User Guide – ITP Mode
Getting Started SECTION CONTENTS PAGE Introduction . . . . . . . . . . . . . . . . . . . . . . . . . . . . . . . . . . . . . . . . . . . . . . . 28 Axxess® Model 8690 User Guide – ITP Mode GETTING STARTED Calibrating the Screen . . . . . . . . . . . . . . . . . . . . . . . . . . . . . . . . . . . . . . 28 Setting Backlight Options . . . . . . . . . . . . . . . . . . . . . . . . . . . . . . . . . . . 29 Configuring VLAN Ports. . . . . . . . . . . . . . . . . . . . . . . . . . . . . . . . . . . . .
INTRODUCTION GETTING STARTED Now that you know what your Model 8690 can do, it’s time to start using it. In this section, you’ll learn how to set system tray menu options, install software upgrades, and use basic endpoint and voice mail features. Most of the features in this section do not require the endpoint to be logged on to UC. For instructions on how to use UC advanced features on your endpoint, see page 81.
SETTING BACKLIGHT OPTIONS The default backlight timeout is four hours. You can select a different backlight timeout as explained below. NOTE: UC Message alerts (see page 106) and status alerts (see page 107) do not “wake” the screen, however software upgrade prompts (see page 38) do. To change the default value for the backlight timeout: 1. Press Start - Settings - Control Panel. 2. Double-press Display. 3. Select the Backlight tab. 4.
CONFIGURING VLAN PORTS To improve voice quality and security, your network administrator may place your endpoint in a Virtual Local Area Network (VLAN). GETTING STARTED A VLAN is a network of computers that behave as if they are connected to the same wire, even though they may be physically located on different segments of a LAN. VLANs minimize congestion on the network because they allow voice and data to be routed more efficiently.
USING THE SYSTEM TRAY MENU To access the system tray menu, press the system tray icon (see page 10) to display the menu. Menu-accessible options are discussed throughout this section. Setting Options The following instructions explain how to set the available options in the Options dialog box. Some of these settings require information you must obtain from your network administrator. To open the Options dialog box, press the system tray icon, then select Options from the menu.
Appearances Tab GETTING STARTED To set or edit options on the Appearance tab: 1. Select Specify alternate appearance to change the default skin (see page 11). 2. Select the UC functions where you would like to use large icons. You may want to use large icons so that screen items are easier to read. However, less information will be displayed.
Advanced Tab NOTE: Typically, you would enter the extension of the Unified Communicator telephone client (or an attendant) in this field. When the endpoint auto dials the UC telephone client, you can use the UC Voice User Interface (VUI) to issue voice commands such as, “Call Bob Smith” to make calls. Check with your network administrator to obtain your system’s telephone client number.
4. Enable or disable the following options: • Log to file: Diagnostics are logged to a file stored in the My Computer folder on the endpoint. This option is ON by default. NOTE: This file is stored in an area of the file system that will be lost if you GETTING STARTED reset the endpoint. If you are asked to provide this file to technical support, either copy the file off of the device, or copy the file to the Mounted Volume folder (My Computer\Mounted Volume) before resetting the endpoint.
Adding a .NET Passport NOTE: This option is only available when you are logged on to UC. NOTICE At the time of this publication, Microsoft had disabled connectivity to the MSN network for third-party products like Unified Communicator, in preparation for a licensing model which had not yet been disclosed. Currently, the .NET Passport dialog box allows you to enter information, but the functionality has been disabled.
Auto Upgrade and Pending Upgrades GETTING STARTED Although your endpoint automatically checks for upgrades, you can run the Auto Upgrade feature using the Advanced option on the system tray menu. If there are no new upgrades available, you will not be notified, and your endpoint will function normally. If there is an upgrade available, the Software Upgrade dialog box opens, and you are prompted to install the upgrade.
Station Password NOTE: This option is only available when you are logged on to UC. The station password allows you to quickly add your endpoint as a device to UC. 2. Enter your old password. 3. Enter a new password. 4. Enter the new password again to confirm it. 5. Press OK. Default Configuration The Default Configuration option restores the endpoint configuration to its default state.
INSTALLING SOFTWARE UPGRADES GETTING STARTED Periodically, your endpoint automatically checks for the following upgrades: • Firmware: You are notified that the upgrade is starting, and the client application continues to run. You can monitor the progress of the upgrade on the six-line display. When the upgrade is complete, the endpoint resets. • Phone Application: The client application exits and the upgrade application launches.
• Operating System: The client application exits, and the upgrade application launches. An upgrade of the operating system takes approximately 30 minutes to complete. CAUTION The upgrade application erases the existing version of the operating system from the persistent memory. Upon completion, the upgrade application downloads the new version of the operating system from the TFTP server.
When an upgrade is available, the Software Upgrade dialog box opens, and you are prompted to install the upgrade. To install the upgrade immediately, press OK. To install the upgrade later, you can set a reminder (see instructions below). When the reminder timer has expired, the Software Upgrade dialog box automatically prompts you to install the pending upgrade. GETTING STARTED To set a reminder to install an upgrade: 1. On the Software Upgrade dialog box, set the reminder timer using the drop-down box.
Placing Intercom Calls To place a non-handsfree call that will ring at the other endpoint until answered: Press # before dialing the extension number. NOTE: Dialing before the extension number forces the called extension to ring # and overrides the handsfree option. To program your endpoint to always send non-handsfree calls using the Ring Intercom Always feature: 7 7 With the handset in the cradle, dial 3 . The current status is shown.
Receiving Intercom Calls Your endpoint can receive both intercom and non-handsfree intercom calls. If the handsfree feature is enabled on your endpoint, intercom calls are automatically answered. Non-handsfree intercom calls (see page 41) override the handsfree option. GETTING STARTED If your handsfree feature is disabled, or if you receive a non-handsfree intercom call, you must pick up the handset or press the Answer button to answer the call.
Outside Calls With outside calls, you can talk to people who aren’t members of your telephone system. When you make an outside call, however, you must dial any area codes or long distance digits that your telephone company requires. Placing Outside Calls NOTE: If you see a request for an account code and hear a single beep, you must dial an account code before you can place your call (see page 71).
Receiving Outside Calls To receive an outside call: EITHER, Lift the handset. OR, Press Answer or the ANSWER menu button. GETTING STARTED Instead of answering a ringing call, you can press one of the following menu buttons: • SEND TO V-MAIL: Sends the call directly to your voice mailbox. This option is not available if you do not have a mailbox. • SEND TO DEST: Redirects the call to the intercom or outside number that you entered. (See page 50 for more information about the Redirect Call feature.
PLACING CALLS ON HOLD You can place calls on hold in one of two ways: individual or system. Individual Hold places the call on hold at one endpoint. It can then be directly picked up at that endpoint or it can be picked up at another endpoint using the Call Pickup (Reverse Transfer) feature (see page 48). • System Hold places the call on hold in the system. You can then pick up the call at any endpoint that has a flashing button for the call, including the endpoint that placed it on hold.
PLACING CONFERENCE CALLS With the Conference feature, you can establish a conference call with up to three intercom and/or outside parties (four, including you). GETTING STARTED To place a conference call: 1. While on the first call, press the CNF menu button to put the call on hold. 2. Place another intercom or outside call. 3. Press the CNF menu button to place the call on hold. (If necessary, repeat steps 2 and 3 to add another caller to the conference.) 4.
TRANSFERRING CALLS Although transferring calls is considered a basic function of an endpoint, the Model 8690 has many advanced options for this feature. With your endpoint, you can transfer a call to another extension, voice mail, or even an outside line. To Another Extension other endpoint. 2. Dial the desired extension number or press the IC DIRECTORY menu button to look up the number. To transfer to your message center, press the MESSAGE CENTER menu button. 3.
USING REVERSE TRANSFER GETTING STARTED The Reverse Transfer (Call Pick Up) feature allows you to answer a call that is ringing or holding at another endpoint. For example, if you are away from your work station and you are aware that a party is holding for you at your extension, you can pick up the call from any extension using the Reverse Transfer (Call Pick Up) feature. To answer a call ringing or holding at another endpoint: 1. Lift the handset and dial 4 . 2.
Manual Call Forwarding Manual call forwarding allows you to send incoming calls to another extension number. You can even forward calls to outside numbers, if your endpoint is programmed to allow this. • NO ANSWER: All incoming calls are forwarded if they are not answered before a timer expires. NOTE: Only the installer or system administrator can adjust this timer. • BUSY: When your endpoint is busy, all incoming calls are forwarded without ringing at your endpoint.
System Forwarding System Forwarding allows the system to automatically route calls based on the type of call and the status of your telephone. Although you cannot program the path of a system forward, you can enable or disable this feature on your endpoint. GETTING STARTED To enable or disable System Forwarding: 5 4 Dial 3 . NOTE: Manual forwarding overrides System Forwarding.
REDIALING A NUMBER The Redial feature allows you to quickly redial the last outside number you dialed. Although most phones redial the last number dialed, your system administrator can program your endpoint to redial the last number saved. For UC redial options, see page 89. To use the Last Number Saved feature (if enabled): • To save the last number dialed: While the endpoint is idle or while listening to intercom dial tone, press the REDIAL menu button.
4. When the message has finished playing, you have the following options: • Press 1 to replay the message from the beginning. • Press 2 to reply to the message. You have the following options: — Press 1 to leave a voice mail message for the caller. GETTING STARTED If the caller had a mailbox number, it will ask you to verify the destination by pressing # . If the number was not associated with a mailbox, it will ask you to enter a mailbox number.
Undeleting Messages If you accidently delete a voice mail message, you can retrieve it within a specific time frame (programmed by your voice mail administrator). Any retrieved messages are then restored to your saved-message queue. Messages that are not undeleted within the programmed time (up to 24 hours) are automatically erased. — Press 1 to replay the message. — Press 2 to reply to the message. — Press 3 to forward the message to another mailbox. — Press 4 to listen to the previous message.
Sending Messages GETTING STARTED To send a voice mail message: 1. Access your mailbox as described on page 25. 2. Press 2 . 3. Dial the desired mailbox number or group list number. 4. Press # to accept the subscriber’s name. 5. Record your message after the tone. While recording, you have the following options: • Press 2 to pause while recording. Then press any button to continue. • Press to erase and re-record your message. 3 6.
Canceling Unheard Messages You can cancel unretrieved messages that you have sent to individuals, but not messages that you sent to group lists. • Press 2 to add to the message. • Press 3 to forward the message to another mailbox. • Press 4 to listen to the previous message. • Press 5 to play the message envelope. • Press 6 to listen to the next message. • Press 7 to save the message in your mailbox. • Press 9 to delete the message. 6. Hang up.
USING DO-NOT-DISTURB MODE GETTING STARTED If you are away from your desk, or if you do not want to be disturbed, you can use the DND feature. This halts all pages and calls to your endpoint, except queue callbacks, recalls, and direct ring-in calls. When other users call your endpoint, they hear a repeating signal of four fast tones and, if they have a display endpoint, see the DND message you have selected.
3. If desired, customize the second display line by dialing the desired numbers or letters as described below: • Remain in numeric mode (Message lamp unlit): Press the dialpad buttons to dial the desired numbers. Press # for a hyphen (-), * for a colon (:), Fwd to leave a space, or Mute to backspace. • Change to alphanumeric mode (Message lamp lit): Press Message or the USE ALPHA MODE menu button and then press the dialpad buttons to enter the desired characters. (Refer to the chart below.
GETTING STARTED 58 Axxess® Model 8690 User Guide – ITP Mode
Moving On SECTION CONTENTS PAGE Introduction . . . . . . . . . . . . . . . . . . . . . . . . . . . . . . . . . . . . . . . . . . . . . . . Setting Preferences . . . . . . . . . . . . . . . . . . . . . . . . . . . . . . . . . . . . . . . . Endpoint Configuration. . . . . . . . . . . . . . . . . . . . . . . . . . . . . . . . . . . Voice Mail Options . . . . . . . . . . . . . . . . . . . . . . . . . . . . . . . . . . . . . . 60 60 60 62 Speed Dialing . . . . . . . . . . . . . . . . . . . . . . . . . . . .
INTRODUCTION In this section, you’ll learn how to program your endpoint, use directories, access your voice mailbox remotely, and perform various other functions. The features in this section do not require the endpoint to be logged on to UC. For instructions on how to use UC advanced features on your endpoint, see page 81. For additional programming information, see the Model 8690 Administrator’s Guide. SETTING PREFERENCES Your endpoint and voice mailbox are automatically set to specific defaults.
Selecting a Ring Tone The ability to change your ring tone is helpful in close-quartered environments. If your ring tone is unique, you can quickly identify when a call is ringing on your endpoint. To select the type of ring tone for your endpoint: 9 8 1. With the handset in the cradle, dial 3 . 2. Do one of the following to select your ring tone: • Press 0 or the RINGER OFF menu button for no ringing. • Press the PREVIOUS or NEXT menu button to scroll to the desired tone.
Enabling Automatic Call Answer The Automatic Call Answer feature determines whether or not you are automatically connected to a caller when you lift the handset (or press Answer ). If this feature is enabled, you are automatically connected when you go off-hook. If it is disabled, you must first lift the handset (or press Answer ) and then press the flashing button. To enable/disable this feature for ringing outside calls: 6 0 With the handset in the cradle, dial 3 .
Changing the Voice Mail Message Envelope When you receive a voice mail message, voice mail plays the message in an “envelope” that can include the time and date the message was left, the source of the message, and/or the message length. By default, the envelope contains all of this information, but you can change your envelope, as described below. Axxess® Model 8690 User Guide – ITP Mode 63 MOVING ON To change and save your message envelope: 1. Access your mailbox as described on page 25. 2.
Changing the Call Screening Transfer Method NOTE: The Call Screening feature is available only if it is enabled for your mailbox (ask your voice mail administrator). Depending on the transfer method you select, transferred calls from voice mail may be unannounced (as usual), or one of the following may occur: • “Announce Only” Calls: Before voice mail transfers a call to you, a prompt asks the caller to record his or her name. When you answer, you hear “You have a call from (caller’s name).
Changing the Message Search Order When more than one message is left in your voice mailbox, you can change the order in which you retrieve your messages, based on the date and time they were received. To change the listening order of your messages: 1. Access your mailbox as described on page 25. 2. Press 4 to select the Personal Options Menu. 3. Press 9 for More Options. 4. Press 2 for the Message Search Order. 5.
To set up remote messaging: 1. Access your mailbox as described on page 25. 2. Press 4 to select the Personal Options Menu. 3. Press 5 . NOTE: This option is not available if you do not have Remote Messaging enabled. 4. Press 1 to set up a primary cascade or press 2 to set up an alternate cascade. 5. Do one of the following. • To program a cascade level: Press 1 and enter the number of the level you wish to program (1-9).
SPEED DIALING Speed dialing allows you (and your system administrator) to store frequently dialed numbers for easy dialing. Each number is stored on your endpoint (Station Speed Dial) or in the telephone system (System Speed Dial) and is identified by a location number. Once programmed, you can quickly dial these numbers by entering a feature code and dialing the desired location number. Because the system supports both station and system speed-dial numbers, you can have access to over 1000 stored numbers.
4. Dial the extension number or telephone number to be stored, as described below: • Numeric mode (Message lamp unlit): Enter the number. NOTE: You cannot use hyphens or colons in the number. If your number includes an asterisk, pound, hookflash, or pause, use the menu buttons to enter the special character. • Press the ACCEPT menu button on the display to save the number.
USING RECORD-A-CALL NOTE: This feature is not supported on peer-to-peer (P2P) calls. Ask your network administrator if your endpoint is configured to use P2P audio. If your telephone system is equipped with a Voice Processor (voice mail), you may have access to the Record-A-Call feature. If so, you can record an ongoing call as a mailbox message. You can then retrieve the message, just as you would any other mailbox message. To use the Record-A-Call feature while on a call: 8 5 1.
PAGING The Paging feature allows you to make an announcement through endpoint speakers or external speakers (if your system is equipped with external paging equipment). To prevent announcements from transmitting through every endpoint in the system, this feature uses page zones. Each zone contains a different combination of extensions and external paging equipment, and is programmed by your system administrator.
PERFORMING A “HOOKFLASH” DURING A CALL Certain telephone service companies may require a timed hookflash (a quick hang up and release). To generate a hookflash while using a line: EITHER, Press the FLASH menu button. If the FLASH menu button is not visible, press MORE until you see FLASH. OR, Press and dial 3 3 0 . USING ACCOUNT CODES If your telephone system is programmed to use the Station Message Detail Recording (SMDR) feature, you might be required to enter account codes when you place a call.
SCREENING CALLS NOTE: This feature is available only if your telephone system is equipped with a Voice Processor (voice mail). If your voice mailbox is programmed correctly, you can screen calls that are transferred from voice mail. This allows you to accept and/or refuse specific calls. Depending on the transfer method you use, calls from voice mail may be unannounced, announce only, or screened calls (see page 64 for details).
To perform a directory search using your dialpad buttons: 1. If your endpoint is idle, press the DIRECTORY menu button, then press the menu button for the desired directory (IC DIRECTORY, OUTSIDE DIR, or FEATURE DIR). If placing a call, choose between OUTSIDE DIR and IC DIRECTORY. 2. Enter letters or numbers (up to 10 characters) as described below: • Remain in alphanumeric mode (Message lamp lit): Press the dialpad buttons to enter the desired characters.
Voice Mail Directory Whenever voice mail asks you to enter a mailbox number, you can use the mailbox and extension number directories. You can also use these directories to leave a voice message with another user. Like the telephone directory, you don’t have to enter the full name because the system finds the closest match based on your entry. To perform a directory search using your dialpad buttons: When prompted, press the buttons to enter the name.
PROGRAMMING REMOTE FEATURE ACCESS If you are away from your desk and forgot to put your endpoint in DND, don’t worry. With the Remote Feature Access, you can place your endpoint in DND or forward calls from any other endpoint on the system. And, if you have a special dial-up line, you can access your endpoint features from an outside line. Remote Access Password Before you use Remote Feature Access, you should program a password, as described below. To change the password from your endpoint: 9 2 1.
Remote Feature Access To access your endpoint from another endpoint: 1. EITHER, Call your Direct Inward System Access (DISA) number (provided by your system administrator). If required, enter your password. OR, Use any endpoint on the system. 5 9 2. Enter 3 . 3. Enter your extension number. 4. Enter your password followed by # . You can now use any of the following features. To change the station password using Remote Programming: 9 2 a. Enter 3 . b. Enter the new password, followed by # .
REQUESTING AGENT HELP NOTE: This feature is not supported on peer-to-peer (P2P) calls. Ask your network administrator if your endpoint is configured to use P2P audio. Your telephone system may be programmed to support the Agent Help feature, which allows you to request help from a designated “Agent Help Extension” (usually your supervisor) during a call. When your request call rings at the Agent Help Extension, the supervisor can choose to join the call or reject the request.
WORKING IN HUNT GROUPS Your system may be programmed with “hunt groups.” Hunt groups are groups of phones that share a common extension number in addition to having individual extension numbers. This allows someone to call anyone in the group (using the common extension) or a specific member (using the individual extension). The members of these groups and the common extension(s) are programmed by your system administrator.
Logging In and Out of ACD Hunt Groups Agents can log in to and out of the ACD hunt group at any time. While logged in, the agent receives calls through the ACD hunt group. When the agent is logged out, calls to that ACD hunt group bypass the agent. To log in to all of your ACD hunt groups at once using the ACD Agent Login/ Logout feature code: 2 8 With or without the handset lifted, dial 3 and enter your Agent ID, if necessary. The display shows AGENT LOGGED IN TO ALL ACDS, and you hear a confirmation tone.
When you log in to a group, you may be automatically connected to a call after you hear a short ring burst. If the ACD Agent ID Automatic Connect option is enabled for your hunt group and you are using a headset, you will be automatically connected. If this option is not enabled for your hunt group, the call will ring until you answer it or until it times out to another extension.
Using UC SECTION CONTENTS PAGE Introduction . . . . . . . . . . . . . . . . . . . . . . . . . . . . . . . . . . . . . . . . . . . . . . . Logging On and Off of UC . . . . . . . . . . . . . . . . . . . . . . . . . . . . . . . . . . . Using UC Views. . . . . . . . . . . . . . . . . . . . . . . . . . . . . . . . . . . . . . . . . . . . Placing a Call . . . . . . . . . . . . . . . . . . . . . . . . . . . . . . . . . . . . . . . . . . Changing Web Client Options . . . . . . . . . . . . . . . . . . . . . . . .
INTRODUCTION In this section you’ll learn how to log on and off of Unified Communicator (UC) and use UC views to access advanced endpoint features and presence management options. NOTE: Before you use UC on your Model 8690, you must create a UC account using the Web Client, which is the primary UC client that runs on your PC desktop (see page 83). In addition, some UC options can only be changed or implemented from the Web Client.
USING UC VIEWS This section provides instructions on how to use UC features and options from your Model 8690. Placing a Call The most common task you can complete using UC is to place a call.
UNIFIED COMMUNICATOR VIEW The Unified Communicator view displays an icon of your current status next to your current location in the upper-left portion of the screen. The icon indicates that you are available. The icon indicates that you are unavailable. On the right side of the screen, there is a drop-down list that contains all of your saved status entries. You can use this list to change your status to any of the saved status entries.
Performing a Search NOTE: You must use the Web Client to use the Advanced Search function. ALSO: Unified Communicator will automatically try to eliminate duplicate results from the search results list. If the search matches an account, as well as one or more devices owned by the account, the search results only display the matching account. The type-ahead search function allows you to search for contacts, accounts, or devices.
Search results appear in a table under the following columns as you type: • Name: Indicates the type of contact displayed with an icon and the contact or device name. If the contact is an account or a device in your address book, the icon also indicates the current status. If the contact is an account or device that is not in your address book, the icon indicates the result type, but it will indicate an unknown status.
To perform a search: 1. Press Unified Communicator on the endpoint display. 2. Press Search. 3. Use the Input Panel to enter search information by contact or device name or by number. 4. When the search is complete, do any of the following: • To add the search result to the address book or speed-dial list: a. Select the search result. b. Press Add to Address Book or Add to Speed Dial. Adding a contact to your speed dial-list automatically adds it to your address book.
Redialing a Number The Redial feature displays the last five outgoing calls (from the call log) as buttons containing information about the call. You can press one of the buttons to place a return call. To redial a number: 1. Press Unified Communicator on the endpoint display. 2. Press Redial. The Redial dialog box appears. 3. Press one of the five buttons in the list. The Call dialog box appears. 4.
Working With the Speed-Dial List If you have added contacts to your speed-dial list, the list is located below the Search, Redial, and Favorites buttons (the location may vary depending on the display skin used). The speed-dial list provides quick access to frequently called numbers and shows the current status of accounts and devices. NOTE: If you have several speed-dial entries, they are displayed (in alphabetical order) on two or more pages labeled “Page 1,” “Page 2,” etc.
MESSAGES VIEW The Messages view displays a list of voice mail, station, and system messages. Additional details are provided when pressing . The messages are listed in a table containing the following columns: • From: Specifies the message type. This column also indicates the number (and the name, when available) of the caller that left the station or voice mail message. If the message is a system message, this column displays the message.
CALL LIST VIEW The Call List view displays a list of your current calls. These include calls that are ringing, connected, or holding. The Call List view automatically appears any time you place or receive a call and remain active until you navigate to a different view. When the last call in the list ends, the previous view is displayed. You cannot sort the call list. The call list shows all call activity for every device you own (in addition to the Model 8690).
• Number: Indicates the number (if known) of the party on the other end of the call. • Call Control Buttons: Below the call list, buttons appear that allow you to control the selected call(s). If you select a call from the call list, the state of the call determines which Call Control buttons are displayed. Call Control buttons include: Places the selected call on hold. This button is only present if the selected call is in a connected state. Answers the selected call.
To save a new telephone number for an identified contact: 1. Select the contact type to associate with the number (e.g., Mobile, Home, etc.). 2. Press OK to store the number or Cancel to cancel. 3. Select the check box if you do not want to be prompted to save telephone numbers in the future. You can also set this preference by navigating to My Account on the Web Client. To place a call on hold: 1. Select the call you want to place on hold. 2. Press The . icon indicates that a call is on hold.
To create a conference call, use one of the following options: • To conference selected or holding calls: Select two or more connected or holding calls in your call list. Press . • To conference all calls: With one call selected, press . The selected connected and/or holding calls disappear from your call list, and a new conference call appears. NOTE: is only present if you have two or more calls in your call list that can be conferenced.
CALL LOG VIEW The Call Log view allows you to view a history of your recent calls. For each call, you can view call details such as the call type, date and time of the call, and the name and number of the person that called. If a call in the log was from another UC account or device, the current account/device status is also displayed. You can return a call directly from the call log, and you can add a call log entry to your address book.
• Name/Number: Displays the name and number of the caller or called party (if available). If the name/number is not recognized, UC indicates that the called party/caller is unknown. If the caller is a device or account (or a contact linked to a device or account), this column also displays the caller’s current status as an icon. If the caller exists in your address book, the caller’s current status is always displayed and is updated in real time as the status changes.
To return a call: 1. Press Call Log on the endpoint display. 2. Double-press the endpoint icon next to the entry. 3. Select from any of the following options: • Press one of the numbers in the list to initiate a call to that number. • Press Find Me to place a call to the account’s primary device, allowing the account’s call routing rules to route the call to the appropriate location.
Call Details Dialog Box The call log Details dialog box displays the following call information: • Type: Displays the call type (incoming or outgoing) with an icon (see page 95) and text. • Date/Time: Displays the date and time the call came in. • Name/Number: Displays the name/number of the caller/called party. An icon indicates the current contact status if the entry corresponds to an account or a device. See page 96 for a description of the icons.
ADDRESS BOOK VIEW NOTE: You must use the Web Client to Synchronize your UC Address Book and to add, edit, and delete Groups. The Address Book view is where you store and work with your contact information. The address book stores two types of contacts: static and linked. Linked contacts are associated with an account or device on the telephone system, and display a real-time status. Static contacts contain information about a person or company you manually added to the address book.
Filtering Address Book Contacts The tabs located along the bottom of the Address Book table allow you to filter contacts. To filter the contact list: 1. Press Address Book on the endpoint display. 2. Filter the address book contacts, using either or both of the following methods: • Press the following tabs to filter a subset of your contacts: — #: Filters contacts to display only those names that start with non-alphabetic characters. — ABC through YZ: Filters contacts by the selected letter(s).
To check contact status: 1. Press Address Book on the endpoint display. NOTE: The Status column displays the real-time status for the contact. Simple contacts (contacts that are not linked to an account or device on the system) will not display a status. Contacts linked to system accounts and devices can display one or more of the following icons: Indicates that the status of the user is currently unknown. Press this icon to retrieve a snapshot of the status.
To add a simple contact to your address book: 1. Press Address Book on the endpoint display. (The list appears empty if no contacts have been added.) 2. Press Add Contact. 3. Enter the following information for this contact: • Name (see page 104) • Work (see page 104) • Home (see page 105) 4. Press OK. The information is saved for your address book, only and the newly added simple contact appears in the address book.
Adding a Linked Contact A linked contact is connected to a UC account or device in the system. Like simple contacts, linked contacts also store contact information. Unlike simple contacts, linked contacts also display real-time status information for the account or device to which they are linked. To add a linked contact, either use the type-ahead search (see page 85) or the call log main screen (see page 95). To add a linked contact: 1. Press Unified Communicator on the interface, then press Search. 2.
To access and edit address book contact information: 1. Press Address Book on the interface. The Address Book view appears. 2. Press the contact you want to edit, then press Edit. You can also double-press the contact to enter edit mode. NOTE: This panel provides full access to all of the contact information as it appears in the database. To edit your personal information, use the Web Client from your PC. 3.
— Work Pager Number (64-character limit) — Work Pager Number (64-character limit) — Work Web Page (2048-character limit) NOTE: Include http:// in the Work Web Page address.
CALL ROUTING VIEW NOTE: You must use the Web Client to set up your Call Routing rules and to create Greetings. The Call Routing view allows you to view and enable or disable the call routing rules you created on your PC desktop using the UC Web Client. To enable call routing, select the Enable call routing option under the displayed call routing rules. To view call routing rules: 1. Press Call Routing on the endpoint display. The list of call routing rules appears. 2.
Receiving Status Change Alerts The Status Change alert appears any time a status of someone in your UC speed-dial list changes. The alert information differs as follows: • If the contact in your speed-dial list is a device: The alert indicates the person whose status changed and the new DND status of the device. • If the contact in your speed-dial list is an account: The alert indicates the person whose status changed and the account’s new status description.
USING UC 108 Axxess® Model 8690 User Guide – ITP Mode
Learning More SECTION CONTENTS PAGE Introduction . . . . . . . . . . . . . . . . . . . . . . . . . . . . . . . . . . . . . . . . . . . . . . What the Administrators Can Do for You . . . . . . . . . . . . . . . . . . . . . . Frequently Asked Questions (FAQs) . . . . . . . . . . . . . . . . . . . . . . . . . . Default Feature Codes . . . . . . . . . . . . . . . . . . . . . . . . . . . . . . . . . . . . .
INTRODUCTION If you want to know more about your endpoint and voice mail system, this is the section for you. With additional information and FAQs, you should be able to find answers to most of your questions. NOTE: Because the telephone system is very flexible and programmable, the procedures for using the features might vary slightly from the descriptions in this guide. If so, your trainer or system administrator can tell you how your system differs and how to use the features.
FREQUENTLY ASKED QUESTIONS (FAQS) This section includes some of the most frequently asked questions. If you have problems with your endpoint or voice mailbox, refer to this section before you contact the appropriate administrator or your local Inter-Tel dealer. Q1. How do I program System Speed-Dial numbers? A1. Only your system administrator can program System Speed-Dial numbers.
LEARNING MORE Q7. Why don’t the local telephone company star codes (i.e.*82, *69, etc.) work when I press the Outgoing button or use the Outgoing Call feature code ( 8 by default) to call an outside number? A7. Rather than pressing the Outgoing button or 8 to access an outside line, you must dial a Select Line Group number before you can use the star codes. For example, if your system is using the default Select Line Group numbers, dial 92001 to access that line.
Q13. When I set my preferences using the Options dialog box, I opted to use large icons. Because the large icons and text take up so much area in the tables that display the information, how can I see all of the information that is displayed? A13. The large fonts option (see page 32) increases the size of the text and icons when the information is presented in a table format such as the Address Book view, Call List view, etc.
DEFAULT FEATURE CODES The following table lists the default feature codes for the telephone system. Check with your system administrator to see if the feature codes used in your system have been changed. Use the blank spaces below to enter custom feature codes, if necessary.
GENERAL FEATURE CODES (CONTINUED) FEATURE CODE 312 319 315 316 317 336 335 330 322 323 324 365 366 368 Axxess® Model 8690 User Guide – ITP Mode NEW CODE 367 314 7 325 392 6 385 380 331 305 306 359 4 377 398 304 382 383 352 353 354 381 346 345 115 LEARNING MORE FEATURE NAME Group Listen Handsfree On/Off Headset On Headset Off Headset On/Off Hold – Individual Hold – System Hookflash Hunt Group Remove Hunt Group Replace Hunt Group Remove/Replace Message Message – Cancel Message Left Message – Cancel Me
LEARNING MORE NOTES 116 Axxess® Model 8690 User Guide – ITP Mode
Index .
Changing call screening transfer method 64 fax destination number 64 message envelope 63 message search order 65 personal greeting 23 remote feature access password 76 transfer method 64 voice mail message envelope 63 voice mailbox password 62 volume levels 60 Web Client options 83 your status 84 Checking Contact’s Status 101 Checking Messages 90 Compact Flash (CF) Port 4 Composite Status, Current 99 Conference Calls 46 Connecting a Headset 21 Contacts accessing and editing 105 adding linked 103 E-mail addr
F Favorites 88 Favorites Button 88 Fax Destination Number 64 Feature Buttons 7, 8, 11 Features account codes 71 agent help 77 automatic call answer 62 background music 61 call waiting 44 conference 46 default endpoint 62 do-not-disturb 56 group listen 19 handsfree 42 hold 45 hookflash 71 hunt groups 78 individual hold 45 last number dialed/saved 51 manual forwarding 49 mute 19 paging 70 queue 41 record-a-call 69 redial 51 redirect 50 remote feature access 75 reverse transfer 48 ring intercom always 41 ring
Log Off 82 Log On 82 Logging In and Out of ACD Hunt Groups 79 Logging On and Off of UC 82 M Mailbox 15 full, almost full 25 unassociated 15 Making an emergency call 44 pages 70 Making and Receiving Calls 23, 40 Manual Call Forwarding 49 Members, Hunt Group 78 Menu 9 Menu Buttons 7 Message button 20 count 25 envelope 63 notification 66 search order 65 Message Indicator Lamp 3, 5, 16 Messages station 90 system 90 voice mail 90 Messages View 90 Messaging, Remote 25 Microphone 3, 46 Model 8690 (Photo) 3 Model
Q Queue the Line 41 R Receiving incoming call alerts 107 intercom calls 42 new message alerts 106 outside calls 44 status change alerts 107 Record-A-Call 69 Recording personal greetings 23 voice mail directory name 24 Recording a Call 93 Recovering Deleted Messages 53 Redial 88 Redialing a Number 51, 88 Redirect Calls 50 Remote Access Password 75 Remote Feature Access 76 Remote Messaging 25 Requesting A Callback (Queue) 41 Reset Button 4, 5 Responding to a Waiting Call 44 Responding to Agent Help 77 Retrie
T system tray menu 30 the message button 20 Taskbar 12 Technical Support 113 Telephone Directory 72 Telephone Interface 7 Temporary Composite Status 84 Temporary Status 84 Terminating the ACD Agent Call 80 the speakers and the microphone 19 UC on your endpoint 83 UC views 83 voice mail messages 51 V Timers 49, 80 Viewing Call Details 98 Touch Screen Backlight 16, 29 Viewing Call Routing Rules 106 Transfer Button 93 Viewing Speed-Dial Numbers 68 Transferring Calls 47, 93 Virtual Local Area Networ
VOICE MAIL FLOWCHART NOTE: At any menu level, you can press ACCESSING YOUR MAILBOX • EITHER, Press the Message button to respond to a message from voice mail. OR, Call the voice mail extension number, press , and enter your mailbox number. • Enter your password and then # . SUBSCRIBER MAILBOX MENU to cancel or return to the previous menu or press # to accept.
Part No. 550.8116 Issue 8.