
User's Manual
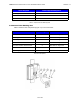

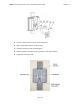
Table Of Contents
- 1 Preface
- 2 AB-MAX Product Overview
- 3 Pre-Installation
- 4 Installing the Mounting Poles
- 5 Radio Installation
- 6 Installing the Interconnect Cables
- 7 Grounding the System
- 8 Installing the NIA/Power Adapter Hookup
- 9.0 Configuring the ABMAX Access Point Base Station
- Appendix A: Glossary of Terms and Abbreviations

ABMAX ACCESS POINT INSTALLATION AND MAINTENANCE GUIDE VERSION 1.1
15
OF 39
4 Installing the Mounting Poles
First install the mounting poles, on which you will mount the outdoor transceivers.
Bear in mind the direction in which the transceivers will point.
Attention! The mounting pole must be mounted in a vertical position. Failure to do so may
result in improper alignment of the outdoor transceiver. If you need to tilt the transceiver
down to avoid self-interference in a cellular-style deployment, you should use an (optional)
tilt bracket.
Warning! The mounting pole must be grounded. See Section Grounding the System .
4.1 Installing On an Antenna Mast
1) Position the mounting pole on the antenna mast.
2) Insert the U-bolts around the mast (Figure 4-2) and through the holes in the mounting pole.
Install a washer and nut to each side of the threaded U-bolt and hand tighten. Repeat this
step for the second U-bolt.
3) Tighten nuts equally until mounting pole is secure and cannot rotate.
Figure 4-2 Mounting Pole Installed on Pole or Antenna Mast
4.2 Installing On Brick or Masonry
1) Place the mounting plate against the wall (Figure 4-3:). Use a level or plumb line to set the
mounting pole perpendicular to the ground.
2) Mark the hole locations.
3) Set the pole aside.
4) Drill ¼ inch holes at the marked locations. Drill the holes approximately ½ inch deep.
5) Insert the expansion shields into the drilled holes and tap them home.