
Installation Manual Part 2

Company Proprietary
Adaptive Broadband
U-NII Product Installation Manual 05/29/2001
7-4
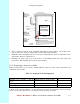
7.2.2 Installing on a Wall with Wood Siding
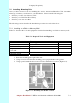
Table 7-2 describes the tools and equipment needed when installing on a wall with wood siding.
Table 7-2 Required Tools and Equipment
Tools Equipment Quantity
Power Drill Mounting pole 1
1/8 inch drill bit #6 wood screws 4
Bubble level or plumb line Spacers 1
Phillips head screwdriver or
power drill
1
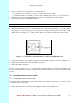
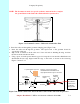
1. Place the mounting plate against the wall. Using a level, be sure that the mounting
pole is perpendicular to the ground.
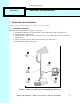
This procedure is similar to that shown previously in Figure 6-2.
Note that when mounting on clapboard siding, you may need to use spacers to make
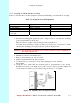
sure that the mounting pole is perpendicular, as shown in Figure 6-4.
Attention!
The mounting pole must be in a vertical position for proper alignment of
the outdoor transceiver.
2. Mark the locations for the drilled holes.
3. Remove the mounting pole and set it aside.
4. Drill 1/8 inch diameter in the places marked.
5. Use #10 or #12 wood screws to secure the mounting pole to the wall and
hand tighten.
6. Using the level, check that the mounting plate is perpendicular to the ground.
Readjust if necessary (you might need to add or remove spacers) and then tighten all
screws with a screwdriver or power drill, being careful not to over tighten.
Figure 7-4 Mounting Pole on Clapboard Siding