
Installation Manual Part 2

Company Proprietary
Adaptive Broadband
U-NII Product Installation Manual 05/29/2001
9-1
9 Testing the System
9.1 Introduction
This section explains how to:
• Power up your AB-Access System
• Use a PC (known as the Test PC) to check the alignment of your outdoor transceiver
• Make sure you have the best connection to your service provider.
Attention!
This operation may need two people – one to operate the Test PC and one
to align the outdoor transceiver.
Note: For purposes of AB-Access Extender, the two ends of the AB-Access Extender link appear
like
static
point-to-point AP and SUs with respect to testing.
9.2 Equipment Required
You will need the following equipment to test your AB-Access System:
• Standalone PC or laptop (Test PC) with a web browser (e.g., Netscape Navigator 4.5 or
higher, Internet Explorer 4.0 or higher).
• Standard 10Base-T Ethernet cable with RJ-45 connectors to connect the Test PC to the
indoor junction box.
You will also need to know the correct IP address and subnet mask to configure the Test PC.
Your service provider should have supplied these. The defaults for an SU are 192.168.3.254
Netmask 255.255.255.0.
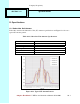
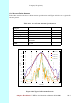
9.3 Testing
In order to be able to check the alignment of your outdoor transceiver, along with the connection
to your service provider, you need to know how to configure an IP address and subnet mask. If
you are not sure how to do this, look in the manual that came with the PC you are using as the
Test PC. You could also check the online help.
9.3.1 Connecting Test PC
1. Connect the Test PC to the indoor junction box using a standard 10Base-T Ethernet cable
(with RJ-45 connectors).
2. Insert the power plug adapter into the indoor junction box.
3. Insert the AC power plug into an AC outlet.
4. Check the LEDs on the junction box.
SECTION 9
Testing the System