
Installation Manual Part 1

Company Proprietary
Adaptive Broadband
U-NII Product Installation Manual 05/29/2001
6-7
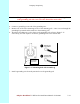
TBD: Update this section for AB-Access Extender – insert photo of correct tilt bracket connected
to Extender
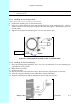
6.6.1 Installing the Access Panel
You will probably install the Access Panel in a rack, along with the anchor switch and other
associated equipment. However, keep in mind that the access panel should be:
• Located where you can easily connect to a power supply.
• Close to the anchor switch.
• Accessible for service and troubleshooting.
• Protected from rain and extremes of temperature (it is designed for indoor use).
6.6.2 Installing The Interconnect Cables
For each interconnect cable, you will need to perform the following steps.
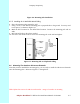
6.6.2.1 Route The Cables
4. Select where the cable will enter the building from the outside.
5. Determine the length of cable required. Allow three extra feet on each end to allow for strain
relief, as well as any bends and turns.
6. Route the cable.
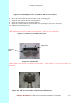
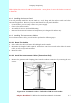
6.6.2.2 Install the Interconnect Cables (Transceiver End)
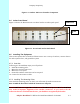
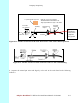
3. Remove the grommet and clamping plate from the outdoor transceiver by removing the two
screws.
Figure 6-10 Grommet Location - Underside of AB-Access Extender