
Installation Manual Part 1


Company Proprietary
Adaptive Broadband
U-NII Product Installation Manual 05/29/2001
4-5
4.4.1 Access Panel Installation Steps
1. At the Access Panel, be sure all power switches are set to
OFF
.
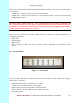
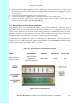
2 Determine ports to be used on the Access Panel, and set jumpers on rear of panel to desired
setting (either Ethernet or ATM). Reference the following Figure 4-3.
Figure 4-3 Access Panel Jumpers
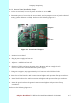
3. Position Access Panel
4. Plug in power supply and turn on.
5. Adjust to +48VDC and turn off.
6. Obtain red, black, and green 18 gauge wire. Measure and cut enough of each
color to connect the Access Panel to the power supply.
7. Using wire strippers, strip approximately 1/4" from one end of all three leads.
8. Insert the red lead into the +48V connection and tighten with precision flat tip screwdriver.
8. Insert black lead into the -48V connection and tighten with precision flat tip screwdriver.
9. Insert the green lead into the ground connection and tighten with precision flat tip
screwdriver.
Reference the following Figure 4-4.
Jum
p
ers
Jumper
Configuration