
User's Manual
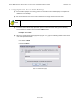
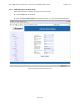
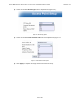
Table Of Contents
- 1.0 Preface
- 2.0 Introduction
- 3.0 Installation
- 3.1 Compliance Alert - Operation in the 3.4 - 3.6 GHz Band
- 3.2 Operation in the 3.650 - 3.675 GHz Band
- 3.3 Installation Warnings
- 3.4 Environmental Cautions
- 3.5 Installing Outdoor Equipment
- 3.6 Installing an Optional Sector Antenna
- 3.7 Installing Optional Omnidirectional Antenna
- 3.8 Installing the Access Point
- 3.9 Power and Data Connections - AC and DC Power Options
- 4.0 Configuring an Access Point for Single-Channel Use
- 5.0 Maintenance Guide
- Appendix A: NIA/Power Adapter Specifications: Model # TR60A-POE-L
- Appendix B: ExcelMax DC PSU/NIA (020-44109-0802)
- Appendix C: Glossary of Terms and Abbreviations

EXCELMAX ACCESS POINT CELL INSTALLATION AND MAINTENANCE GUIDE VERSION 1.4
51
OF 65
4.1 Logging into the Access Point Web Page
1) If the installer laptop is not running, power on and wait for the installer laptop to complete ini-
tialization to the desktop.
2) Set the IP address to be on the same network as the single-channel Access Point.
3) To run the Access Point setup operation, open an internet browser and type the following
Access Point’s IP address in the browser Address field:
Example: 10.1.1.254
4) Whe
n the authentication popup appears (Figure 4-1:), type the following default values in the
user name/password fields:
User Name: admin
Password: admin
Figure 4-1: Authentication popup
Note
The Access Point default IP address is 10.1.1.254, and the netmask is 255.255.255.0.
N