
User Guide
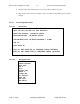
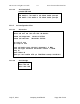
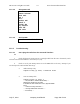
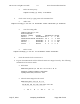
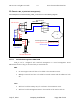
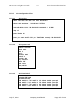
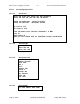
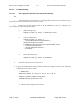
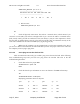
Table Of Contents
- Revision History
- PLEASE READ THESE SAFETY PRECAUTIONS!
- Document Overview
- AB-Access Overview
- AB-Access
- RF Design and Planning
- Static Configurations
- CLIP_T
- CLIP_S
- Hybrid CLIP_S
- 1483_T
- 1483_S
- Native ATM
- Extender
AB-Access Config & User Guide 5.5 Axxcelera Broadband Wireless
July 27, 2004 Company Confidential Page 104 of 129
• Delete an atmarp entry
root@cs1 11:13:42 (6) [~] # atmarp -d 192.168.2.50
3. Check route on CS, by typing route at the Command line.
• Add a route
root@cs1 11:17:19 (8) [~] # route add -net 192.168.100.0 netmask 255.255.255.0 gw 192.168.2.50
• View the routing table
root@cs1 11:18:51 (9) [~] # route
Kernel IP routing table
Destination Gateway Genmask Flags Metric Ref Use Iface
10.9.144.1 * 255.255.255.255 UH 0 0 0 eth0
192.168.100.0 192.168.2.50 255.255.255.0 UG 0 0 0 atm0
192.168.2.0 * 255.255.255.0 U 0 0 0 atm0
10.9.144.0 * 255.255.255.0 U 0 0 0 eth0
127.0.0.0 * 255.0.0.0 U 0 0 0 lo
• Delete a route
root@cs1 11:20:26 (10) [~] # route del -net 192.168.100.0 netmask 255.255.255.0
4. Check the Switch for the correct PVC’s.
• Log into the ATM switch and check that the PVCs are mapped correctly. The following
commands are for an FVC switch.
• Add a PVC
ADMIN Access_NGI>set pvc add 101 0 34 be 102 0 34 be
Adding PVC i=101/0/34 o=102/0/34 to switch fabrice
Updating FLASH memory. Please wait ... Done.
• Show the PVCs mapped in the switch
ADMIN Access_NGI> show pvc list id 0
------------------------------------------------------------
PVC ID IPort IVPI IVCI BW OPort OVPI OVCI BW
------------------------------------------------------------
1 101 0 34 0 102 0 34 0