
User manual


203
10.3.2 Using Protocol Linking to Overcome Limitation in Single Line
Perfusion Protocols
One limitation of the current version of WinLTP is that there are only 4 different sweeps available to load
in different rapid perfusion changes. However, patch-clamp automated perfusion changes can
realistically involve at least 16 different perfusion solutions (3 antagonist and 12 agonist+antagonist
solutions in the following example). With the future addition of 8 PulseSweeps and 8 TrainSweeps for a
total of 16 different sweeps, 16 different perfusion solutions can be delivered in one protocol file. And with
the future addition of increment/decrement of epoch voltages will also allow at least 16 different solutions
to be delivered in one protocol file.
However, as an alternate solution to this problem now, we have implemented Protocol Linking in WinLTP
2.00 (Chapter 9). With Protocol Linking, once a protocol has finished (for example after applying 4
different agonist+antagonist solutions during the sweeps), WinLTP can now load and start the second
protocol containing 4 more different solution changes, and then load and start the third protocol containing
4 further different solution changes, and can do this, ad infinitum. Also, even if we had implemented our
16 sweeps for applying 16 different solutions during sweeps, it is very conceivable that a researcher
would want to deliver 32 different solutions and therefore would have to use Protocol Linking anyways.
Figs. 9.1.1 and 10.3.2.1 show an example of using Protocol Linking with Fast Perfusion link three different
protocol files to continuously perfuse solutions containing 3 different antagonist concentrations, and
momentarily rapidly apply 4 different agonist concentrations with the different antagonist concentrations -
ie apply 15 different solutions.
Figs. 9.1.1 shows the Protocol Linking section of the first protocol file which is set to Load the second
protocol file "FastPerfusion2.pro" when the first protocol self-terminates. The AutoStart check box is also
checked so the second protocol will automatically start running.
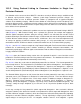
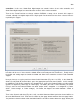
Fig. 10.3.2.1 shows the results after the third linked protocol file has finished. The first two protocol files
have already finished. The first protocol file (FastProtocol1.pro) delivered Antagonist 1, then Antagonist 1
+ Agonist 1, then Antagonist 1 + Agonist 2, then Antagonist 1 + Agonist 3, then Antagonist 1 + Agonist 4.
The second protocol file (FastProtocol2.pro) delivered Antagonist 2, then Antagonist 2 + Agonists 1 to 4,
and the third protocol file (FastProtocol3.pro) delivered Antagonist 3, then Antagonist 3 + Agonists 1 to 4.
The Protocol Builder (big panel on left) shows that when the third protocol file auto-starts, the Perfuse
statement causes Ch3, Antagonist 3 solution to be continuously perfused. Then four different sweeps
(P0, P1, T0 then T1) are output 4 times. Each sweep contains a 1000 msec output of Antagonist 3 +
Agonist 1 (P0sweep, Ch12), Antagonist 3 + Agonist 2 (P1sweep, Ch13), Antagonist 3 + Agonist 3
(T0sweep, Ch14) and Antagonist 3 + Agonist 4 (T1sweep, Ch15, shown in the bottom two panels). For
T1sweep, setting the Step1 Amplitude (V) to 15V turns on Ch 15 perfusion (bottom left panel, black
rectangle).
In this way, running the first protocol file (which output with Antagonist 1 alone and with 4 different
antagonist solutions) then loaded and started second protocol file (which output with Antagonist 2 alone
and with 4 different antagonist solutions), which then loaded and started the third protocol file (outputting
Antagonist 3 and with 4 different antagonist solutions). The top right Analysis Graphs panel shows DC
output voltages for turning on the Chs 1-3 antagonist solutions and Chs 4-15 antagonist + agonist