
User manual


178
The first method is to use a Continuous Flow To Waste system. With some systems that use three way,
normally open – normally closed, pinch valves such as those from ALA Scientific and Warner, the tubing
between the reservoir and the manifold is placed in the Normally Closed slot of the pinch valve and only
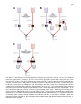
opens when that perfusion channel is turned on. The tubing flowing to waste is connected by a ‘Y’
connector between the reservoir and the pinch valve is placed in the Normally Open slot of the pinch
valve and aerated solution normally flows to waste until that perfusion channels is turned on and the
Normally Open line is shut (Fig 10.2.4.1C). With the three way Normally Open – Normally Closed pinch
valve, either the Normally Open OR the Normally closed line so that only one is open at one time.
Provided that the flow in the Normally Open Continuous Flow To Waste line is (just) sufficient to provide
aerated solution at the ‘Y’ connector, and that the solution you are perfusing is relatively inexpensive, this
can be a good substitute for the 2 valve pre-flush system.
Sometimes, a combination can be used. For example, for an 8 valve system which normally would
normally deliver 4 solutions using pre-flush (2 valves/line), you could have three perfusion lines with
expensive solutions using pre-flush 2 valves/line, and two perfusion lines with inexpensive solutions using
the Continuous Flow To Waste 1 valve/line system.
The second method to get around using an expensive 2 valve/line pre-flush system is to mount the
syringe reservoir directly on top of the pinch valve, as with Automate systems. This makes the
perfusion line from the reservoir to the pinch-valve as short as possible. This can be done if the reservoir
(a syringe) is mounted right on top of the pinch valve, as with Automate systems. However, unless you
are perfusing room temperature solution, the solution has to be directly warmed by a heater directly
surrounding the syringe, such as Automate’s BubbleStop heater.
10.2.7 Setting up WinLTP to use your Automated Perfusion System
To use automated perfusion control for extracellular slice experiments in WinLTP, first check the Slow0
Automated Perfusion check box. Then set whether you want to use the standard perfusion system with 1
valve/line, or the pre-flush system with 2 valves/line, and set the number of perfusion channels you need.
You do this by going to the Edit Protocol dialog box (using File -> Edit menus), click on the Resources
Used tab and then enter the Digitally Controlled Perfusion System dialog box selection (Fig. 10.2.7.1).