
Operating instructions


Maintenance
19
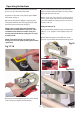
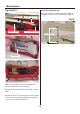
Checking & Replacing the Motor Brushes
After a period of time the scroll saw’s motor brushes
are due to wear and may need replacing, please
follow the instruction below for checking and
replacing the brushes.
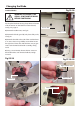
1)
There are two motor brush ports one on either side
of the machine, using a small flat head screwdriver
remove one of the motor’s brush access plugs and
place safely aside, see fig 35-36.
NOTE: Be careful when removing the plug, the motor
brush is sprung loaded.
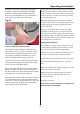
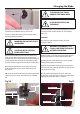
NOTE: Take careful note of the orientation of the
brushes when you remove them, remember that
they have bedded themselves to the profile of the
commutator in that position. If you fit them reversed
they may not be in exactly the same position, which
can cause excessive sparking and heat until they
have re-bedded themselves.
2)
Carefully remove the motor brush, see fig 37. Check
the brush for signs of wear If it’s O.K. re-fit. If the brush
is badly worn, replace with a new one.
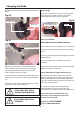
3)
Repeat the process for the other motor brush.
WARNING! DISCONNECT THE
SCROLL SAW FROM THE MAINS
BEFORE CONTINUING.
Fig 35-36
Fig 37
The motor is permanently lubricated. Do not try to
oil the motor bearings or service any internal parts
of the motor. If the power cord is worn, frayed, cut or
damaged, contact Axminster Tools & Machinery. Do
not try to patch it up with electrical tape, this could
lead to more trouble.
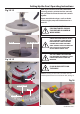
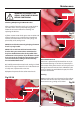
Cleaning
1)
Remove the scroll saws side panel and base plate
and blow out the dust that may accumulate inside
the motor housing, see figs 38-39-40-41
Flat head screwdriver
Motor brush plug
Remove the plug
Remove the motor brush
General Maintenance
Continues Over...
Fig 38
Side panel
Screw
Screw