
Operating instructions


Changing the Blade
17
6)
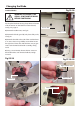
Clean both blade holders and remove any
compacted crud before fitting a new blade.
7)
Check sawblade for flaws (cracks, broken teeth,
bending) before installation.
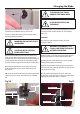
WARNING! DO NOT USE FAULTY
SAWBLADES.
MAKE SURE THE TEETH ARE
POINTING IN THE CUTTING
DOWN DIRECTION!
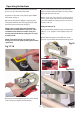
8)
Lower the blade down through the table insert
hole and into the lower housing. Insert the blade
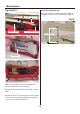
between the slot in the upper blade holder, see fig 30
and re-tighten the Hex screw to secure the blade in
position see fig 27. Repeat for the lower blade holder.
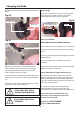
9)
Re-tension the blade by turning the tensioning
lever clockwise then press down the lever to lock
the tension.
10)
Close the access door below the table, replace the
table inset and re-attach the blade guard assembly
(B).
Fig 30
Blade holder slot
Blade
Hex screw
Pin Blades
The scroll saw will accept pin blades, to fit see
instruction below.
PLUG IN AND SWITCH ON
THE MAINS.
CLEAR AWAY ANY TOOLS
AROUND THE WORK AREA.
11)
Start the scroll saw and check everything running
correctly. If all OK, switch off the saw. If not repeat
steps 1-10.
WARNING! DISCONNECT THE
SCROLL SAW FROM THE MAINS
BEFORE CONTINUING.
1)
Repeat steps 1-5 on the previous page to remove
the standard blade and clean both blade holders.
2)
Check pinned sawblade for flaws (cracks, broken
teeth, bending) before installation.
3)
Make sure the teeth are pointing down lower the
pinned blade down through the table insert hole and
into the lower housing.
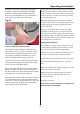
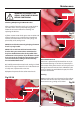
4)
Insert the blade between the slot in the lower
blade holder so that the pins on the end of the blade
engage into the cradles recess, see fig 31.
Fig 31
Continues Over...
Cradle recess
Blade pin
Blade holder
Hex screw