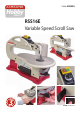
AXMINSTER Code 508294 Hobby SERIES RSS16E Variable Speed Scroll Saw AT&M: 04/09/2014
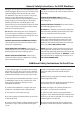
Index of Contents Index of Contents Declaration of Conformity What’s Included General Notes Introduction General Safety Instructions for 230V Machines Additional Safety Instructions for Scroll Saw Specification Initial Assembly Mounting the Scroll Saw Illustration and Parts Description Setting Up the Saw Operating Instructions Changing the Blade (Standard Blades) (Pinned Blades) Maintenance Parts Breakdown/List Wiring Diagram 02 02 03 03 04 04-05 05-06 06 06-07 07 08-09-10-11 12-13 13-14-15 16-17-18 16 17-
What’s Included Quantity Item Part Model Number RSS16GA 1 No RSS16E Hobby Scroll Saw A Blade comes fully assembled but not tensioned 1 No Blade Guard B 2 No M5 x 10mm Butterfly Screw Knobs and flat washers C 1 No Manual B A C General Note Please read the Instruction Manual prior to using your new tool; as well as the operating procedures for your new tool, there are numerous hints and tips to help you to use the tool safely and to maintain its efficiency and prolong its life.
Introduction Perfect for the hobby user who wants a more advanced scroll saw, the RSS16E is a machine that will allow you to take on more advanced projects. Based around a cast iron base with cast alloy body and table, it’s not too heavy to move and the integrated handle makes this an easy task. Several features make this scroll saw stand out: variable motor speed giving a good cutting range for many tasks, easy blade changing plus it can take both pinned and un-pinned blades in the same blade holders.
General Safety Instructions for 230V Machines Do not store materials above or near a machine, such that it is necessary to stand on the machine to reach them. flying grit, dust or chips, wear the appropriate safety clothing, goggles, gloves, masks etc., and if the work operation appears to be excessively noisy, wear ear-defenders.
Additional Safety Instructions for Scroll Saw event, switch OFF the machine and disconnect from the supply. Wedge open the kerf, and withdraw the work piece. 16. Set up the machine and make all adjustments with the power OFF, and disconnected from the supply. 13. Switch off the saw, and make sure the blade has come to a complete stop before clearing sawdust or off-cuts from the table. 17. DO NOT operate the machine with the covers off.
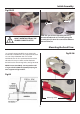
Initial Assembly Fig 02-03 C B NOTE: The guard can be adjusted by loosening the two butterfly knobs (C) and sliding the guard assembly (B) up or down to accommodate different timber thicknesses. don’t overtighten as the guard is only plastic! Mounting the Scroll Saw It is strongly recommended that you mount the machine to a workbench or to a purpose built scroll saw stand. A pad between the saw and the workbench/stand is also recommended to reduce vibration.
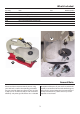
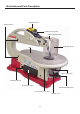
Illustration and Parts Description ON/OFF buttons Bearing bushes Variable speed control Guard supporting arms Adjustable guard Table Table scale pointer Motor brush port Spare blade holder Table tilt butterfly clamp Lower blade access door Table tilt scale 8
Illustration and Parts Description A B ON/OFF buttons (A) Variable speed control (B) Blade tensioning clamp lever Spare blade holder A C B Table tilt scale (A), Adjusting knob (B) and Butterfly clamp (C) Air delivery tube ( Place near work piece) Scroll saw guard 9 Scale pointer Lower blade holder access door
Illustration and Parts Description Carrying handle Guard butterfly clamp Air delivery tube Table insert Scroll saw chassis Motor brush port Table tilt control knob Dust extraction outlet Scroll saw mounting hole 10
Illustration and Parts Description Table tilt control clamp Scroll saw table tilted to 45˚ Upper blade holder Table tilt control knob Lower blade holder Lower rocker arm and motor assembly 11 Table insert Dust extraction outlet
Setting Up the Saw The scroll saw comes with the blade assembled but not tensioned and the table tilted. Please follow the instruction below to set up your scroll saw. Tensioning the Blade Lift up the blade tensioning clamp lever (A) and turn it clockwise to tension the blade, see fig 07.
Setting Up the Saw/ Operating Instructions NOTE: If you are new to scroll saws, there will be a learning period, a period to learn the saw itself, and a period to learn how the wood and saw work together. Fig 12-13 Expect some blade breakages, scroll saw blades are fairly fragile, compared to blades found on a bandsaw. WARNING! Under no circumstances should CHILDREN be allowed in work areas.
Operating Instructions 2) Place the work piece on the table and lower the guard so its just above the work piece. 3) Switch on the scroll saw by pressing the ‘GREEN ON’ button, see fig 17. 4) Increase the speed to 400rpm, supporting the work piece with both hands slowly guide the work piece forward into the blade, see fig 18. NOTE: You must guide the wood into the blade SLOWLY, because the teeth are very small, and it cuts ONLY on the downward stroke.
Operating Instructions 3) Switch on the scroll saw by pressing the green ‘ON’ button, set the variable speed and carefully guide the work piece into the blade, see fig 22. Once you have completed your cut, switch off the scroll saw by pressing the red ’OFF’ button. 4) The teeth on the blade will wear out sooner or later. The blade must therefore be replaced often to obtain the best cutting results.
Changing the Blade Fig 25-26 Standard Blades WARNING! DISCONNECT THE SCROLL SAW FROM THE MAINS BEFORE CONTINUING. 1) Lift up the blade tensioning clamp lever and rotate until the tension on the blade has been released, see fig 7 on page 12. Access door 2) Remove the table insert, see fig 23. Phillips screw 3) Remove the blade guard (B) and place safely aside, see fig 24.
Changing the Blade Clear away any tools around the work area. PLUG IN and switch on the mains. 6) Clean both blade holders and remove any compacted crud before fitting a new blade. 11) Start the scroll saw and check everything running correctly. If all OK, switch off the saw. If not repeat steps 1-10. 7) Check sawblade for flaws (cracks, broken teeth, bending) before installation. Pin Blades The scroll saw will accept pin blades, to fit see instruction below. WARNING! Do not use faulty sawblades.
Changing the Blade 5) Repeat the process for the upper blade holder, see fig 32. Fig 32 Blade storage If you have several blades you can, easily store them away safely by using the scroll saw’s spare blade holder to the side of the machine, see fig 34. Fig 34 Cradle recess Spare blade holder Blade pins Blade Notes on Saw Blades Fig 33 BLADES BREAK FOR FIVE PRINCIPAL REASONS Blade tensioning lever 1. Too much tension or too little tension on the blade. 2.
Maintenance WARNING! DISCONNECT THE SCROLL SAW FROM THE MAINS BEFORE CONTINUING. Remove the plug Checking & Replacing the Motor Brushes After a period of time the scroll saw’s motor brushes are due to wear and may need replacing, please follow the instruction below for checking and replacing the brushes. Fig 37 1) There are two motor brush ports one on either side of the machine, using a small flat head screwdriver remove one of the motor’s brush access plugs and place safely aside, see fig 35-36.
Maintenance Fig 39-40-41 Rocker arm Rocker Arm Bearing Bushes After a period of use it is recommended to lightly oil the upper and lower rocker arm bearings, see fig 42. Lower blade holder Fig 42 Motor assembly Dust extraction outlet Bearing bushes Base plate 2) An occasional light coat of oil on the table to prevent surface rust is recommended. 3) Occasionally wipe the machine over with a damp cloth.
Parts Breakdown/List 21
Parts Breakdown/List Part Description Qty 41 Strain Relief 1 1 Variable Speed Control Knob 1 42 Cable 1 2 Switch 1 43 Pan Head Tapping Screw ST4.
Parts Breakdown/List 78 Radial Spherical Plain Bearing 1 91 Cross Recessed Pan Head Screw M4x10 2 79 Bearing 625ZZ 1 92 Blade Guard Support 1 80 Link 1 93 Blade Guard 1 81 Big Spacer 1 94 Dust Port 1 82 Eccentric 1 95 Hex Socket Cap Wrench S4 1 83 Hex Socket Set Screw M8x8 1 96 Washer ø 6 3 84 Base Foot 4 97 Hex Nut M10 1 85 Moter 1 98 Washer ø 10 1 86 soleplate 1 99 spring 1 87 Back Plate Cover 1 100 Hex Socket Cap Wrench S3 1 88 Tooth Washer 4
The Axminster guarantee is available on Hobby, Trade, Industrial, Engineer, Air Tool & CNC Technology Series machines It’s probably the most comprehensive FREE guarantee ever- buy with confidence from Axminster! So sure are we of the quality, we cover all parts and labour free of charge for three years! • Look for the icon and put your trust in Axminster • No registration necessary - just keep your proof of purchase • Optional Service Plan for Industrial Series machinery Great value & easy-to-use, perfect