
Specifications

Changing the Planing Blades
15
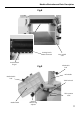
Locate the 5.5mm x 7mm A/F spanner in the tool kit.
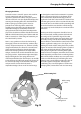
Turn the cutter block until one of the slots is
uppermost, (between the tables). Using the spanner
drive the 5 No. bolts into the chipbreaker/wedge, thus
removing the clamping effect. This should allow the
blade to ‘spring’ up (not like a jack in a box!) to
protrude clear of the edge of the cutter block.
Carefully remove the blade, lay aside. Remove the
chipbreaker/wedge, lay aside, finally remove the
springs from the slot and lay them aside. Repeat the
process for the other two blades. If the block becomes
difficult to hold located, being out of balance with the
blade/s removed; use a thin wedge of material to jam
the cutter block in position.
Now is a very good time to clean the slot housings
thoroughly, remove the resin build-up, sawdust, chips
and any old joiners/carpenters etc., that have recently
disappeared without trace. Ensure the circumference
of the cutter block is likewise cleaned thoroughly.
Remove the clamping bolts from the chipbreaker/
wedges, clean the bolts and the threaded holes, clean
the springs and the chipbreaker/wedges thoroughly.
Apply a little light oil to the springs. Remove the
new/sharpened blades from their ‘keeper’; set carefully
to hand and put the ‘old’ blades away in the ‘keeper’ to
be sent for sharpening. Locate the blade setting tool
and put it to hand. Screw the bolts into the
chipbreaker/wedges. Select one of the slot housings
Changing the Blades
and wedge the cutter block to maintain it in position.
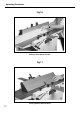
Set the springs into the holes in the bottom of the
slot, introduce the chipbreaker/wedge, position it
against the ‘back’ of the slot, introduce a blade in front
of it. Using the spanner start to unscrew the bolts, take
care at this time as the blade could be protruding well
above the block. Unscrew the bolts until the wedge
just starts a ‘nip’ on the blade, then screw them back in
half a turn.
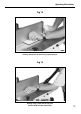
At this point all the components should be loose in
the slot (not slack), carefully position the blade and
the wedge to line up with the edge of the cutter
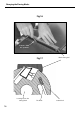
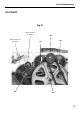
block. Press the blade setting tool gently down onto
the blade, (See fig 15 & 16) ensure that the locating
feet are firmly in contact with the cutter block, and the
blade is against the setting recess. (See fig 15 & 17)
Holding the blade and the setting tool in this position,
tighten at least two of the clamping bolts to provide a
firm clamp of the blade, with the setting tool held
firmly in place. Tighten the remaining bolts. Tighten
hard, but do not overtighten, remember, these are M4
bolts. Repeat this procedure for the remaining blades.
When all the blades are fitted, carry out a quick check
of the set of the blades, by hand rotating the cutter
block in reverse and visually inspecting the edge of
the blades against a fixed point . If this appears
satisfactory, carry out a final ‘tightness’ check on the
clamping bolts; remove all the tools and stow away.
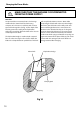
Blade Setting Tool
Locating feet set on
cutting block
Blade setting
recess
Fig 15