
User Manual

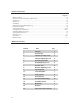


Specifications
Axminster No
502514
Rating Trade
Dovetail Size 15mm
Material Thickness
15 to 32mm
Material Width 275mm
Material Thickness
Front and back pieces 1/2" (12.7mm) to 11/4" (32mm)
Side pieces 3/8" (9.5mm) to 3/4" (19mm)
Joint Size The template and cutter supplied will produce dovetail pins and sockets approximately 3/8"
(9 .5mm) deep and spaced 1" apart. The purchase of a bearing guided straight cutter,
(order no. 666106), will enable 1/2" wide box joints to be made in timber up to a
maximum thickness of 3/4"(19mm)
04
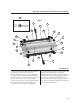
1. Assembling and Mounting the Jig
Screw the front and top handles into the eccentric
bars in such a way that the workpiece is locked when
the top handle is pushed away from you and when the
lower handle is pushed downwards. Mount the jig to a
firm and stable workbench at a comfortable height,
remembering that the router sits on top of the jig. The
jig must be mounted close to the front edge so as to
leave clear passage for the timber to the front, vertical
clamp. Also, leave ample clearance to the rear of the jig
to accommodate the longest length of timber you are
likely to want to work a dovetail joint on.
There are two holes provided in the base for securing
the jig to the bench. The front clamp holds the side
piece and the top clamp holds the front or back piece
of the drawer. The complete joint is cut in a single pass
through the side piece (making the pins) and into the
back or front piece (making the pockets).
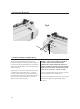
2. Preparation of Timber
As with all joinery work the drawer or box
components must be sized and cut square accurately.
It is preferable that the width of the timber is in exact
steps of 1/2" (i.e. 5", 5 1/2", 6", 6 1/2", etc.) as this will
give a series of fully-formed dovetails without part-
formed pins or sockets at the ends. The dovetail joints
are cut with the insides of the components facing
outwards and the edges that will form the top drawer
hard up against the side stops of the jig, therefore the
right hand side of the drawer and corresponding front
joints are cut on the left hand side of the jig and vice
versa. It is a good idea to identify the drawer pieces as
in Fig 2 so that they are positioned correctly in the jig.
Fig 2