
User Manual


11
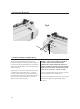
The first board should be positioned in the jig with its
left hand edge in line with the left hand edge of one
of the template fingers and its top edge in contact
with the underside of the template as shown in Fig 9.
Place the router on the template with the cutter clear
of the timber, start up the router and then trace
around the template fingers. When cutting is
completed switch off the router and let it come to a
stop before removing from the jig. The second board is
cut in the same way except that its left hand edge is
lined up with the right hand edge of one of the
template fingers; this will automatically produce the
necessary 1/2" offset between the two halves of the
joint. If multiple joints are to be made then it may be
more convenient to use the vertical end stop to
position the timber correctly relative to the template
quickly and accurately each time.
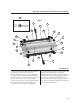
WARNING Before starting to cut the timber make
sure that (a) the bottom of the cutter is well clear of
the top face of the body of the jig and (b) the cutter
guide bearing is running correctly in the template.
8. Box Jointing
Miniature Joints
Fig 8
Fig 9
Align one board with left
hand edge of finger, the
other with right hand edge.
There is a special kit available, consisting of fine finger template, template guide and cutter, which can produce
6mm deep dovetails spaced 11mm apart for making small boxes, drawers, jewellery boxes and similar small
projects. There is also a fine comb jointing cutter for use with the same template.
(Order from Axminster Power Tool Centre under the following numbers):
410227 Fine Dovetail Set
666267 Fine Comb Joint Cutter