Code 502514 Dovetail Jig AT: 26/04/2021 BOOK VERSION: 2
Index of Contents Page No. What’s in the Box................................................................................................................................................................................ 02 Illustration and Parts Description of Dovetail Jig....................................................................................................................03 Introduction...........................................................................................................
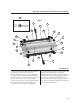
Illustration and Parts Description of Dovetail Jig 17 Fig 1 5 6 7 2 11 4 8 6 9 3 4 12 8 16 10 15 6 14 13 2 1 5 6 Introduction You now own a jig that will make jointing drawers and boxes with your router a fast and easy task. Although most routers can be used successfully with this jig the medium sized machines with fine height adjusters are the most suitable.
Specifications Axminster No Rating Dovetail Size Material Thickness Material Width Material Thickness Joint Size 502514 Trade 15mm 15 to 32mm 275mm Front and back pieces 1/2" (12.7mm) to 11/4" (32mm) Side pieces 3/8" (9.5mm) to 3/4" (19mm) The template and cutter supplied will produce dovetail pins and sockets approximately 3/8" (9 .5mm) deep and spaced 1" apart. The purchase of a bearing guided straight cutter, (order no.
3. Setting the End Stops Start by temporarily removing the front clamp bar from the jig. Now draw a pencil line across the template, halfway across the first finger and square to the edges of the template.(see Fig 3). Set the top left hand stop in line with the line marked on the template and square to the body of the jig. Offset the left hand vertical stop 1/2" to the right of the top one and square with the top face of the jig (Fig 4).
3. Setting the End Stops Fig 4 90˚ 90˚ 1/2" 4. Setting Template and Backstop Unlock the two locking knobs (4) see Fig 5 and position the template so that the tips of the fingers sit inside the vertically mounted timber by a minimum of 1/16"(1.5mm) for thin timber and 1/8" (3mm) for thick timber (see Fig 5).
4.
5. Assembling Timber into the Jig Adjust the top and front clamp bars via the hand screws at either end of each bar so that the wood is held firmly in place when the cam clamp handles are operated. When narrower pieces of timber are being worked it is best to use a packing piece of the same thickness at the opposite end of the clamp bar to ensure an even grip and to avoid distorting the bars.
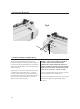
6. Setting the Dovetail Cutter Fit the bearing guided cutter securely into the router collet and then set the cutter depth, preferably using a fine height adjuster, until the bottom face of the cutter protrudes below the router base by 16mm (see Fig 7). Allowing for the 6mm thickness of the template this will give a nominal dovetail depth of between 9 and 10mm.
7. Cutting the Joint Because there may be a need to alter one or more of the settings in order to get the joint to fit correctly it is wiser to carry out the initial cuts on two trial pieces of timber of the same width and thickness as the final components. Position the router on the template with the cutter clear of the timber and switch on. Now with just a light cut run the router from right to left across the work, just touching the end of each finger.
8. Box Jointing Fig 8 The first board should be positioned in the jig with its left hand edge in line with the left hand edge of one of the template fingers and its top edge in contact with the underside of the template as shown in Fig 9. Place the router on the template with the cutter clear of the timber, start up the router and then trace around the template fingers. When cutting is completed switch off the router and let it come to a stop before removing from the jig.
Axmister Tools, Axminster, Devon EX13 5PH axminstertools.