WISP 20M USER MANUAL
THANK YOU FOR CHOOSING A XLER. The Axler WISP-20M is a compact and lightweight handheld gimbal for mirrorless cameras. Ideal for event videography, documentaries, music videos, and similar productions, it’s designed to help capture smooth movement and panning with cameras weighing up to 1.87 lb. (850 g). This handheld gimbal uses quiet and reliable brushless motors to control all three axes (pitch, roll, and yaw), and it operates in two different modes.
CONTENTS Precautions �������������������������������������������������������������������������������������������������������������� 4 Overview ������������������������������������������������������������������������������������������������������������������� 5 Getting Started �������������������������������������������������������������������������������������������������������� 6 Charging the Batteries ������������������������������������������������������������������������������������� 6 Attaching the Ru
PREC AUTIONS • Please read and follow these instructions, and keep this manual in a safe place. • Keep this product away from children. • Make sure everything is secure before proceeding. • Make sure that this product is intact and that there are no missing parts. • To avoid damage to this product, be careful not to overtighten or improperly thread any of the threaded fittings. • Do not exceed the maximum load capacity. • Using a charger that does not support 1.
1 OVERVIE W 1. Adapter plate 2 3 2. Mounting screws (x2) 3. Rubber grips (x8) 4 6 5 4. Quick-release plate 7 5. Mounting platform 8 6. Reset button 9 7. Control stick 8. Power/calibration button 10 9. Grip 10. Battery compartment cap 11 11. LED light 12. Battery cradle contacts 12 13 13. Micro-USB port 14 14. Micro-USB charging cable 15. ICR 18650 batteries (×3) 16. 3/8" mounting socket 17. USB port (5v output) 18.
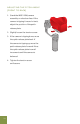
G E T T I N G S TA R T E D C H A R G I N G T H E B AT T E R I E S 1. Remove the battery cradle by unscrewing the battery compartment cap and sliding the battery cradle out of the compartment. 2. Connect the Micro-USB cable to a 1.5–2 A power supply, and insert the Micro-USB plug into the port on the battery cradle. A green light will illuminate on the battery cradle, indicating that it is connected to your power source. 3. Place the batteries into the battery cradle.
Note: Using a charger that does not support 1.5–2 A will result in the batteries failing to charge. 4. Once the batteries are charged, slide the battery cradle and batteries into the battery compartment. Make sure that the positive side goes into the compartment first. 5. Replace the battery cap by screwing it on until secure. AT TA C H I N G T H E R U B B E R G R I P S The WISP should not be used without the rubber grips.
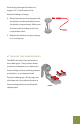
AT TA C H I N G T H E C A M E R A 1. Loosen the tension screw at the bottom of the mounting platform, and slide the quick-release plate off of the platform. 2. Attach the quick-release plate to the camera by tightening the mounting screw into the camera’s mounting socket. Use a slotted screwdriver or a coin to tighten the mounting screw. 3. Slide the quick-release plate and camera onto the mounting platform, and tighten the tension screw.
BAL ANCING THE C AMER A For optimum performance from your WISP-20M, the camera must be balanced on both axes. To balance the camera, follow these steps: ADJUSTING THE ROLL ANGLE (SIDE TO SIDE) 1. Stand the WISP-20M/camera assembly on a level surface. If the camera tips to one side, the camera needs to be moved in the opposite direction. 2. Insert a screwdriver through the slot in the mounting plate, and use it to slightly loosen the mounting screw. Move the camera toward the side that needs more weight. 3.
ADJUSTING THE PITCH ANGLE (F RON T T O B AC K) 1. Stand the WISP-20M/camera assembly on a level surface. If the camera is tipping forward or back, adjust the position of the quickrelease plate. 2. Slightly loosen the tension screw. 3. If the camera is tipping down, move the quick-release plate back. If the camera is tipping up, move the quick-release plate forward. Move the quick-release plate in small increments until the camera is balanced. 4. Tighten the tension screw until secure.
THE C AMER A WON’ T FIT OR BAL ANCE Some cameras won’t fit properly on the WISP due to the position of their mounting sockets. The included adapter plate can remedy this problem. Follow these steps: 1. Loosen the tension screw and remove the quick-release plate. 2. Insert the mounting screw into the adapter plate from underneath. 3. Screw the adapter plate onto the bottom of the quick-release plate. Make sure the holes are along the direction that gives you the best fit. 4.
USING THE WISP-20M For optimum performance, start the WISP-20M only when the camera has been balanced. Stand the WISP-20M/camera assembly on a level surface, and press the power button. The WISP will begin to calibrate for balance by adjusting the roll and pitch of the camera platform. Wait until the WISP has fully calibrated the balance and comes to a stop before you start to use it. FOLLOW MODE The WISP-20M starts up in Follow mode.
LOCK MODE Lock mode keeps the camera balanced in the position in which it’s pointed, regardless of the angle or movement of the handle. Switching to Lock mode from Follow mode allows the user to point the camera in a single direction while still moving. To enter Lock mode, quickly press and release the control stick once. Pressing the control stick again returns the WISP-20M to Follow mode. LOW-ANGLE SE T TING To use your camera in an inverted position, follow these steps: 1.
CONTROL STICK Up-down and side-to-side movement of the camera can be controlled by the control stick in both Follow and Lock modes. Note: When in inverted mode, the control stick will also be inverted, and the platform will move opposite to the control stick commands. R E C A L I B R AT I N G T H E G I M B A L 1. Stand the WISP-20M on a flat surface. Press and hold the control stick for 2 seconds to stop the motors. 2.
MOUNTING THE WISP-20M THE WISP-20M can be mounted on a tripod, jib, or other device with a 3/8ʺ threaded mounting post. 1. Screw the handle of the WISP-20M into the tripod or jib’s quick-release plate until secure. 2. Attach the WISP to the tripod or jib. 3. Rebalance the camera before turning the WISP’s power on. USING THE LED LIGHT The included LED light can be used when shooting in dimly lit areas. Plug it into the USB port on the handle, and twist it to the desired position.
SPECIFICATIONS Dimensions (H × W × D) 10.6ʺ × 6.4ʺ × 5.5ʺ (26.9 × 16.3 × 13.5 cm) Weight (with batteries) 1.9 lb. (862 g) Weight without batteries 1.6 lb. (726 g) Power 3.7 V Li-ion 2600 mAh 18650 battery (×3) Battery life 3 hr. Main board 8-bit board 2.40b7: 3-axis stabilizer gyro system Range of motion 90°–180° Roll: 355° ±60° Pitch: 355° ±180° Yaw: 355° Maximum supported camera weight 1.9 lb.
TROUBLESHOOTING The batteries are not charging (the indicator light on the battery cradle is not lit when charging). Make sure that the USB cable is connected to a 1.5–2 A power supply. Check the connections to make sure that the MicroUSB and USB connectors are completely inserted into the ports on the battery cradle and the power supply. The camera shakes while shooting. The gimbals need to be recalibrated. See Recalibrating the Gimbals on page 14. The camera shakes on startup.
ONE-YEAR LIMITED WARRANTY This Axler product is warranted to the original purchaser to be free from defects in materials and workmanship under normal consumer use for a period of one (1) year from the original purchase date or thirty (30) days after replacement, whichever occurs later.
www.AxlerSupports.