
User manual


AXIS Q6032-E PTZ Dome Network Camera
PTZ (Pan Tilt Zoom)
For more information see the online help .
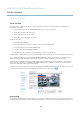
Tour Recording
The guard tour function in this product includes tour recording, which allows recording o f a custom tour using an input device such
as a joystick, mouse, keyboard or through the VAPIX® Application P rogramming Interface (API). A recorded tour displays the video
stream of the recorded sequence of Pan/Tilt/Zoom movements, including their variable speeds and lengths.
To add a recorded tour:
1. Go to PTZ>GuardTourand click Add.
2. Select Create a record tour and click OK.
3. Enter a descriptive name.
4. Specify the pause length between runs.
5. Click
to start r ecording the Pan/Tilt/Zoom movements.
6. When satisfied, click
.
7. Click OK.
Note
Only the name of the recorded tour and pause between runs can be modified. Starting a new record ing will overwr ite the
existing guard tour.
The recorded tour can be activated from the Live View and Guard Tour pag es or through e
vents. For more information see
theonlinehelp
.
OSDI Zones
On-Screen Direction Indicator (OSDI) zones can be included in t
he overlay text (see
Overlay, on page 18
)toaidtheusertonavigate
the Axis product. Each OSDI zone is set up with coordinates and a descriptive name.
OSDI zones are set up under PTZ > OSDI Zones. The Axis product uses the coordinates of the center of the view to set the lower
left and upper right zone areas. First navigate to where you would like the lowermost left point of the O SDI zone to be located.
Click Get to set the coordinates. Pr
oceed to where the upper right point of zone should be located and click Get. Give the zone a
descriptive name and click OK.
To include the name of the OSDI zone in the overlay text, go to Video < Video Stream < Overlay Settings.ChecktheInclude
text box and enter the m odifier #L in the field. For more information about modifiers, see
File Naming & Date/Time Formats
in
theonlinehelp
.
Advanced
Limits
Define the pan, tilt, zo om and focus limits for the Axis p roduct. Movements to the left and right, up and down, can be restricted to
narrow the area under surveillance.
Configure the near focus limit to avoid focusing on objects too close to the camera lens.
When Enable E-flip is selected, as it tilts down and continues to pan backwards, the Axis product will automatically correct the view
and flip it 180 degrees. The left limit must be set to –180 degrees and the right limit to 180 degrees for e-flip to work.
Move speed sets the speed of the camera’s pan and tilt movements. The default setting is maximum speed.
26