AXIS Q6042-E PTZ Dome Network Camera AXIS Q6044-E PTZ Dome Network Camera AXIS Q6045-E PTZ Dome Network Camera Installation Guide ENGLISH AXIS Q60 Series
Legal Considerations Regulatory Information Video surveillance can be regulated by laws that vary from country to country. Check the laws in your local region before using this product for surveillance purposes. This product includes one (1) H.264 decoder license. To purchase further licenses, contact your reseller. Europe Liability Every care has been taken in the preparation of this document. Please inform your local Axis office of any inaccuracies or omissions.
Australia/New Zealand This digital equipment fulfills the requirements for RF emission according to the Class A limit of AS/NZS CISPR 22. The product shall be connected using a shielded network cable (STP) that is properly grounded. Notice! This is a Class A product. In a domestic environment this product may cause RF interference, in which case the user may be required to take adequate measures.
AXIS Q60 Series Safety Information Read through this Installation Guide carefully before installing the product. Keep the Installation Guide for future reference. Hazard Levels Indicates a hazardous situation which, if not avoided, will result in death or serious injury. WARNING Indicates a hazardous situation which, if not avoided, could result in death or serious injury. CAUTION Indicates a hazardous situation which, if not avoided, could result in minor or moderate injury.
AXIS Q60 Series Safety Instructions WARNING • The Axis product shall be installed by a trained professional. NOTICE TICE NO • The Axis product shall be used in compliance with local laws and regulations. • Store the Axis product in a dry and ventilated environment. • Avoid exposing the Axis product to shocks or heavy pressure. • Do not install the product on unstable brackets, surfaces or walls. • Use only applicable tools when installing the Axis product. Excessive force could cause damage to the product.
AXIS Q60 Series WARNING • Risk of explosion if the battery is incorrectly replaced. • Replace only with an identical battery or a battery which is recommended by Axis. • Dispose of used batteries according to local regulations or the battery manufacturer's instructions. Dome Cover • Do not clean a dome cover that looks clean to the eye and never polish the surface. Excessive cleaning could damage the surface.
AXIS Q60 Series Installation Guide This Installation Guide provides instructions for installing AXIS Q6042-E/Q6044-E/Q6045-E PTZ Dome Network Camera on your network. For other aspects of using the product, see the User Manual available at www.axis.
AXIS Q60 Series Optional Accessories • AXIS T91A Mounting Accessories • Smoked dome cover • RJ45 IP66-rated Cable with Premounted Connector (CAT6) 5 m • AXIS T8310 Video Surveillance Control Board • AXIS T90A Illuminators • Installation Display • Midspan For information about available accessories, see www.axis.
AXIS Q60 Series 5 6 7 8 9 10 Part number (P/N) & Serial number (S/N) Power button Heater Control button Status LED indicator SD card slot (SDHC) Dome Cover 2 3 4 5 6 1 2 3 4 5 6 Dome bracket screw PH2 (4x) Dome bracket Rubber gasket Dome ring Dome ring screw T30 (4x) Dome cover 11 ENGLISH 1
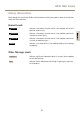
AXIS Q60 Series Sunshield 1 1 2 2 Screw holes Holes for unit holders LED Indicators LED Color Indication Status Unlit Connection and normal operation Amber Steady during startup. Flashes during firmware upgrade. Amber/red Flashes amber/red if network connection is unavailable or lost. Red Flashes red for firmware upgrade failure. Green Shows steady green for 10 seconds for normal operation after restart. Midspan LED Indicators LED Color Indication Port Unlit No camera connected.
AXIS Q60 Series AC Green, flashing Fast flash when input voltage is out of range or other internal error. Green Steady when AC power input connected. Connectors and Buttons For specifications and operating conditions, see page 13. ENGLISH Specifications Operating Conditions The Axis product is intended for outdoor use.
AXIS Q60 Series Install the Hardware NOTICE TICE NO • The AXIS product shall be connected using a shielded network cable (STP). All cables connecting the product to the midspan shall be shielded (STP) and intended for their specific use. Make sure that the midspan is properly grounded. For information about regulatory requirements, see Regulatory Information on page 2 . • Mount the product with the dome cover facing downward.
AXIS Q60 Series 3. Make sure the rubber gasket is fitted correctly on the dome cover. 4. Align the bulge on the dome cover with one of the logotypes on the dome ring. 5. Attach the dome bracket and the dome cover to the dome ring and tighten the screws (torque 1.2 Nm). 6. To install an SD card (not included), see Install an SD Card on page 15. 7. To attach the dome cover to the top cover, align the bulge on the dome cover with the heater on the camera unit and tighten the screws (torque 1.5 Nm).
AXIS Q60 Series 1 2 3 4 5 1 2 3 4 5 Network connector – RJ45 Push-pull Connector (IP66) Network connector and network connector shield Ground screw T20 Washer Cable shoe 5. Attach the grounding wire to the cable shoe using cable shoe pliers. 6. Put the cable shoe and washer back in their original positions and tighten the screw (torque 0.5 Nm). Make sure the cable shoe is in contact with the grounding surface. 7.
AXIS Q60 Series 1 4 2 3 ENGLISH 1 2 3 4 Screw T30 (3x) Slot for unit holder (3x) Safety wire Wall bracket (mounting example) 11. Install the supplied midspan. See page 17. Install the Midspan The supplied midspan enables Axis network video products with high power consumption to receive data and power over the same network cable. 1. Connect the midspan (data in) to the network switch using a network cable. 2.
AXIS Q60 Series 1 4 2 3 1 2 3 4 Data and power out (connect to Axis product) Data in (connect to network) AC input LED indicator Port LED indicator 4. Make sure that the LEDs on the midspan indicate the correct conditions. See Midspan LED Indicators on page 12. Access the Product Use the tools provided on the Installation and Management Software CD to assign an IP address, set the password and access the video stream. This information is also available from the support pages on www.axis.
AXIS Q60 Series 4. The process is now complete. The product has been reset to the factory default settings. If no DHCP server is available on the network, the default IP address is 192.168.0.90 5. Using the installation and management software tools, assign an IP address, set the password and access the video stream. It is also possible to reset parameters to factory default via the web interface. Go to Setup > System Options > Maintenance. Further Information Visit www.axis.
Errata Valid for AXIS Q6044-E/Q6045-E About this document This document is a correction of AXIS Q60-E Series Installation Guide AXIS Q6042-E/Q6044-E/Q6045-E. page 2 Regulatory Information USA This equipment has been tested using an unshielded network cable (UTP) and found to comply with the limits for a Class A digital device, pursuant to part 15 of the FCC rules.
Installation Guide AXIS Q60 Series © Axis Communications AB, 2014 Ver. M2.7 Date: July 2014 Part No.