
Installation Manual


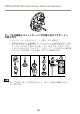
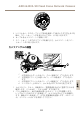

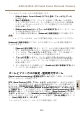


Table Of Contents
- toc
- toc
- Safety Information
- Safety Instructions
- Installation Guide
- Informations sur la sécurité
- Consignes de sécurité
- Guide d'installation
- Procédures d’installation
- Contenu de l'emballage
- Outils recommandés
- Aperçu du matériel
- Caractéristiques techniques
- Installation du matériel
- Accès au produit
- Focus & Zoom (Mise au point & zoom)
- Définir le zoom et la mise au point - Zoom optique pour la surveillance
- Réinitialisation aux paramètres d'usine par défaut
- Pour obtenir plus de renseignements
- Informations sur la garantie
- Sicherheitsinformation
- Sicherheitsanweisungen
- Installationsanleitung
- Informazioni di Sicurezza
- Istruzioni di sicurezza
- Guida all'installazione
- Procedure di installazione
- Contenuto della Confezione
- Strumenti raccomandati
- Panoramica dell'hardware
- Dati tecnici
- Installazione dell'Hardware
- Accedere al Prodotto
- Messa a fuoco e zoom
- Impostare zoom e messa a fuoco - Zoom ottico per monitoraggio
- Ripristino dei valori predefiniti di fabbrica
- Ulteriori Informazioni
- Informazioni sulla garanzia
- Información de seguridad
- Instrucciones de seguridad
- Guía de instalación
- Pasos de la instalación
- Contenido del paquete
- Herramientas recomendadas
- Información general del hardware
- Especificaciones
- Instalación del hardware
- Acceso al producto
- Enfoque y zoom
- Ajuste de zoom y enfoque: zoom óptico para supervisión
- Restablecimiento a la configuración predeterminada de fábrica
- Más información
- Información de la garantía
- 安全情報
- 安全手順
- インストールガイド

AXISQ3505–VEFixedDomeNetworkCamera
3.いじり止めヘックスローブレンチTR20を使用して4本のいたずら防止ネジを
締め、ユニットケーシングを取り付けブラケットに取り付けます。
4.ケーブルをカメラユニットに接続します。
5.ユニットケーシング内のスプリングを横に引き、カメラユニットをユニッ
トケーシングに取り付けます。
カ カ
カ
メ メ
メ
ラ ラ
ラ
ア ア
ア
ン ン
ン
グ グ
グ
ル ル
ル
の の
の
調 調
調
整 整
整
1
2
3
4
1.
光 学 部 品 ホ ル ダ ー 上 の ラ イ ン 。 チ ル ト 角 度 (10° ず つ ) を 示 し ま す 。
2.
光 学 部 品 マ ウ ン ト 上 の 短 い ラ イ ン 。 パ ン の 角 度 (3° ず つ ) を 示 し
ま す 。
3.
光 学 部 品 マ ウ ン ト 上 の ラ イ ン 。 パ ン の 角 度 (15° ず つ ) を 示 し ま す 。
4.
レ ン ズ カ バ ー 上 の ラ イ ン 。 カ メ ラ を 水 平 に す る の に 役 立 ち ま す 。
1.カメラのパン、チルト、回転を行い、監視領域をもれなく監視できるかを
確認します。パンは360°、チルトは90°まで可能です。
2.パンと回転を行い、適切な画像が得られるよう、レンズを調整します。
レンズカバーの2本のラインを使用して、カメラが水平かどうかを確認し
ます。機能ボタンを使用して、水平化支援機能を起動します。
105 ペ ー ジ
の 、 イ ン ス ト ー ル ガ イ ド
を参照してください。
111
ò
ò
¨
¨
¾
¾