
Installation Manual

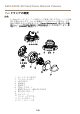


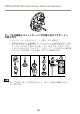
Table Of Contents
- toc
- toc
- Safety Information
- Safety Instructions
- Installation Guide
- Informations sur la sécurité
- Consignes de sécurité
- Guide d'installation
- Procédures d’installation
- Contenu de l'emballage
- Outils recommandés
- Aperçu du matériel
- Caractéristiques techniques
- Installation du matériel
- Accès au produit
- Focus & Zoom (Mise au point & zoom)
- Définir le zoom et la mise au point - Zoom optique pour la surveillance
- Réinitialisation aux paramètres d'usine par défaut
- Pour obtenir plus de renseignements
- Informations sur la garantie
- Sicherheitsinformation
- Sicherheitsanweisungen
- Installationsanleitung
- Informazioni di Sicurezza
- Istruzioni di sicurezza
- Guida all'installazione
- Procedure di installazione
- Contenuto della Confezione
- Strumenti raccomandati
- Panoramica dell'hardware
- Dati tecnici
- Installazione dell'Hardware
- Accedere al Prodotto
- Messa a fuoco e zoom
- Impostare zoom e messa a fuoco - Zoom ottico per monitoraggio
- Ripristino dei valori predefiniti di fabbrica
- Ulteriori Informazioni
- Informazioni sulla garanzia
- Información de seguridad
- Instrucciones de seguridad
- Guía de instalación
- Pasos de la instalación
- Contenido del paquete
- Herramientas recomendadas
- Información general del hardware
- Especificaciones
- Instalación del hardware
- Acceso al producto
- Enfoque y zoom
- Ajuste de zoom y enfoque: zoom óptico para supervisión
- Restablecimiento a la configuración predeterminada de fábrica
- Más información
- Información de la garantía
- 安全情報
- 安全手順
- インストールガイド

AXISQ3505–VEFixedDomeNetworkCamera
取 取
取
り り
り
付 付
付
け け
け
ブ ブ
ブ
ラ ラ
ラ
ケ ケ
ケ
ッ ッ
ッ
ト ト
ト
取り付けブラケットは、4種類のパターンで取り付けることができます。取り付けパ
ターンは、以下の取り付けオプションの基準に従って設定されています。
•:4インチの正方形ボックス
•
:標準サイズの米国ダブルギャングジャンクションボックス
•:4インチの八角形ボックス
•:標準サイズの米国シングルギャングジャンクションボックス
取 取
取
り り
り
付 付
付
け け
け
ブ ブ
ブ
ラ ラ
ラ
ケ ケ
ケ
ッ ッ
ッ
ト ト
ト
の の
の
壁 壁
壁
面 面
面
へ へ
へ
の の
の
取 取
取
り り
り
付 付
付
け け
け
1.適切なネジを使用して、取り付けブラケット(
109 ペ ー ジ の 、 イ ン ス ト ー ル
ガ イ ド
を参照)を壁面に取り付けます。
2.ケーブル配線については、
108 ペ ー ジ の 、 イ ン ス ト ー ル ガ イ ド
を参照して
ください。
3.後でさらにケーブル長が必要になる場合に備えて、取り付けブラケットの
溝に沿ってネットワークケーブルを巻き付けます。
109
ò
ò
¨
¨
¾
¾