AXIS 230 MPEG-2 Network Camera User’s Manual
AXIS 230 User’s Manual About This Document USA - This equipment has been tested and found to comply This manual is intended for administrators and operators of the AXIS 230 MPEG-2 Network Camera, and is applicable for firmware release 3.10. Later versions of the document will be posted to the Axis Web site, as required. with the limits for a Class B digital device, pursuant to Part 15 of the FCC Rules.
AXIS 230 User’s Manual Table Of Contents Safety Notice - Battery Replacement . . . . . . . . . . . . . . . . . . . . . . . . . . . . . . . . . . . . 5 Introduction . . . . . . . . . . . . . . . . . . . . . . . . . . . . . . . . . . . . . . . . . . . . . . . . . . . . . . 6 Features and Benefits . . . . . . . . . . . . . . . . . . . . . . . . . . . . . . . . . . . . . . . . . . . . . . . . . . 6 Applications . . . . . . . . . . . . . . . . . . . . . . . . . . . . . . . . . . . . . . . . . . . . . . . . . .
AXIS 230 User’s Manual Support - Logs & Reports . . . . . . . . . . . . . . . . . . . . . . . . . . . . . . . . . . . . . . . . . . . . . . . 37 The Factory Default Settings . . . . . . . . . . . . . . . . . . . . . . . . . . . . . . . . . . . . . . . . . . . . 38 Appendix A - Troubleshooting . . . . . . . . . . . . . . . . . . . . . . . . . . . . . . . . . . . . . . 39 Pinging Your IP Address . . . . . . . . . . . . . . . . . . . . . . . . . . . . . . . . . . . . . . . . . . . . . . . .
AXIS 230 Safety Notice - Battery Replacement Safety Notice - Battery Replacement The AXIS 230 MPEG-2 Network Camera uses a 3.0V CR2032 Lithium battery as the power supply for its internal real-time clock (RTC). This battery will, under normal conditions, last for a minimum of 5 years. Low battery power affects the operation of the RTC, causing it to reset at every power-up.
Introduction AXIS 230 Introduction The AXIS 230 MPEG-2 Network Camera combines the features of a high quality network camera containing a built-in zoom with the functionality of a powerful video server, thus providing video and audio streams over IP networks. With its day/night functionality, the AXIS 230 provides quality video 24 hours a day. The AXIS 230 provides real-time compression and transmission of a DVD-quality MPEG-2 video and audio stream over TCP/IP networks.
AXIS 230 Introduction Superior Imaging - The MPEG-2 video stream can be viewed on a LAN by up to 3 standard (unicast) clients, or by unlimited numbers of multicast clients. Full frame rate (25/30 frames per second) is assured, provided the required bandwidth is available. Four different image resolutions up to 720x576 (PAL) / 520x480 (NTSC) are available, and the video quality is configurable to 7 different levels. Each client (unicast or multicast) viewing the media stream requires its own license.
Introduction AXIS 230 Applications The AXIS 230 MPEG-2 Network Camera can be used in a wide range of surveillance and monitoring applications, and is the perfect choice where an application requires a high-quality video and audio stream to be distributed at a fixed frame rate over a local area network (LAN). The AXIS 230 can also upload video sequences to FTP servers.
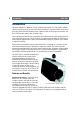
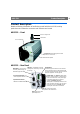
AXIS 230 Product Description Product Description Read the following information to familiarize yourself with the AXIS 230, making particular note of where the connectors and indicators are located. AXIS 230 - Front Screw-in ceiling mount Swivel head Built-in zoom lens The Status LED shows steady green for normal operation, or red for errors The internal microphone AXIS 230 - Rear Panel Reset Button - Press to restore the factory default settings, as described on page 38.
Product Description AXIS 230 Hardware Inventory Check the items supplied with your AXIS 230 against the following list: Item Title/Variant Quantity Network Camera AXIS 230 MPEG-2 Network Camera 1 Power Supply (PS-K) Europe UK USA Japan Australia 1 Camera stand 1 Mounting bracket 1 Terminal Connectors 1 License letter 1 Warranty Document Note that this is packed under the moulded insert containing the camera 1 This Document AXIS 230 Network Camera User’s Manual 1 Disk Media AXIS
AXIS 230 Installing the AXIS 230 Installing the AXIS 230 This section is intended for use by the product administrator. Operators and viewers should read Operating the AXIS 230, on page 15. Installation using AXIS IP Utility Important! • Although it may be possible to use the AXIS 230’s default IP address 192.168.0.90, please consult your network administrator to obtain a suitable IP address for your network/subnet.
Installing the AXIS 230 AXIS 230 Example: c:\WINNT>arp -s 192.168.0.125 00-40-8c-18-10-00 c:\WINNT>ping ping -l 408 -t 192.168.0.125 For Unix/Linux, enter the following: (note that you must be the root user.) Example (for Linux): >arp -s 192.168.0.125 00:40:8c:18:10:00 temp >ping -s 408 192.168.0.125 Note: In some Unix/Linux systems, the arp command can be located in a directory that is not on the command path; e.g: /usr/sbin/arp 4. Now connect power to the camera.
AXIS 230 Installing the AXIS 230 The AXIS Media Control (Viewing Client) To view the video stream from the AXIS 230 in a browser, the AXIS Media Control must be installed. This is performed automatically the first time the camera is accessed from a browser. Simply accept the license agreement displayed in the setup window and the client will install. After the installation has completed, restart your computer, if required.
Installing the AXIS 230 AXIS 230 Accessing the AXIS 230 from Internet Explorer Start your browser and enter the IP address of the AXIS 230 in the location/address field. The first time the camera is accessed, there will be no need to log in. The Live View page opens, allowing you to proceed with the product’s configuration, by clicking on the Setup link.
AXIS 230 Operating the AXIS 230 Operating the AXIS 230 This section is intended mainly for system Operators, that is, personnel responsible for using the AXIS 230 as part of e.g. an integrated surveillance system or similar. Product Administrators will also find this section useful reading.
Operating the AXIS 230 AXIS 230 Access from a browser The video stream and the setup tools in the AXIS 230 can be accessed using Microsoft Internet Explorer 5.5 or higher on Windows 2000 or Windows XP. Follow the instructions below to access your images: 1. Start Internet Explorer. 2. Enter the name or IP address of the AXIS 230 into the Address field: Example! http://192.168.0.125/ The Live View page, similar to the example shown below, is now displayed.
AXIS 230 Operating the AXIS 230 Positional Control of the Video Source Pan/Tilt devices connected to the AXIS 230’s ports can be controlled directly from the web interface, or by third-party applications. When using such a device, Pan and Tilt bars are automatically displayed, as shown in the example below. Note that the selected Pan/Tilt driver determines the actual layout of the controls. Other functions, not shown here, may also be available. Focus bar Allows smooth focusing.
Operating the AXIS 230 AXIS 230 Video Settings The AXIS 230’s video settings, as described below, may or may not need adjustment. • Resolution - the available video resolutions for the AXIS 230 are listed in the table below. The exact resolution will depend on the modulation type - PAL or NTSC. See also the Technical Specifications, on page 55.
AXIS 230 Operating the AXIS 230 • Max Digital Zoom - To prevent distortion of the video stream when zooming, set a maximum value for the digital zoom. This ensures that you always get video of a certain minimum defined quality. • Focus Near Limit - This setting is useful when the camera is mounted e.g. behind glass in an outdoor enclosure. In certain circumstances, e.g. when rain or snow falls on the glass, the auto-focus function may attempt to refocus on this new element in the image.
Operating the AXIS 230 AXIS 230 Audio Settings The AXIS 230 provides a fully synchronized audio stream at up to CD quality. The following settings are available: • Quality - Select the bit rate and sample rate to use. Generally speaking, the higher the setting, the better the sound quality, but at the higher levels the difference might not be audible. The default value (128 Kbit/s) provides good quality sound. • Input - Select the input to use for the audio input.
AXIS 230 Operating the AXIS 230 When you are satisfied with the new layout, click Save. Note: Unchecking the Show Setup link will mean that the administration tools will then only be accessible by entering the full address to the tools into the browser’s URL field, for example: http://172.21.1.200/operator/. Please make a note of the address for your camera, for future use. Events and Event Types The AXIS 230 MPEG-2 is capable of performing various actions when certain types of events occur.
Operating the AXIS 230 AXIS 230 Setting up a new event type Click the menu link to Event Types. This opens the list of event types as in the example below. The list shows various information about the event types currently configured. Click the Add button. This launches the Event Type Setup dialog. Depending on the event type you require, you will then need to provide some or all of the following information: General • Name - Give the event type a suitable name. Respond to Trigger...
AXIS 230 Operating the AXIS 230 Trigger Type The trigger type is what starts the event type. The following options are available: • Input Ports - This describes the states that the 2 inputs must be in before the event is triggered. One or more inputs can be used together, but note that the states for all the inputs used must first be reached before the event is triggered. • Timer - whole time frame - This option will simply use the times specified in Respond to Trigger... described above.
Operating the AXIS 230 AXIS 230 • Pre-trigger recording time up to - The AXIS 230 can save recorded sequences that originate from the time immediately preceding the trigger. This can be very useful when checking to see what happened to cause the trigger. The part of the buffer not used for pre-trigger recording is automatically used for post-trigger recording. This is useful in ensuring that there is no video lost during the short time it takes to complete the connection to the FTP upload server.
AXIS 230 Operating the AXIS 230 • Send email notification to - Check this box to enable the sending of email to notify recipients of events. Enter the email address(es) in the field provided. Multiple addresses are separated by commas (,). To add your own text, check the Include text box and enter your text. Note that a mail server must be configured in the SMTP network settings. • Send HTTP notification - This method sends a notification to an HTTP server. Select the name of the server.
Operating the AXIS 230 AXIS 230 Notification Servers To allow your event types to send HTTP and TCP notifications, the necessary servers must first be configured. The Notification Server list shows the servers currently configured. These servers are shown as the alternatives when selecting this type of notification in the event type setup, as described in the preceding section. Notification normally requires some sort of script to be located on the destination server.
AXIS 230 Operating the AXIS 230 The following information should be provided for a TCP notification server: • Name - This can be any descriptive name you like. • Network address - Provide the address of the server here. This may be an IP address or a host name. Note that to use a host name, a DNS server must be configured in the TCP/IP network settings. • Port - Enter the port number used for accessing the TCP host. • Retry count - If the connection attempt fails, enter the number of times to retry.
Operating the AXIS 230 Preset position setup - Zoom only To add a new preset position for the zoom function, zoom the camera to the required magnification and then enter a descriptive name in the Current Position field and click Apply. To set a position as Home, check the box provided when that position is current. It is possible to go directly to the Home position from any other position - simply by clicking the H button. To remove a preset position, select it from the drop-down list and click Remove.
AXIS 230 The System Options The System Options This section lists and describes the administration tools used for the general configuration of the AXIS 230 - the System Options. The topics covered are, for example, network settings, date and time settings, users, etc. For information on general usage and how to set up event types, etc., please see Operating the AXIS 230, on page 15. The product cannot be configured before it is installed.
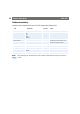
The System Options AXIS 230 System Options Overview The table below provides a brief overview of the System Options. Each section is explained in more detail in the pages that follow.
AXIS 230 The System Options Adding Users Click Add to add a new user. The following fields must then be completed: • User Name - Must contain at least one, but not more than fourteen characters. • Password - Must contain at least one, but not more than eight characters. • Confirm Password - Repeat the above password here.
The System Options AXIS 230 Allowed Ports - Check the boxes for the protocols that the user (IP address) will be allowed to use to access the camera. These can be FTP and/or HTTP. If you have particular requirements concerning which ports access will be allowed on, enter these in the Port range fields. To allow access via HTTP, the port value here must correspond to the value set on the TCP/IP Network Settings page.
AXIS 230 The System Options TCP/IP Network Settings From the Network Settings, configure the TCP/IP network settings as follows: Automatic IP Configuration DHCP - Dynamic Host Configuration Protocol (DHCP) is a protocol that lets network administrators centrally manage and automate the assignment of IP addresses in an organization's network. Check the box to allow a DHCP server on the network to assign the IP address.
The System Options AXIS 230 Manual IP Configuration IP Address - Specify a unique IP address for your camera, to establish communication with your network. Written as four numbers separated by periods, each number in the address must be in the range 0 - 255. For example: 192.168.0.125 Note: IP addresses can be assigned at random within isolated networks, provided that each given address is unique.
AXIS 230 The System Options SMTP (email) Network Settings The AXIS 230 can be configured to send event and error email messages to predefined addresses. Primary mail server - Enter the name or IP address of the server providing your mail facilities. Note that to use a host name, a DNS server must be specified in the TCP/IP network settings. Secondary mail server - Enter the name or IP address of a secondary mail server. This will be used if the primary mail server is unavailable.
The System Options AXIS 230 Ports & Devices IO Ports This page allows configuration of the two inputs and one output supported by the AXIS 230. Ports can be given descriptive names, and their Normal state can be configured. The normal state describes the inactive state for the port. It is also an indication of the function of the connected equipment and how it is activated.
AXIS 230 The System Options Maintenance This section provides tools for the following: • Restart - Clicking this button will restart the AXIS 230. • Restore - This button will reset the camera to its factory default settings. Once this has been done, many of the unit’s parameters will need to be re-configured. The only settings saved are the IP address, the default router and the subnet mask.
The System Options AXIS 230 The Factory Default Settings In certain circumstances, it may be necessary to reinstate the Factory Default settings for your AXIS 230. This is performed in one of two ways: • By clicking the Restore button from the Maintenance page under System Options. This action will reset most of the unit’s parameters but will save the IP-address, the Subnet mask and the Default Router. • By pressing the Reset button, located on the rear panel.
AXIS 230 Troubleshooting Appendix A - Troubleshooting This appendix provides useful information to help you to resolve any difficulty you might have with your AXIS 230. Symptoms, possible causes and remedial actions are provided in a quick reference table. Checking the Firmware One of your first actions when attempting to solve a problem should be to check the firmware version currently installed. An updated version may contain a correction that fixes your particular problem.
Troubleshooting AXIS 230 Symptoms, Possible Causes and Remedial Actions Symptoms The AXIS 230 cannot be installed, or cannot be accessed from a browser after installation. Possible causes Remedial actions The IP address is already being Run Ping (as described below) and follow the appropriate used by another device. recommendations. The IP address used during installation is not valid on your subnet. Run Ping. If you get “Destination host unreachable” or similar, the diagnosis is probably correct.
AXIS 230 Symptoms Slow video Troubleshooting Possible causes Outdated drivers for graphics card. Remedial actions Obtain and install the latest device driver for your graphics card from the manufacturer’s web site. Also check that DirectDraw acceleration is enabled. This can be done by running the program DxDiag.exe (click Start - Run and then type dxdiag.exe) Check on the Display tab that DirectDraw acceleration is enabled.
Troubleshooting AXIS 230 Pinging Your IP Address By sending a packet to the specified address and waiting for a reply, the Ping utility can determine whether a specific IP address is accessible. It also provides a useful method for confirming addressing conflicts with your AXIS 230 on the network. Follow the instructions below to ping your unit: 1. Start a Command window and type ping x.x.x.x, where x.x.x.x is the IP address of the AXIS 230. 2.
AXIS 230 Updating the Firmware Appendix B - Updating the Firmware The AXIS 230 firmware is stored in Flash memory. This memory is provided by a silicon chip that, just like any other ROM device, retains data content even after power is removed. Flash memory is unique because it allows its data to be erased and re-written. This means firmware upgrades can be installed as they become available - without having to replace any parts. New firmware is simply loaded into the AXIS 230 over the network.
Updating the Firmware AXIS 230 3. Open a browser and type in the IP address of the AXIS 230. In the page that appears, use the Browse button to select the upgrade file to use, e.g. axis230.bin. Then hit the Load button to restart the upgrade process. 4. After the upgrade has completed (1-10 minutes), the unit will automatically restart and show a steady green on the Power and Status LED:s and flashing green or amber on the Network LED. 5. Repeat the arp and ping commands as described above. 6.
AXIS 230 Customizing The AXIS 230 Appendix C - Customizing The AXIS 230 Modifying the File System The Linux-based operating system and flash memory file system make it possible for advanced users and application developers to customize the AXIS 230 by adding additional files to the read-write area of the flash memory. Important! • Modification of the flash file system is NOT supported by Axis.
Customizing The AXIS 230 AXIS 230 Custom Web Pages The AXIS 230 contains a re-writable flash memory file system that allows some directories and files to be changed by the root user, using FTP. This strictly non-supported product functionality, makes it possible for advanced users and application developers to add their own Web pages, scripts, and other files to the Axis product. Customizing Procedures The existing web pages are stored in a compressed read-only area of the file system.
AXIS 230 Customizing The AXIS 230 Example! http://192.168.0.125/local/index.html Your page now appears in your browser. 8. Enter bye in the command window to exit FTP. Note: You can change the html files as and when you like, but remember that the available flash memory is limited.
Customizing The AXIS 230 AXIS 230 After making these changes, you will not be able to automatically access the default index page. Instead you must type in the complete URL to access it: http://IP#/view/index.shtml or, if PTZ is enabled: http://IP#/view/ptzFrame.shtml Note: As an alternative to the above, edit the line starting with Document Root so that it points directly to the local directory.
AXIS 230 Unit Connections Appendix D - Unit Connections The D-Sub Connector The AXIS 230 provides one 9-pin D-sub connector, providing the physical interface for an RS-232 port, used for connecting accessory equipment; such as stand-alone Pan/Tilt devices for the remote positioning of connected video cameras. A diagram of the RS-232 connector, complete with pin assignment table, is shown below.
Unit Connections Schematic Diagram - Terminal Connector Block AXIS 230
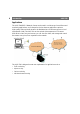
AXIS 230 Unit Connections Connecting Pan/Tilt Devices The AXIS 230 supports a range of Pan Tilt device drivers. The driver is selected from the COM Port settings, which are found under System options - Ports & Devices. Please see the online help or www.axis.com for a complete list of supported devices. The diagram below illustrates how the AXIS 230 connects to your workstation and a Pan Tilt device.
Unit Connections AXIS 230 Controlling and Monitoring By entering http requests in your browser’s URL field, you can: • drive the transistor output high or low • monitor the status of the digital inputs This requires administrator access to the AXIS 230, and thus a user name and password. Log in as root and supply the root password (default = pass).
AXIS 230 Example: - Monitor data on inputs 1 and 2 http://server/axis-cgi/io/input.
Audio Settings AXIS 230 Appendix E - Audio Settings The maximum audio level depends on the configuration used. • Selecting external microphone and high sensitivity input, sets the 0dB level (the maximum level) to 25mVpp. • Selecting external microphone and low sensitivity input, sets the 0dB level (the maximum level) to 270mVpp. • Selecting external line input sets the 0dB level (maximum level) to 3.0 Vpp.
AXIS 230 Technical Specifications Appendix F - Technical Specifications System Requirements - Windows® 2000 or Windows XP (with latest Service Pack.) AGP graphics card with 16 MB video memory and support for DirectDraw®. Use the latest available driver. Internet Explorer 5.5 or higher (with latest Service Pack.) DirectX® (latest version.) Installation - Physical network connection using RJ-45 twisted pair cable. 10baseT or 100baseTX Fast Ethernet.
Technical Specifications AXIS 230 Approvals - EMC • EN 55024:1998+A1 (CISPR 24:1997+A1.) Applies when using the internal microphone or an external line input, but not when using an external microphone.
AXIS 230 Bandwidth Appendix G - Bandwidth As different networks have different characteristics and different amounts of bandwidth available, the AXIS 230’s video and audio settings may need to be adjusted to suit the prevailing conditions. The Video Quality Level The video quality level describes how much video data is transferred per second, and can be set in the range 1-7 (lowest to highest).
Bandwidth AXIS 230 Other Considerations • The MPEG-2 encoder chip in the AXIS 230 is designed for constant video bit rates from 1.0 8.0 Mbit/s. The parameter on the encoder chip that controls the video bit rate allows even lower settings, but not at constant bit rates. At low bit rates, the encoder delivers variable bit rates, and the rate is strongly affected by the selected video resolution and image information. • The video quality level can be set from 1 (low) to 7 (high.
AXIS 230 Index A Access from a browser 14 Actions 21 Activate output port 24 Adding Allowed IP addresses 31 Notification servers 26 Upload servers 25 Users 30 Additional information - upload servers 25 Administrator - user group 31 Advanced image settings 19 Allowed IP addresses 31 Anonymous viewers 30 Applications 8 Audio - event triggering 23 Audio Equipment 14 Audio In connector 14 Audio settings 20, 54 Automatic IP Configuration 33 AXIS IP Utility 11 AXIS Media Control 13 B Bandwidth 57 Base file na
Index 60 G Group of Pictures (GOP) 19 H Hardware Inventory 10 Home page 47 HTTP event notification 25 IP address notification 33 notification server 26 port number 34 I I/O Terminal Block 49 Information Log 37 Input Ports - event triggering 23 Inputs 36 Installation 11 Installing Pan/Tilt devices 51 Internet Explorer 12 IO Ports 36 IP address notification 33 IP addresses - allowed 31 IP Utility 11 IR Illumination 19 K Keep active during event 24 Keep active for 24 L Layout - live view 20 Live Vie
AXIS 230 Respond to trigger...
Glossary of Terms AXIS 230 Glossary of Terms ActiveX - A control (or set of rules) used by a browser. ActiveX controls are often downloaded and installed automatically as required. NWAY - A network protocol that automatically negotiates the highest possible common transmission speed between two devices. ARP - Address Resolution Protocol. A protocol for assigning an IP address to a physical device address that is recognized in the local network.