
User Guide


31
AXIS 209FD/FD-R/FD-R M12
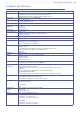
Support
The Support Overview page provides valuable information on troubleshooting and contact information,
should you require technical assistance.
System Overview - is a quick look over the camera’s status and
settings. Information that can be found here
includes the camera’s Firmware version, IP address, Security, Optional Network Services, Event Settings,
Image settings and Recent log items. Many of the captions are also links to the proper Setup page to
conveniently make adjustments in the camera’s settings.
Logs & Reports - When contacting Axis support, please be sure to provide a valid
Server Report with your
query.
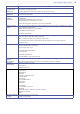
Advanced
Scripting is an advanced function that provides the means for customizing and using scripts.
Caution!
The scripting function is a very powerful
tool. Improper use may cause unexpected behavior or even loss of
contact with the unit. If a script does cause problems, reset the unit to its factory default settings (in which
case, a previously saved backup file will be useful for returning the unit to its latest configuration).
Axis strongly recommends that you do not use th
is function unless you fully understand its
consequences. Axis support provides no assistance for customized scripts.
For more information, please visit the Developer pages
at www.axis.com/developer
Plain Config
- this function is for the advanced user with previous experience of configuring Axis cameras.
All parameters can be set and modified from this page. Help is available via the links on the standard setup
pages.
About
Third Party Software Licenses - Click View licenses for a list of the licensed software used in the
AXIS 209FD/FD-R Network Camera.
Resetting to the factory default settings
To reset the camera to the original factory default settings, go to the System Options > Maintenance web
page (as described in Maintenance, on page 30) or use the Control button, which is found inside
the camera
cover (see Overview, on page 5) as described below:
Using the Control Button
To reset the camera to the factory default settings using the Control Button:
1. Remove the camera’s cover.
2.
Disconnect the network to remove power.
3. Press and hold the Control button while reconnecting the cable.
4. Keep the Control button pressed until the Status Indicator color changes to amber (this may take
up to 15 seconds).
5. Release the Control button.
6. When the Status Indicator changes to Green (which may take up to 1 minute), the process is
complete and the camera has been reset. The unit will now have the default IP address
192.168.0.90
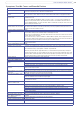
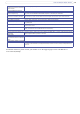
Unit connectors
(AXIS 216FD) network connector. Female RJ-45 Ethernet connector for 10BaseT/100BaseTX. Supports
Power over Ethernet. Using shielded cables is recommended.