USER’S GUIDE AXIS T8311 Video Surveillance Joystick AXIS T8312 Video Surveillance Keypad AXIS T8313 Video Surveillance Jog Dial ENGLISH AXIS T8310 Video Surveillance Control Board
Legal Considerations Video and audio surveillance can be prohibited by laws that vary from country to country. Check the laws in your local region before using this product for surveillance purposes. Electromagnetic Compatibility (EMC) This equipment generates, uses and can radiate radio frequency energy and, if not installed and used in accordance with the instructions, may cause harmful interference to radio communications.
AXIS T8310/T8311/T8312/T8313 User’s Guide Page 3 AXIS T8310, AXIS T8311 AXIS T8312 & AXIS T8313 User’s Guide This User’s Guide provides instructions for installing AXIS T8310 Video Surveillance Control Board. For all other aspects of using the product, please see the AXIS Camera Station help pages. Installation Steps 1. Check the package contents against the list below. 2. Hardware overview. See page 4. 3. Install the hardware.
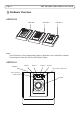
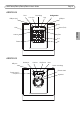
Page 4 AXIS T8310/T8311/T8312/T8313 User’s Guide Hardware Overview AXIS T8310 AXIS T8311 AXIS T8312 AXIS T8313 Note: The functionality of the programmable hotkeys is dependent on the application software. The descriptions below are valid for AXIS Camera Station.
AXIS T8310/T8311/T8312/T8313 User’s Guide Page 5 AXIS T8312 Start USB port (2x) Live view Recordings Logs Configuration USB port Preset Alarm (Tool) View 0-9 Tab Alt AXIS T8313 USB port Bookmark Previous Play/Pause Next Search recordings Toggle search/ Snapshot Shuttle wheel Jog wheel ENGLISH Time Camera
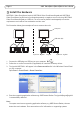
Page 6 AXIS T8310/T8311/T8312/T8313 User’s Guide Install the hardware AXIS T8311 Video Surveillance Joystick, AXIS T8312 Video Surveillance Keypad and AXIS T8313 Video Surveillance Jog Dial can be connected separately or together as one unit using AXIS T8312 Video Surveillance Keypad as a USB hub. The units can be placed interchangeably to meet the requirements and needs of the workstation and the users. The illustration below gives examples of how to connect the units.
AXIS T8310/T8311/T8312/T8313 User’s Guide Page 7 Troubleshooting If you experience problems during the installation, please do or check the following: • • • • Restart the supporting application software, e.g. AXIS Camera Station. Disconnect the USB plug from the computer, wait 10 seconds and then reconnect. Move the USB plug to another available USB port on your computer. Verify that the operating system has identified the joystick.
Page 8 AXIS T8310/T8311/T8312/T8313 User’s Guide Technical specifications Item Specification Models AXIS T8310 Video Surveillance Control Board: Deflection Functionality Application defined hotkeys • AXIS T8311 Video Surveillance Joystick • AXIS T8312 Video Surveillance Keypad • AXIS T8313 Video Surveillance Jog Dial • AXIS T8311: Square delimiter Pan/Tilt (XY): ±15° with central return spring Zoom (Z): ±25° with central return spring • AXIS T8311: Control of the pan, tilt, zoom functional
User’s Guide AXIS T8310/T8311/T8312/T8313 © Axis Communications AB, 2010 Ver.1.00 Printed: February 2010 Part No.