AXIS 5500/AXIS 5550 Network Print Servers User’s Manual AXIS 5500 / AXIS 5550 User’s Manual 1
Regulatory Information Safety Notices Important: Take some time to read through the safety notices before installing the AXIS 5500/AXIS 5550. Please observe all safety markings and instructions when using this product. Observe “Important:” in the text to avoid operational impairment. Do not proceed until you have fully understood the implications.
Table of Contents Table of Contents Section 1 Introduction . . . . . . . . . . . . . . . . . . . . . . . . . . . . . . . . . . . . . . . About this Manual . . . . . . . . . . . . . . . . . . . . . . . . . . . . . About Axis . . . . . . . . . . . . . . . . . . . . . . . . . . . . . . . . . . . . Support Services . . . . . . . . . . . . . . . . . . . . . . . . . . . . . . . Supported Environments . . . . . . . . . . . . . . . . . . . . . . . . . Section 2 Product Overview . . . . . . . . . . . . . . . . .
Table of Contents 4 Setup using iPrint . . . . . . . . . . . . . . . . . . . . . . . . . . . . . Basic Setup with AXIS NetPilot . . . . . . . . . . . . . . . . . . . Advanced Installation using AXIS NetPilot . . . . . . . . . . Basic Queue-based printing over IP . . . . . . . . . . . . . . . . 61 65 67 69 Section 7 Adding Printers in UNIX/Linux . . . . . . . . . . . . . . . . . . . . . . . . Print Tools . . . . . . . . . . . . . . . . . . . . . . . . . . . . . . . . . . .
Table of Contents Section 15 Technical Specification . . . . . . . . . . . . . . . . . . . . . . . . . . . . . 133 Section 16 The Parameter List . . . . . . . . . . . . . . . . . . . . . . . . . . . . . . . . NetWare Parameter Combinations . . . . . . . . . . . . . . . TCP Ports Opened for Raw Printing . . . . . . . . . . . . . . . SNMP Device Index . . . . . . . . . . . . . . . . . . . . . . . . . . . Section 17 Glossary . . . . . . . . . . . . . . . . . . . . . . . . . . . . . . . . . . . . . . . .
Introduction Section 1 Introduction Thank you for purchasing the AXIS 5500/AXIS 5550. This product has been developed to connect your printers anywhere in your network, allowing all network users access to shared printer resources. About this Manual This manual is applicable for an AXIS 5500/AXIS 5550 with firmware version 7.00 or higher, providing introductory information as well as detailed instructions on how to set up and manage the print server in various network environments.
Introduction If you are connected to the Internet, you can: • • • • Download user documentation and firmware updates Find answers to previously resolved problems in the FAQ database. Search by product, category or phrase Report problems to Axis support staff by logging in to your private support area Visit the Axis support Web at www.axis.
Product Overview Section 2 Product Overview Package Contents Verify that nothing is missing from the AXIS 5500/AXIS 5550 package by using the check list below. Please contact your dealer if anything is missing or damaged. All packing materials are recyclable.
Product Overview AXIS Network Product CD The AXIS Network Product CD provides an easy-to-use electronic catalog, that includes Axis software, firmware and user documentation. If your computer is set to French, German, Italian or Spanish, the information will automatically be presented in that language, otherwise you will see the English version. To read the PDF documents you need an Acrobat Reader, which can be fetched at http://www.adobe.com/products/acrobat/readermain.
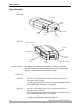
Product Overview Physical Description AXIS 5500 Test button Network indicator Ethernet connector USB printer port (USB1) Power Adapter connector Power indicator AXIS 5550 Parallel printer port (LPT1) Test button Ethernet connector Network Indicator Power Adapter connector Power USB printer port (USB1) Indicator Network Connector Axis Network Print Servers are designed for 10 Mbps or 100 Mbps Ethernet networks and connect to the network via a twisted pair RJ45 category 5 cable (10baseT and 100b
Product Overview Test Button The test button is used for: printing a test page to check the connection to the printer printing the parameter list showing the print server settings performing a Factory Default of the print server, which will restore most of the parameters and settings to factory default values See “The Test Button” on page 129 for details. • • • Network Indicator Power Indicator Compatible Printers The network indicator flashes to indicate network activity.
Product Overview Flexibility The print server supports printing in all major computer systems and environments, including five different print methods in the TCP/IP environment. AXIS 5550 allows you to print on two printers simultaneously. The integrated IPP (Internet Printing Protocol) function allows for printing from LAN to LAN via a WAN, such as the Internet. Speed The AXIS ETRAX 100 LX chip has been specifically designed for LAN products.
Basic Installation Section 3 Basic Installation Quick Overview Follow these steps to make your printer network ready: 1. “Connecting the Hardware” on page 13 2. “Assigning an IP Address to the Print Server” on page 15 3.
Basic Installation Backside label on print server Serial number same as MAC/Ethernet number; e.g. 00408c181cf0 = 00-40-8c-18-1c-f0 1. Make sure that your printer is switched off and that the print server’s Power Adapter is disconnected. 2. Locate the serial number, found on the underside label of the print server, and write it down. You will need this number to configure the print server. Example: S/N: 00408c181cf0 3.
Basic Installation Assigning an IP Address to the Print Server Receiving an IP Address with DHCP If you have a DHCP server on your network, your print server will receive an IP address automatically. The IP address will then appear on the test page you print by pressing the test button once. If you are not working in a DHCP network, you need to set the IP address of the print server manually.
Basic Installation Manual IP Address Assignment Method Platform Comment See Windows Requires the IP address for each device to be downloaded individually. Cannot be used over routers. “Set the IP Address using ARP in Windows 98/NT/ Me/2000/XP” on page 20 UNIX/Mac OS X You must define the Default Router and Subnet Mask. Log in to the print server’s Web pages and select Admin | Network Settings | Detailed View | TCP/IP Network | Default Router and Subnet Mask.
Basic Installation in the print server’s Web interface. Refer to “Management and Configuration” on page 88. If the host name matches another entry in the DDNS data base, the print server deletes that entry before registering. Notes: • The default host name of the AXIS 5500/AXIS 5550 is ’AXIS’ followed by the last 6 digits in the serial number. e.g. AXIS181636. The host name (Print server name) can be changed in the PS_NAME. field on the Admin | General Settings page.
Basic Installation Set the IP Address using RARP in UNIX/Linux Follow the instructions below to set the IP address using RARP. Append the following line to your Ethernet Address table. This is typically located in the /etc/ethers file: Example: 00:40:8c:10:00:86 npsname 1. Update, if necessary, your host table and alias name databases as required by your system. 2. If it is not already running, start the RARP daemon. This is typically performed using the rarpd -a command.
Basic Installation Set the IP Address using BOOTP in UNIX/Linux Below is an example of how to set the IP address of the print server using BOOTP: Append the following entry to your boot table. This is typically performed by editing the file: /etc/bootptab :ht=:vm=:\ :ha=:ip=:\ :sm=:gw= Example: npsname:ht=ether:vm=rfc1048:\ :ha=00408c100086:ip=192.168.3.191:\ :sm=255.255.255.0:gw=192.168.1.1 1.
Basic Installation Set the IP Address using ARP in Windows 98/NT/ Me/2000/XP 1. Open a Command Prompt and enter the following commands: Syntax arp -s ping Example arp -s 192.168.3.191 00-40-8c-10-00-86 ping 192.168.3.191 2. The host will return reply from 192.168.3.191, or a similar message. This indicates that the address has been set and that communication is established. 3.
Basic Installation Notes: • If the host name has not been mapped to an IP address, simply replace the host name entry with the IP address. • The ARP command varies between different UNIX/Linux systems. Some BSD type systems expect the host name and node address in reverse order. Furthermore IBM AIX systems will require the additional argument ether. • When you execute the ping command for the first time, you may experience a significantly longer response time than is usual.
Basic Installation Installation and Integration Refer to the table below to select the appropriate installation method. All Axis client software is available on www.axis.
Adding Printers in Windows Section 4 Overview of Installation Methods Adding Printers in Windows This section describes how to add network printers to a computer in Windows. Refer to the table below to determine the most appropriate installation method according to your computer environment: Windows Platform Windows 2000, XP, 2003 Windows 2000 Protocol TCP/IP (LPR) NetBIOS/NetBEUI Method See...
Adding Printers in Windows client computer that wants to print. Each client computer must install the appropriate printer drivers in order to print properly. In Windows 98 and Me, AXIS Print Monitor must be installed on all (printing) client computers for Peer-to-Peer printing. SNMP Device Index When using the TCP/IP protocol (and if the printer driver permits), the print server can use SNMP Status to find out if the printer is ready to accept a new job. See “SNMP Device Index” on page 158.
Adding Printers in Windows 5. The Wizard searches for a suitable printer driver. If a suitable driver is not found, you will be asked to select a driver, otherwise the Wizard suggests which Printer Model and Printer Driver to use. Click Change driver to select another driver, or click Finish to accept and install the suggested driver. The installation is complete and you can start using the network printer.
Adding Printers in Windows Go Straight to the Print Server’s Web Interface Right-click on a printer in the Select Network Printer list and select Print server home page to configure the print server from its embedded Web pages.
Adding Printers in Windows 3. Click the Create a new port radio button and select Standard TCP/IP Port from the list. Click Next and the Add Standard TCP/IP Printer Port Wizard starts. Click Next. 4. Enter the IP address of the print server (Example: 192.168.3.191) The Port Name will be filled in automatically when you enter the IP address. Optionally , you can add the port you want to use as a suffix: AXIS 5500: Enter _LPT1 for the USB port.
Adding Printers in Windows 5. In the Additional Port Information Required window, choose the Device Port you want to use, you will see LPT1, LPT2 and COM1 in a drop-down menu: AXIS 5500: Enter LPT1 for the USB port*. AXIS 5550: Enter LPT2 for the USB port* and LPT1 for the parallel port. Click Next. Click Next and Finish 6. Select Manufacturer and Printer from the driver list. Click Next. 7. Choose whether you want to keep the existing driver or to replace it.
Adding Printers in Windows 9. Choose whether you want to share the printer with other network users, print a test page, etc. Select the appropriate radio button and click Next and Finish. 10. Print a test page to verify. You have now completed the installation. *Tcpmon.ini If you have an old version of Windows (prior to XP Service Pack 2), the USB port will not appear as an option in the Windows Device Port list (see Step 5 above).
Adding Printers in Windows Installing a Network Printer 1. Go to Start | Settings | Printers | Add Printer. Select My Computer and click Next. 2. From the Available Ports list, choose the appropriate printer port, which will appear as the IP address or host name of the print server. If it doesn’t appear in the list, click Add Port. 3. Choose LPR Port from Available Printer Ports and click New Port. 4.
Adding Printers in Windows Adding Printers in Windows 2000 / XP / 2003 using the Microsoft LPR Monitor This section describes how to set up a Windows 2000/XP server for LPR printing over the TCP/IP protocol, using the built-in Microsoft LPR Monitor i.e. Print Services for UNIX. Note: See “Alternative Method for LPR Printing” on page 32 for instructions on how to set up printing over LPR without installing Print Services for Unix.
Adding Printers in Windows 4. Enter the name of the server (or its IP address) in the field Name and address of server providing lpr (Example: AXIS100086) and enter the port you want to use in the field Name of printer or print queue on that server (Example: USB1). Click OK.
Adding Printers in Windows AXIS Print Monitor Software AXIS Print Monitor is the recommended tool to use for network printing in Windows 98 and Me environments. AXIS Print Monitor is available free of charge on www.axis.com AXIS Print Monitor Overview AXIS Print Monitor allows an AXIS 5500/AXIS 5550 to be connected in the same simple fashion as connecting a local printer. Once installed, it is automatically initialized upon system startup.
Adding Printers in Windows Adding NetBIOS/NetBEUI Printers in Windows 2000 using AXIS Print Monitor See to it that the NetBEUI protocol is installed on your client. Follow the procedure below to install Axis Printer Ports from a Windows 2000 workstation: 1. To start the Add Printer Wizard, select Settings | Printers from the Start menu and double-click the Add Printer icon. Start the installation by clicking Next. 2. The Wizard asks you to select Local printer or Network printer. Select Local printer.
Adding Printers in Windows Adding Printers over NetBIOS/NetBEUI in Windows NT using AXIS Print Monitor See to it that the NetBEUI protocol is installed on your client. Follow the procedure below to install Axis Printer Ports from a Windows NT workstation: 1. Install AXIS Print Monitor on all workstations that will print via the print server. 2. To start the Add Printer Wizard, select Settings | Printers from the Start menu and double-click the Add Printer icon. 3.
Adding Printers in Windows Adding Printers in Windows 98 and Me over TCP/IP using AXIS Print Monitor 1. Install AXIS Print Monitor on all workstations that will print via the Axis print server. 2. Next, start the Windows Add Printer Wizard: select Settings | Printers from the Start menu and double-click the Add Printer icon. 3. After clicking Next in the first dialog, the Wizard asks you to select between Local Printer and Network Printer.
Adding Printers in Windows 2. Choose whether error condition pop-up messages are to be displayed by checking the box in the Configure AXIS Ports dialog. Define the frequency at which the error messages should be displayed after retry. Click OK. Note: Even if the desired printer is available in the Manufacturers and Printers lists, you are advised to use the print driver provided with the printer. This assures you of the latest driver software.
Adding Printers in Windows 7. Choose whether error condition pop-up messages are to be displayed by checking the box in the Configure AXIS Ports dialog. Define the frequency at which the error messages should be displayed after retry. Click OK and Next. 8. Enter an appropriate name for your printer and click Next. 9. Choose whether you wish to print a test page and click Finish.
Adding Printers in Macintosh Section 5 Adding Printers in Macintosh Having connected the AXIS 5500/AXIS 5550 to your network, this section now describes how to set up your print server for printing in Mac OS X and earlier Macintosh environments using AppleTalk. If you intend to use the print server in a multi-protocol environment, refer to the chapters pertaining to the respective operating systems in this manual. Bonjour Printing in Mac OS X Bonjour is available from Mac OS X 10.2 and up.
Adding Printers in Macintosh 6. Click Add to finish the installation. The print server has now been added to the Printer List. 7. If you wish to configure printer settings, click Printers | Configure Printer. To Change the Bonjour Service Name You can change the print server’s Bonjour service name via the print server’s Web interface: Admin | Network Settings | Detailed View | TCP/IP Network => Bonjour Service Name.
Adding Printers in Macintosh Installation in Mac OS X using AppleTalk This section describes setting up your print server for printing in the Mac OS X. 1. Start Print Center (from Go | Applications | Utilities => Print Center) or the Printer Setup Utillity. 2. Select Printers | Add Printer... 3. From the Printer List dialog, select AppleTalk. 4. Now, the port of your AXIS 5500 will appear in the list of available printers. The port is shown as _. Example: AXIS100086_USB1.
Adding Printers in Macintosh Installation on Mac OS 9.1 or older, using AppleTalk Basic Configuration On Mac OS 9.1 or older, basic configuration in AppleTalk is performed simply by opening the Chooser window and selecting a printer. You can change the default name of your print server or any of default parameters by editing the print server’s config file.
Adding Printers in Macintosh 4. Click the name of the printer you want — the ports are shown as _. Example: AXIS100086_USB1. On an AXIS 5550 you will also have access to an LPT port, which will appear as LPT1 in the list. Example: AXIS100086_LPT1. 5. Click the Close box. This completes the configuration and closes the Chooser. Repeat this procedure for each Macintosh computer on the network using the print server. LaserWriter 8.
Adding Printers in Macintosh Note: For information on advanced AppleTalk functions such as non-PostScript printer support, please refer to the AXIS 5500/AXIS 5550 Technical Reference on the Axis Web site. BCP and TBCP You should specify if you want to enable or disable binary transfer of print data in the print server’s Web interface (Admin | Network Settings | Detailed View | Macintosh | Binary Protocol for Printer n.
Adding Printers in Macintosh Example: The following example describes how you set the print server parameters in AppleTalk. Important: DO NOT use the parameter values from this example when configuring your print server. You should select values that are appropriate for your printers and network settings. 1. Open the Chooser from the Apple menu. 2. Select a network printer driver — any LaserWriter will do. 3. Select the printer port ending with _CFG. 4. Close the Chooser. 5. Open a text editor, e.g.
Adding Printers in NetWare Section 6 Adding Printers in NetWare This section describes how to continue the installation of the AXIS 5500/AXIS 5550 in the NetWare environment. Identify which transport protocol you are running on your network and which installation method you should use.
Adding Printers in NetWare Setup using NDPS The AXIS 5500/AXIS 5550 supports Novell Distributed Print Services (NDPS). You can run NDPS over Pure IP (TCP/IP) or IPX/SPX. Before the AXIS 5500/AXIS 5550 can be installed, make sure that NDPS is installed and a Broker is loaded on your NetWare file server. Axis Network Print Server uses the AXIS NDPS Gateway for printing in networks using either IP or IPX as transport protocols. The printer gateways are included with the NDPS software (from version 5.
Adding Printers in NetWare 4. Type a name of your choice in the NDPS Printer Agent field 5. Select the Axis Gateway configuration in the Gateway Type window. 6. Click OK 7. In the Select the printer’s type window, choose your printer. If you cannot find the printer, select an appropriate Generic one (PCL, PS, etc) 8. Select TCP/IP (default) or IPX as network protocol. Click Next.
Adding Printers in NetWare 9. You will find the print server in the next window with the printer attached on the connected port. Depending on the transport protocol you used when you start the installation, the print server should appear as following: • TCP/IP Network protocol: IP Address and Port, e.g: 192.168.70.243 and LPT1 Only the ports with a connected printer show up in this window.
Adding Printers in NetWare :: Example: 01d7e1c2:00408c5ff6a6:400c, where 400c corresponds to the LPT1 physical port, and 401c corresponds to the USB1 physical port. If the printer is not in the displayed print list, click Manually specify the print server and do the following: 1. Enter the in the Network field. 2. Enter the in the LAN HW address field. 3.
Adding Printers in NetWare 5. Next, select the printer drivers for each client operating system. (Windows 2000, NT and 95/98). These drivers will be automatically downloaded to users’ workstations when they install this printer in the future. 6. Click Continue and OK in the next NDPS window. The new Printer Agent appears in the Printer Agent List window. Check the Status: it should be Idle. 7.
Adding Printers in NetWare 4. From the Object menu, select Create. The New Object dialog appears. 5. Select NDPS Printer. The Create NDPS Printer dialog appears. 6. Type a name of your choice in the NDPS Printer Name field, e.g. AXIS5FF66A_IPX1 In the Printer Agent Source field, select the source of the Printer Agent. The following options are available: - Create a New Printer Agent. If you select this option, you are asked to select either the Novell Gateway or a third party Gateway.
Adding Printers in NetWare 8. Confirm the Printer Agent name (default is the name of the new printer you are creating) and browse to select the NDPS Manager to which you want to assign it 9. Select AXIS Gateway Configuration in the Gateway Type field. 10. Click OK. 11. In the Select the printer’s type window choose your printer. If you cannot find the printer, select an appropriate Generic one (PCL, PS, etc) 12. Select TCP/IP (default) or IPX as network protocol. 13. Click Next. 14.
Adding Printers in NetWare • TCP/IP Network protocol: IP Address and Port, e.g: 192.168.70.243 and LPT1 Only the ports with a connected printer will show up in this window. If the printer is not in the displayed print list: 1. Click Manually specify the print server enter the print server’s IP address in the IP Address field and choose a port in the Print server port field e.g., 192.168.70.243 and LPT1. The port numbers are USB1 or LPT1; “other/unknown” denotes the USB1 port.
Adding Printers in NetWare IPX Network protocol: All the available ports will be presented, regardless if the printers are or not connected to those ports. Example: AXIS5FF66A_P1 corresponds to the LPT1 port, and AXIS5FF66A_P2 corresponds to the USB1 port.
Adding Printers in NetWare If the printer is not in the displayed print list: 1. Click Manually specify the print server and enter the in the Network field. 2. Enter the in the LAN HW address field and choose a port in the Print server port field: e.g.: 01d7e1c2:00408c5ff6a6 and LPT1. The port numbers are USB1 or LPT1; “other/unknown” denotes the USB1 port.
Adding Printers in NetWare 5. Click Continue and OK in the next NDPS window. Your printer will appear as an NDS object in the Directory Tree and will offer a full range of network security options. To install the printer on the workstation, See “Installing an NDPS Printer on a Workstation” on page 57. Installing an NDPS Printer on a Workstation To install the printer on a workstation, use either Novell Printer Manager (NetWare 5.1 only) or the Add Printer Wizard on the local workstation.
Adding Printers in NetWare 4. Click Add. A list of available printers appears. 5. The list of available printers shows the NDPS Public Access Printers on the network and the NDPS Controlled Access Printers in you current NDS context. To see the Controlled Access Printers in other context that you have rights to, click the Browse button and select your choice. Click OK. 6. Once selected, click Install. The Novell Printers – Install dialog appears.
Adding Printers in NetWare 7. Click OK. The default driver for that printer is then automatically downloaded. If the printer object does not have a printer driver associated with it, or a driver was not found, you will be prompted to either to choose from a list of printer drivers provided by NDPS or to provide a disk with the appropriate driver. The Novell Printers dialog appears with the new printer, e.g. AXIS5FF6A6_IPX1 in the installed list. 8. Click Close.
Adding Printers in NetWare 9. Verify by clicking Start - Settings - Printers on the workstation. Using the Add Printer Wizard 1. Click Start on your workstation, select Settings =>Printers. There might be some differences regarding this menu depending of MS Operating System you are running. 2. Start the Add Printer Wizard on the workstation. The Add Printer Wizard dialog will appear. Click Next. 3. Select Network printer and click Next. 4.
Adding Printers in NetWare When you have completed these steps, you are ready to start printing. Notes: • The Public Access print servers are immediately available for everyone on the network • The Axis Gateway Configuration Utility is an installation and configuration tool for NDPS printers in the NetWare environment. The Axis Gateway will appear in NetWare 5.1 and later releases. You can download the Axis Gateway Configuration Utility for use with earlier versions of NetWare from www.axis.com.
Adding Printers in NetWare 3. Novell iPrint uses the NDPS infrastructure, so make sure that all the NDPS requirements have been met: • Make sure that the BROKER.NLM is loaded. If it isn’t, type LOAD BROKER in the server console prompt and select the name of the Broker. • Make sure that the NDPS Manager object is created in the Novell Directory Services (NDS) tree. Refer to your Novell documentation for creating this object. • Make sure that the NDPSM.NLM is loaded.
Adding Printers in NetWare Install a printer with AXIS IPP Gateway Configuration Snapin 1. Use an AXIS 5500/AXIS 5550 and connect a printer to any port. 2. Connect the print server to the network. 3. Connect the power adapter. 4. Start the printer and the print server. 5. Log in as Admin. 6. Use a Web browser and the local host URL to login into iManager on your NetWare server. 7. Open your browser to the following URL: https://:2200/eMFrame/iManager.html You have to authenticate.
Adding Printers in NetWare 9. Click on Create Printer. 10. Choose a name for the printer. 11. Choose the context where the printer will be installed. 12. Browse for the NDPS Manager and select it. 13. In the Gateway Type drop-down list, choose the Axis LPR Gateway Configuration. Click Next. 14. Choose either the IP address or the DNS Name for your print server. 15. Under Printer name, select the physical printer port, e.g. LPT1 or USB1, or logical printer port pr1—pr8 using the drop-down list. Click Next.
Adding Printers in NetWare Basic Setup with AXIS NetPilot Install the AXIS NetPilot software on your computer. AXIS NetPilot runs on Windows 98 and Windows NT. Starting the Installation Follow the instructions below to install the AXIS 5500/AXIS 5550 with AXIS NetPilot: 1. Start AXIS NetPilot by double-clicking the NetPilot icon, which is located in the folder where you installed AXIS NetPilot. 2. Locate the Axis Network Print Server in the ‘New Axis Units’ folder.
Adding Printers in NetWare Print Queues The Axis Network Print Server uses the print server name followed by the printer port as the default Print Queue names and print server port names. If you want to change the default printer queue names, just type the new names in the available text fields. AXIS 5500 Environment Default Names NetWare AXIS1A0003_USB1_Q Windows AX1A0003.
Adding Printers in NetWare Advanced Installation using AXIS NetPilot Having installed your Axis Network Print Server print server in accordance with the basic installation procedures described in Basic Setup with AXIS NetPilot, on page 65, your Axis Network Print Server print server should now feature in the ‘Network Print Servers’ folder located in the AXIS NetPilot main window.
Adding Printers in NetWare 4. Select the tree or server location of the print queue from the Resources box. 5. Select an existing print queue to connect to the server port, or create a new print queue by clicking on Create Queue... If you have selected an existing queue, advance to step 8. Continue with step 6 only if you want to create a new queue. 6. Type the queue name in the Create Queue dialog window.
Adding Printers in NetWare Basic Queue-based printing over IP Axis print servers with software version 6.0 or later allow users to print in a Pure IP environment using traditional queue-based printing (which usually uses the IPX transport protocol). Note that only NDS queue-based printing is supported. In the NetWare Pure IP environment, you must use the NetWare Administrator to create the printer, print server and queue objects.
Adding Printers in NetWare 5. Use the Add Printer Wizard on your work station to install the printer on your client. Note that only NDS queue based PSERVER printing is supported. When installing, choose Network Printer and browse to the queue you have just created. Alternatively, choose Local Printer and select the queue you have just captured. Any configuration and management of the Axis Network Print Server can be performed from any standard Web browser.
Adding Printers in NetWare Using Novell Utilities After installing the Axis Network Print Server into the NetWare environment, you can manage your Axis Network Print Server, using either Novell’s NetWare Administrator, or PCONSOLE. NetWare Administration Some useful features provided by the NetWare Administrator are described in more detail below: Printer Status The Printer Status menu, detailed below, shows the status of an active print job serviced by an Axis Network Print Server network print server.
Adding Printers in UNIX/Linux Section 7 Adding Printers in UNIX/Linux Print Tools For printer configuration, printtool and printconfig are the most common. How they are invoked depends on which distribution and window manager you use. AIX SMIT is the recommended printing tool. It contains an integrated printer driver list, but does not have printer detection functionality. Instructions: Type the command smit in a Terminal window, then click Print Spooling.
Adding Printers in UNIX/Linux Solaris 9 The printing tool is called Printer Administrator. This operating environment has an integrated printer driver list, but does not have printer detection functionality. Instructions: Type the command /usr/sadm/admin/bin/printmgr in a Terminal window. SuSE YaST2 is the recommended printing tool. It contains a printer driver list as well as printer detection capability.
Adding Printers in UNIX/Linux 1. Select the Network printer radio button and click Next. 2. Enter the IP address or host name of the print server as well as the port you want to use. Port numbers available for TCP/IP are: Port number USB port Parallel port AXIS 5500 9902 — AXIS 5550 9902 9900 Also see “TCP Ports Opened for Raw Printing” on page 158. 3. Click Next. Fill in data to help users identify the printer, i.e. name, description and location. Click Next. 4. Select printer model and click Next. 5.
Adding Printers in UNIX/Linux Debian 3.0 Debian offers a choice between plain LPD, LPRng and CUPS. There are several printer configuration tools in this distribution, e.g. the apsfilter (version 5 or later), which adds support for LPRng and Ghostscript's uniprint driver scheme. Red Hat's printtool is also supported, for those who prefer GUI administration tools. For LPRng, LPD and CUPS use the Printtool. Invocation 1.
Adding Printers in UNIX/Linux Red Hat 7.3 Printtool has been replaced by Printconf. The utility maintains the /etc/printcap configuration file, print spool directories, and print filters. Note: If you type printtool at a shell prompt, printconf will automatically start. Invocation 1. On the Gnome desktop, select the Main Menu button (on the Panel) => Programs => System => Printer Configuration to start the graphical version. 2.
Adding Printers in UNIX/Linux Adding a Remote Unix Printer To add a remote UNIX printer, such as one attached to a different UNIX/Linux system on the same network, click the New button in the main printconf window. Select Unix Printer from the Queue Type menu, and click Next. Enter a unique name for the printer in the Queue Name text field. The printer name cannot contain spaces and must begin with a letter a through z or A through Z.
Adding Printers in UNIX/Linux SuSE 8.0 The printing system on SuSE Linux is based on an apsfilter, with some enhancements; SuSE's apsfilter will recognize all common file formats (including HTML, if html2ps is installed).
Adding Printers in UNIX/Linux AXIS axinstall Script Having performed the basic TCP/IP setup procedures as defined earlier in this manual, you are now able to print in interactive mode using PROS, LPR, FTP or Reverse Telnet protocols. However, if you want to integrate the AXIS 5500/AXIS 5550 with your host spooler, you can use the Axis automatic installation script axinstall. The axinstall script is available from ftp://ftp.axis.
Adding Printers in UNIX/Linux Print Methods on TCP/IP Networks The AXIS 5500/AXIS 5550 supports several different print methods in the TCP/IP environment. axinstall will suggest a print method suitable for your particular UNIX/Linux system, but you might want to use another method depending on your printing requirements (banner pages, status logging, etc). The diagram below shows the alternative data paths taken by some of the UNIX/Linux print methods.
Adding Printers in UNIX/Linux PROS A protocol developed at Axis. Comes in two versions; named pipe (PROS A) and filter (PROS B). PROS A Advantages The AXIS 5500/AXIS 5550 appears as a device to the system. This makes all filter and model options available. It provides accounting and status logging. Supports bi-directional printing. The printer information read back can be viewed in a log file. PROS A Limitations A ‘C’ compiler is required to build the PROS A drivers.
Adding Printers in OS/2 Section 8 Adding Printers in OS/2 This section describes how to set up your print server for printing in the OS/2 environment. Continue with the instructions presented in the table below: Protocol TCP/IP NetBIOS/NetBEUI See ... “TCP/IP Printing” on page 82 “NetBIOS/NetBEUI Printing in OS/2” on page 82 TCP/IP Printing Having assigned an IP address to the print server, you are now ready to install it for TCP/IP printing in the OS/2 environment.
Adding Printers in OS/2 www.axis.com => Software => Discontinued products. Install it if you have not already done so. If you want to change the default name or any of the print server’s default parameters, you can do so using any standard Web browser or WinOS/2 window under OS/2. Refer to Section 10 Management and Configuration, on page 88, for more information. The AXIS Print Utility for OS/2 is not needed on the client platforms when using a client-server configuration.
Adding Printers in OS/2 Creating a Print Queue (OS/2 version 2.x and OS/2 Warp) 1. Double-click the Templates folder, then drag the Printer icon out to the Workplace Shell (or into a folder) while holding the right mouse button down. 2. Type a name of your choice in the Name field. Ports available AXIS 5500 AXIS 5550 USB port US1 US1 Parallel port — LP1 3. Select \PIPE\., from the Port list, and select a printer driver suitable for your printer from the Standard Printer list. 4.
Updating the Firmware Section 9 Updating the Firmware Upgrading the Firmware You can upgrade the AXIS 5500/AXIS 5550 firmware using one of the following methods: • • • AXIS ThinWizard (TCP/IP) From the print server’s internal Web pages (TCP/IP) FTP (TCP/IP) Note: Updating instructions are supplied with the firmware release notes.
Updating the Firmware 7. If you do not have a default password, just click Next >. If some of your servers use a different User ID or Password than the default entries, they will be displayed in the Remaining servers list. Enter the User ID and Password for each individual server. Click Next >. 8. Name the upgrade job. This is optional, so you can leave the field blank if you want. Click the Start button to start the upgrading job. 9. You can view the progress of the job in the Event Log.
Updating the Firmware 1. From www.axis.com, download the firmware and save it to a new directory on your computer, e.g. c:\Axis (if the directory does not exist, create it). 2. Open a command prompt from Start => Run. The Run window will appear. Type cmd and click OK. (Windows 98: Type command and click OK.) The DOS Command Prompt window will open. 3. Make sure you are working from the correct directory: type cd c:\Axis and press Enter. 4. Connect to the print server using ftp: type ftp 10.13.4.
Management and Configuration Section 10 Management and Configuration The management and configuration tools that are supported by the Axis Network Print Server allow you to: • • • • • Configuration Overview Change the print server parameters, i.e.
Management and Configuration Admin When in Admin mode, you have access to all the print server's parameters and you can change them to your liking. This mode is intended for network administrators and can be password protected to prevent unauthorized changing of the print server parameters. Note: To protect the Admin pages from unauthorized use, it is highly recommended that you change the default password. This is done from the Admin | General Settings | General tab.
Management and Configuration Available Services from the User Mode Printer Overview The following services are available from the User mode. A link to the Axis home page is available from this mode. The Printer Overview page contains a section that allows you to view the general parameter setting of the Axis Network Print Server, including the print server name and the location of the print server in your organization, if defined.
Management and Configuration accumulated usage of the connected printers allows you to control the usage of the connected printers. To delete an ongoing print job, use the delete button next to the job. Network Settings From the Network Settings page you can set all parameters that control the network traffic to and from the Axis Network Print Server. You can enable or disable any of the supported network protocols and fine-tune the parameter settings.
Management and Configuration Software Default A Software Default will reset all print server parameters and settings to their default values except: • • • • • Node address (NODE_ADDR.) IP Address (INT_ADDR.) DHCP enabled (DHCP_ENB) Installed certificate Private key Also see The Test Button, on page 129 for instructions on performing a Factory Default. Firmware Upgrade Upgrades the print server’s internal software.
Management and Configuration 5. The AXIS ThinWizard interface appears: Important! These parameters must be enabled in the print server’s Web interface for AXIS ThinWizard to function properly: • FTP_ENB (FTP enabled): click Admin | Network Settings | Detailed View | TCP/IP Network| FTP Enabled => Yes. • SNMP_ENB (SNMP Enabled): click Admin | Network Settings | Detailed View | SNMP | SNMPv1 Enabled => Yes These parameters are enabled by default in the print server.
Management and Configuration Managing Print Servers Follow the instructions below to access the AXIS 5500/AXIS 5550 using AXIS ThinWizard: 1. Click Manage Network in the main menu. 2. Select the network group, including the, from the drop-down list. All AXIS servers included in the network group appear in the window. 3. Click the link of the AXIS 5500/AXIS 5550 to access its internal Web page. 4. The ‘Srv’ and ‘Dev’ columns show the status of your print servers and printers.
Management and Configuration Editing the config file Follow the instructions below to edit the config file using FTP: 1. Log in to the Axis Network Print Server by typing: ftp or ftp in a DOS window (Windows) or in a UNIX shell. 2. Enter the user id and the password. (The default entries are root and pass.) 3. Download the config file to your host by typing: get config 4. Edit the file using your preferred text editor. 5.
Management and Configuration Viewing the Account File The account file contains data concerning the ten last print jobs. It specifies an internal job number, the user that initiated the job, the protocol and logical printer that was used, current status (Completed, Offline, or Printing), number of bytes printed, elapsed time and off- line time. Follow the instructions below to view the account file using FTP: 1.
Management and Configuration 1. Log in to the Axis Network Print Server by typing: telnet or telnet in a DOS window (Windows) or in a UNIX shell. 2. Enter the user id and the password. (The default entries are root and pass.) 3. View the account file by typing: account The example below shows how to view the account file using Telnet from a UNIX shell. Example: > telnet npserver Trying 192.36.253.96... Connected to npserver. Escape character is ‘^]’.
Management and Configuration Performing Resets Three types of reset commands allow you to perform soft resets, to perform hard resets, and to reset the print server’s parameters to its default settings. Follow the instructions below to perform a soft reset using telnet: 1. Log in to the Axis Network Print Server by typing: telnet or telnet in a DOS window (Windows) or in a UNIX shell. 2. Enter the user id and the password. (The default entries are root and pass.) 3.
Management and Configuration 1. Log in to the Axis Network Print Server using FTP. 2. Download the MIB file /snmp/axis.mib to the NMS host. 3. Install the AXIS MIB according to instructions in your NMS software documentation. The AXIS MIB The AXIS MIB contains a large number of objects which may be categorized as follows: • Menu objects - used for viewing and changing the Axis Network Print Server configuration from the NMS program. Refer to The Parameter List, on page 137.
Management and Configuration NetWare Administrator Printer Status Menu Notification You can use the NetWare Administrator to enable or disable status notification messages for printers connected to the Axis Network Print Server, e.g. Busy, Off-line, Out of paper, Paper jam, etc. You can also add or remove print job owners and administrators from the list of persons to be notified.
Configuration Possibilities Section 11 Configuration Possibilities This section describes some special features offered by the AXIS 5500/AXIS 5550: Autodetect Printer Type, on page 101 Auto-IP, on page 101 Changing Language in the Print Server’s Web Interface, on page 119 E-mail Notification, on page 102 Enabling Secure Web Services — SSL/TLS, on page 121 Flashloading New Firmware into the Print Server, on page 119 IPP (Internet Printing Protocol), on page 102 Logical Printers for Customized Printing, on
Configuration Possibilities Auto-IP, a method which enables the host to automatically take a linklocal IPv4 address. Auto-IP is supported by Windows 98, Me, 2000, XP and Mac OS version 8.5 and higher. E-mail Notification Whenever an event that needs human intervention occurs in a network printer, the concerned person can be notified by e-mail. This ’troublereport’ contains a short and concise description of the event. Five events are covered: Paper Jam, Out of Paper, Toner Low, No Toner, Printer Off-line.
Configuration Possibilities With IPP, a user with an Internet connection can send a document to any printer which is connected to the Internet. IPP is platform independent and can be used to print over any LAN or WAN that supports TCP/IP. In practical terms, this means that you can send documents to a remote printer as an addition to or replacement of fax and e-mail, with the same quality and color options of traditional network printing.
Configuration Possibilities Example using an IP Address in the 1.1 Standard: IPP User Requirements Firewall Considerations with IPP How to Print from Windows 98: If “171.16.5.218” is the IP address of the print server and "USB1" is the local printer port name, then the syntax of the address scheme will be ipp://171.16.5.218/USB1 in the 1.1 standard.
Configuration Possibilities How to Print from Windows NT: Before you print to an IPP printer you will need to know: the address of the print server. The address contains the IP address or host name of the print server and the printer port name. • the brand and type of the printer in order to install the appropriate printer driver. 1. First you need to select the IPP printer to which you want to send your document. Select the destination printer from your Printer Name list (in File | Print | Printer Setup).
Configuration Possibilities 5. In the Available Ports window, click Add Port: 6. The Printer Ports dialog will appear, showing a list of Available Printer Ports. 7. Choose The HP Internet Printer Connection Port and click New Port. 8. The HP Internet Printer Connection will start. Click Next.
Configuration Possibilities 9. In the IP Address, Host Name or URL field, type the address of the AXIS 5500/AXIS 5550 to which the destination printer is connected. The URL will automatically appear in the Port Name field as well: (Example: http://171.16.5.218:631/LPT1 if you have an AXIS 5500 and want to address the parallel port or http://171.16.5.218:631/USB1 to address the USB port.) Click Next. 10. The Wizard will confirm the information you have entered.
Configuration Possibilities 14. The new printer will appear in your Printer window. You are now ready to start printing using IPP. How to Print from Windows 2000/XP Before you print to an IPP printer you will need to know: the address of the print server. The address contains the IP address or host name of the print server and the printer port name. • the brand and type of the printer in order to install the appropriate printer driver. 1. Select the IPP printer to which you want to send your document.
Configuration Possibilities 4. Enter the printer address in the URL field. (Example: http://171.16.5.218:631/LPT1 if you have an AXIS 5500 and want to address the parallel port or http://171.16.5.218:631/USB1 to address the USB port.) Click Next. 5. If you do not have a driver corresponding to the destination printer installed on your computer, the Wizard will prompt you to install one. Click OK. 6. The Installation Wizard will ask you to select a printer driver corresponding to the destination printer.
Configuration Possibilities 8. The new printer is added to your Select Printer window: 9. You are now ready to print using IPP: specify your new destination printer from the printer list and click Print.
Configuration Possibilities Logical Printers for Customized Printing The AXIS 5500/AXIS 5550 has a powerful facility for altering the print data. This means that your desired print format can be realized on any type of printer.
Configuration Possibilities The AXIS 5500/AXIS 5550 solution to this problem is to assign a character set conversion filter to a logical printer, and then link that logical printer to the host causing the problem. You select your desired conversion filter by setting the Character Set Conversion (PRx_CSET.) parameter. The output from the conversion filter is always IBM PC Set 2 (Code Page 437), and this is the character set the printer must be set up for.
Configuration Possibilities Example: Assume that the logical printer PR5 is configured as a PostScript printer and that you want to append the PostScript End of File character (hex 04) after each print job. Follow the instructions below to add a string after the print job: 1. From the print server’s internal Web page, select Admin | Logical Printers. 2. Select the PR5 tab. 3. Enter the string 04 in the String After Print Job text field. 4. Click the OK button.
Configuration Possibilities Follow the instructions below to substitute command strings: 1. From the print server’s internal Web page, select Admin | Logical Printers. 2. Select the PR1 Web page. 3. Enter the string 01 0A 02 0D 0A in the String Substitutions text field. Hex Code Explanation 01 length of the string you want to replace 0A the string you want to replace 02 length of the substitute string 0D 0A the substitute string 4. Click the OK button.
Configuration Possibilities ASCII to Postscript Conversion The AXIS 5500/AXIS 5550 logical printers can translate ASCII print data into PostScript format. This makes it possible to print on a PostScript printer from a host that does not support PostScript. The conversion is selected by activating a filter that converts ASCII data into Postscript. This filter can be activated individually for each logical printer. Activate your desired filter by setting the Printer Language Translation (PRx_FILT.
Configuration Possibilities 4. Set the PostScript Page Size parameter to LETTER. 5. Set the PostScript Page Orientation parameter to LANDS. 6. Enter the string 48 0 120 60 30 50 in the PostScript Page Format text field. Hex code Explanation 48 48 lines per page 0 disable line wrap 120 120 = 12 characters per inch 60 60 = 6 lines per inch 30 30 = 3 mm left margin 50 50 = 5 mm top margin 7. Enter the string Helvetica in the PostScript Font text field. 8. Click the OK button.
Configuration Possibilities Read Back of information The AXIS 5500/AXIS 5550 supports bi-directional printing. The information from the printer is read back on the parallel port when the parameter Read Back Port (PRx_IN.) has the default setting of AUTO. However, it is required that the printer also supports bi-directional printing. Please refer to your printer documentation for further details regarding bi-directional printing support.
Configuration Possibilities Network Speed With the Network Speed parameter you can manually specify the speed at which you will send and receive network packages. You can change the Network Speed setting to correspond to the type of network you are using (10 or 100 Mbit). To change the Network Speed in an Ethernet network, log in to the print server’s internal Web pages and click Admin | General Settings => Change.
Configuration Possibilities Print Server Levels Print server signature levels are assigned by a new NET.
Configuration Possibilities TCP/IP Restrictions In a new and unconfigured Axis Network Print Server any user is allowed to send TCP/IP print jobs. Using a restriction list you can reject TCP/IP printing from specified IP addresses. Enabling TCP/IP Restrictions In the print server’s Web interface, select Admin | Network Settings | Detailed View | TCP/IP Printing. Print jobs from IP addresses specified in the TCP printing restriction list will be rejected.
Configuration Possibilities Enabling Secure Web Services — SSL/TLS In a new and unconfigured AXIS 5500/AXIS 5550, SSL/TLS is disabled. Certificates To use SSL/TLS you have to create or obtain a digital certificate. There are two kinds of certificates: self-signed certificates and third party certificates. • • Self-signed certificates are less secure but normally they are sufficiently secure for small networks with no public access. You generate such a certificate yourself and there are no fees to pay.
Configuration Possibilities browser session. The browser reports the new state by changing into https mode. In the browser’s Security Alert box, select View Certificate and Install Certificate. Follow the instructions of the Install Certificate Wizard. Generating a Certificate Request Select the Generate Certificate Request radio button and click Next.
Configuration Possibilities Disabling Protocols To further increase security, you must disable protocols that are considered insecure; • FTP (also used by AXIS ThinWizard, if FTP is disabled, AXIS ThinWizard can not function properly.) • Telnet • Auto-IP • DHCP • BOOTP • Remote Config (used by AXIS NetPilot) • SNMP Configuration (also used by AXIS ThinWizard. Note that if SNMP is disabled, AXIS ThinWizard can not function properly.
Configuration Possibilities Enabling the SNMPv3 Protocol Invoke the print server’s Web interface to enable the SNMPv3 protocol. 1. Select Admin | Network Settings | Detailed View | TCP/IP Network and ensure that HTTPS Enabled is set to yes to guarantee a secure configuration. Note: You must have a valid certificate loaded to be able to enable HTTPS. See “Enabling SSL via the Web Interface” on page 121. 2. Select Admin | Network Settings | Detailed View | SNMP and set SNMPv3 Enabled to yes. 3.
IP Addressing Section 12 IP Addressing IP Address and Subnet Mask The print server must be correctly configured with the following information to function properly: • • • an IP address a subnet mask a default gateway (or router) IP Address Each device on your network must have a unique IP address to operate correctly. An IP address identifies the address of the device to which data is being sent and the address of the destination network. IP addresses have the format n.n.n.
IP Addressing Type Two In larger (Class B) networks, where there are more devices, the IP address of ‘162.168.3.191’ is split into two parts but is structured differently: • Part one (‘162.168’) identifies the network on which the device resides. • Part two (‘.3.191’) identifies the device within the network. This type of IP address operates on a subnet mask of ‘255.255.0.0’. Default Gateway Examples 1.
IP Addressing Auto-IP Addressing Network devices use automatic IP addressing if they are configured to acquire an address using DHCP but are unable to contact a DHCP server. Automatic IP addressing is a scheme where devices allocate themselves an IP address at random from the industry standard subnet of 169.254.x.x (with a subnet mask of 255.255.0.0). If two devices allocate themselves the same address, the conflict is detected and one of the devices allocates itself a new address.
IP Addressing Setting the IP Address using DHCP Follow the instructions below to download the IP address using DHCP: 1. Edit or create a scope in the DHCP manager of the DHCP daemon. The entries included in this scope should contain the following parameters: • range of IP addresses • subnet mask • default router IP address • WINS server IP address(es) or DDNS server IP address(es) • lease duration 2. Activate the scope. The print server automatically downloads the DHCP parameters.
The Test Button Section 13 The Test Button The test button is located on the front right hand side of the AXIS 5500/AXIS 5550 and is used for: • Printing a test page to check the connection to the printer. • Printing a parameter list to see the print server’s current settings. • Performing a Factory Default of the print server. If you want to change any of the parameters, use one of the methods described in Section 10 Management and Configuration, on page 88.
Troubleshooting Section 14 Troubleshooting This section provides useful information to help you resolve difficulties you might have with your AXIS 5500/AXIS 5550. Fault symptoms, possible causes and remedial actions are provided within a quick reference table. Please visit the Axis Web site for latest troubleshooting tips, more support and additional help through the FAQ database or to fill in and submit a Support question.
Troubleshooting IP Address Check with Ping Windows: By sending a data packet to a specific IP address and waiting for a reply, Ping can determine whether that IP address is accessible. Ping can also help you to determine IP address conflicts with your AXIS 5500/AXIS 5550 and troubleshoot TCP/IP problems on the network. Follow the instructions below to diagnose your problem. Open a Command Prompt and enter the following commands: Syntax ping Example ping 192.168.3.
Troubleshooting Axis Support Server Report In order to obtain optimal support from Axis support technicians, please follow these instructions when submitting a Support question. 1. Go to the print server’s Web pages by typing the print server’s IP address in the Address/Location field of your Web browser. 2. Go to Admin | Support. Click the Server Report link. A new window will open. 3. Save the Server report as an HTML file (with an .html file extension) and go to www.axis.com 4.
Technical Specification Section 15 Supported Printers Technical Specification Low- and Full-Speed USB 1.1 and 2.0 printers. AXIS 5550 also supports all parallel printers except host-based printers and copiers, e.g. CAPT, GDI, PPA Supported Systems Microsoft Windows Novell NetWare Apple Unix/Linux Additional Systems 95, 98, Me, NT, 2000, XP and 2003 3.X, 4.X, 5.X, 6.X. Supports bindery and NDS mode. Supports user messages and printer status. NDPS supported over IP and IPX.
Technical Specification Logical Printers Security Logical printer ports can be programmed to perform auto ASCII to PostScript conversion, add string before and after job, string substitution, alternative output and character set conversion Password protected configuration SSL/TLS support for HTTPS security NetWare: Encrypted passwords, NetWare Packet Signature Level 1, 2, 3 Option to disable protocols Print Server Management AXIS ThinWizard for installation, configuration, monitoring and firmware upgra
Technical Specification AXIS 5550 One Low- and Full-Speed USB 1.1 port, which also works with USB 2.0 (Low-Speed and Full-Speed) printers. Note: The USB cable shipped with the product supports Low-Speed and Full-Speed.
Technical Specification Safety Included Accessories EN 60950 AXIS Network Product CD with software for installation, management and printing, including AXIS ThinWizard (the recommended Axis management software for large enterprise networks) and AXIS AddPrinter (for easy and quick installation) User documentation Quick Installation Guide Power adapter Wall mounting clip USB cable All specifications are subject to change without prior notice.
The Parameter List Section 16 The Parameter List This section provides an overview of the AXIS 5500 and AXIS 5550 print server parameters. See the Axis Web site for latest technical information. The config File See Using FTP for Print Server Management, on page 94 for information on how to fetch the print server’s config file. The config file is built up like this: --- General Menu NODE_ADDR. : 00 40 8C 18 1C F0 NETWORK_SPEED.
The Parameter List AXIS 5500 (AXIS 5500 Network Print Server V7.06 Nov 3 2005. S/N: 00408C60F4A1) Parameter settings: --- General Menu NODE_ADDR. : 00 40 8C 60 F4 A1 NETWORK_SPEED. : AUTO_SENSE (AUTO_SENSE, 10_HALF_DX, 10_FULL_DX, 100_HALF_DX, 100_FULL_DX) PS_NAME. : AXIS60F4A1 ROOT_PWD. USERS. : pass : BASE_URL. : www.axis.com CHARSET. : ISO-8859-1 (SHIFT_JIS, ISO-8859-1, UTF-8) LANG. Japanese) : English (English, French, German, Spanish, Italian, AXIS_PRINT_SYSTEM. : YES RCONFIG_ENB.
The Parameter List BOOTP_ENB. : YES RARP_ENB. : YES WINS_ENB. : YES WINS_ADDR1. : 0 0 0 0 WINS_ADDR2. : 0 0 0 0 NBT_SCOPE_ID. : DNS_ENB. : YES DNS_ADDR1. : 0 0 0 0 DNS_ADDR2. : 0 0 0 0 DOMAIN_NAME. : SLP_ENB. : YES SLP_SCOPE_LIST. : DEFAULT BONJOUR_ENB. : YES BONJOUR_SRVNAME_USB1. : SMTP_SERVER. : FTP_ENB. : YES TELNET_ENB. : YES DEF_IP_FRAME_TYPE. : EthernetII (EthernetII, SNAP) --- TCP/IP Printing Menu TCP_ENB. : YES PAR_TCP_RESTRICT_LIST. : PROS_PWD. PROS_PRT. LPD_BANN.
The Parameter List RTEL_PR8. :0 --- SNMP Menu SNMP_V1_ENB. : YES SNMP_V2_ENB. : YES READ_COM. : public WRT_COM. : pass TRAPADDR. :0000 TRAP_COM. : public SYS_NAME. : SNMP_AUT. : DISABLE (DISABLE, ENABLE) TRAP_PRT. : DISABLE (DISABLE, ENABLE) --- SNMPv3 Menu SNMP_V3_ENB. : NO --- NetWare Menu NETW_ENB. : YES NETW_TRANSPORT_PROTOCOL. : DUAL_STACK (IPX_ONLY, IP_ONLY, DUAL_STACK) NDPS. : TCP_AND_SPX (TCP_AND_SPX, TCP_ONLY, SPX_ONLY, DISABLED) JOB_CHECK_DELAY. : 5 CONF_CHECK_DELAY.
The Parameter List PSERVER_BINDERY3. : PSERVER_BINDERY4. : PSERVER_BINDERY5. : PSERVER_BINDERY6. : PSERVER_BINDERY7. : PSERVER_BINDERY8. : PSERVER_BINDERY9. : PSERVER_BINDERY10. : PSERVER_BINDERY11. : PSERVER_BINDERY12. : PSERVER_BINDERY13. : PSERVER_BINDERY14. : PSERVER_BINDERY15. : PSERVER_BINDERY16. : NPRINTER1. : NPRINTER2. : NPRINTER3. : NPRINTER4. : NPRINTER5. : NPRINTER6. : NPRINTER7. : NPRINTER8. : --- NetBIOS/NetBEUI Menu LSLM_ENB. : YES NB_FR_TYPE.
The Parameter List LPRINT_5. : LLOGIC_5. : PR5 (PR1, PR2, PR3, PR4, PR5, PR6, PR7, PR8, USB1) LPRINT_6. : LLOGIC_6. : PR6 (PR1, PR2, PR3, PR4, PR5, PR6, PR7, PR8, USB1) LPRINT_7. : LLOGIC_7. : PR7 (PR1, PR2, PR3, PR4, PR5, PR6, PR7, PR8, USB1) LPRINT_8. : LLOGIC_8. : PR8 (PR1, PR2, PR3, PR4, PR5, PR6, PR7, PR8, USB1) --- AppleTalk Menu ATLK_ENB. : YES ATK_ZONE. : ZONER_EN. : YES ATK_FONT. : DEFAULT (DEFAULT, 35N, ALL) AUTO_DT_PRIN1. : YES APRINT_1. : AXIS60F4A1_USB1 ATYPE_1.
The Parameter List PR1_SIZE. : A4 (A4, LETTER, LEGAL, EXECUT) PR1_ORNT. : PORTR (PORTR, LANDS, R_PORTR, R_LANDS) PR1_FORM. : 66 0 100 60 30 50 PR1_FONT. : --- Printer2 Menu PR2_NAME. PR2_IN. : : AUTO (AUTO, NONE) PR2_BEF. : PR2_STR. : PR2_CSET. : NONE (NONE, ISO>IBM, 7UK>IBM, 7SW>IBM, 7GE>IBM, 7FR>IBM, 7ND>IBM, DEC>IBM) PR2_FILT. : NONE (NONE, POSTSCR, AUTO_PS) PR2_AFT. : PR2_DUMP. PR2_SIZE. : NO : A4 (A4, LETTER, LEGAL, EXECUT) PR2_ORNT.
The Parameter List --- Printer4 Menu PR4_NAME. PR4_IN. : : AUTO (AUTO, NONE) PR4_BEF. : PR4_STR. : PR4_CSET. : NONE (NONE, ISO>IBM, 7UK>IBM, 7SW>IBM, 7GE>IBM, 7FR>IBM, 7ND>IBM, DEC>IBM) PR4_FILT. : NONE (NONE, POSTSCR, AUTO_PS) PR4_AFT. : PR4_DUMP. PR4_SIZE. : NO : A4 (A4, LETTER, LEGAL, EXECUT) PR4_ORNT. : PORTR (PORTR, LANDS, R_PORTR, R_LANDS) PR4_FORM. : 66 0 100 60 30 50 PR4_FONT. : --- Printer5 Menu PR5_NAME. PR5_IN. : : AUTO (AUTO, NONE) PR5_BEF. : PR5_STR.
The Parameter List PR6_BEF. : PR6_STR. : 01 0A 02 0D 0A PR6_CSET. : NONE (NONE, ISO>IBM, 7UK>IBM, 7SW>IBM, 7GE>IBM, 7FR>IBM, 7ND>IBM, DEC>IBM) PR6_FILT. : NONE (NONE, POSTSCR, AUTO_PS) PR6_AFT. : PR6_DUMP. PR6_SIZE. : NO : A4 (A4, LETTER, LEGAL, EXECUT) PR6_ORNT. : PORTR (PORTR, LANDS, R_PORTR, R_LANDS) PR6_FORM. : 66 0 100 60 30 50 PR6_FONT. : --- Printer7 Menu PR7_NAME. PR7_IN. : : AUTO (AUTO, NONE) PR7_BEF. : PR7_STR. : 01 0A 02 0D 0A PR7_CSET.
The Parameter List PR8_AFT. : PR8_DUMP. PR8_SIZE. : NO : A4 (A4, LETTER, LEGAL, EXECUT) PR8_ORNT. : PORTR (PORTR, LANDS, R_PORTR, R_LANDS) PR8_FORM. : 66 0 100 60 30 50 PR8_FONT. : --- USB1 Menu U1_MGM_INFO. : AUTO (DISABLE, AUTO) U1_COMMENT. : U1_BIDIR. U1_READT. : AUTO (DISABLE, AUTO) :3 U1_BUFFER_SIZE. : 0 U1_PORT_STATUS_OVERRIDE. : NO --- Email Menu EMAIL_NOTIFICATION. : NO REPLY_ADDRESS. : PAPER_JAM_ADDRESS. : OUT_OF_PAPER_ADDRESS. : TONER_LOW_ADDRESS. : NO_TONER_ADDRESS.
The Parameter List AXIS 5550 (AXIS 5550 Network Print Server V7.06 Nov 4 2005. S/N: 00408C60F4A1) Parameter settings: --- General Menu NODE_ADDR. : 00 40 8C 60 F4 A1 NETWORK_SPEED. : AUTO_SENSE (AUTO_SENSE, 10_HALF_DX, 10_FULL_DX, 100_HALF_DX, 100_FULL_DX) PS_NAME. : AXIS60F4A1 ROOT_PWD. USERS. : pass : BASE_URL. : www.axis.com CHARSET. : ISO-8859-1 (SHIFT_JIS, ISO-8859-1, UTF-8) LANG. Japanese) : English (English, French, German, Spanish, Italian, AXIS_PRINT_SYSTEM. : YES RCONFIG_ENB.
The Parameter List AUTOIP_ENB. : YES BOOTP_ENB. : YES RARP_ENB. : YES WINS_ENB. : YES WINS_ADDR1. : 0 0 0 0 WINS_ADDR2. : 0 0 0 0 NBT_SCOPE_ID. : DNS_ENB. : YES DNS_ADDR1. : 0 0 0 0 DNS_ADDR2. : 0 0 0 0 DOMAIN_NAME. : SLP_ENB. : YES SLP_SCOPE_LIST. : DEFAULT BONJOUR_ENB. : YES BONJOUR_SRVNAME_LPT1. : BONJOUR_SRVNAME_USB1. : SMTP_SERVER. : FTP_ENB. : YES TELNET_ENB. : YES DEF_IP_FRAME_TYPE. : EthernetII (EthernetII, SNAP) --- TCP/IP Printing Menu TCP_ENB. : YES PAR_TCP_RESTRICT_LIST. : PROS_PWD.
The Parameter List RTEL_PR6. :0 RTEL_PR7. :0 RTEL_PR8. :0 --- SNMP Menu SNMP_V1_ENB. : YES SNMP_V2_ENB. : YES READ_COM. : public WRT_COM. : pass TRAPADDR. :0000 TRAP_COM. : public SYS_NAME. : SNMP_AUT. : DISABLE (DISABLE, ENABLE) TRAP_PRT. : DISABLE (DISABLE, ENABLE) --- SNMPv3 Menu SNMP_V3_ENB. : NO --- NetWare Menu NETW_ENB. : YES NETW_TRANSPORT_PROTOCOL. : DUAL_STACK (IPX_ONLY, IP_ONLY, DUAL_STACK) NDPS. : TCP_AND_SPX (TCP_AND_SPX, TCP_ONLY, SPX_ONLY, DISABLED) JOB_CHECK_DELAY.
The Parameter List PSERVER_BINDERY1. : PSERVER_BINDERY2. : PSERVER_BINDERY3. : PSERVER_BINDERY4. : PSERVER_BINDERY5. : PSERVER_BINDERY6. : PSERVER_BINDERY7. : PSERVER_BINDERY8. : PSERVER_BINDERY9. : PSERVER_BINDERY10. : PSERVER_BINDERY11. : PSERVER_BINDERY12. : PSERVER_BINDERY13. : PSERVER_BINDERY14. : PSERVER_BINDERY15. : PSERVER_BINDERY16. : NPRINTER1. : NPRINTER2. : NPRINTER3. : NPRINTER4. : NPRINTER5. : NPRINTER6. : NPRINTER7. : NPRINTER8. : --- NetBIOS/NetBEUI Menu LSLM_ENB. : YES NB_FR_TYPE.
The Parameter List LPRINT_3. : LLOGIC_3. USB1) : PR3 (PR1, PR2, PR3, PR4, PR5, PR6, PR7, PR8, LPT1, LPRINT_4. : LLOGIC_4. USB1) : PR4 (PR1, PR2, PR3, PR4, PR5, PR6, PR7, PR8, LPT1, LPRINT_5. : LLOGIC_5. USB1) : PR5 (PR1, PR2, PR3, PR4, PR5, PR6, PR7, PR8, LPT1, LPRINT_6. : LLOGIC_6. USB1) : PR6 (PR1, PR2, PR3, PR4, PR5, PR6, PR7, PR8, LPT1, LPRINT_7. : LLOGIC_7. USB1) : PR7 (PR1, PR2, PR3, PR4, PR5, PR6, PR7, PR8, LPT1, LPRINT_8. : LLOGIC_8.
The Parameter List --- Printer1 Menu PR1_OUT. : LPT1 (NONE, LPT1, USB1) PR1_NAME. : PR1_SCND. : PR1 (PR1, PR2, PR3, PR4, PR5, PR6, PR7, PR8) PR1_WAIT. : YES PR1_IN. : AUTO (AUTO, NONE) PR1_BEF. : PR1_STR. : PR1_CSET. : NONE (NONE, ISO>IBM, 7UK>IBM, 7SW>IBM, 7GE>IBM, 7FR>IBM, 7ND>IBM, DEC>IBM) PR1_FILT. : NONE (NONE, POSTSCR, AUTO_PS) PR1_AFT. : PR1_DUMP. PR1_SIZE. : NO : A4 (A4, LETTER, LEGAL, EXECUT) PR1_ORNT. : PORTR (PORTR, LANDS, R_PORTR, R_LANDS) PR1_FORM.
The Parameter List PR2_FORM. : 66 0 100 60 30 50 PR2_FONT. : --- Printer3 Menu PR3_OUT. : LPT1 (NONE, LPT1, USB1) PR3_NAME. : PR3_SCND. : PR3 (PR1, PR2, PR3, PR4, PR5, PR6, PR7, PR8) PR3_WAIT. : YES PR3_IN. : AUTO (AUTO, NONE) PR3_BEF. : PR3_STR. : PR3_CSET. : NONE (NONE, ISO>IBM, 7UK>IBM, 7SW>IBM, 7GE>IBM, 7FR>IBM, 7ND>IBM, DEC>IBM) PR3_FILT. : NONE (NONE, POSTSCR, AUTO_PS) PR3_AFT. : PR3_DUMP. PR3_SIZE. : NO : A4 (A4, LETTER, LEGAL, EXECUT) PR3_ORNT.
The Parameter List PR4_SIZE. : A4 (A4, LETTER, LEGAL, EXECUT) PR4_ORNT. : PORTR (PORTR, LANDS, R_PORTR, R_LANDS) PR4_FORM. : 66 0 100 60 30 50 PR4_FONT. : --- Printer5 Menu PR5_OUT. : LPT1 (NONE, LPT1, USB1) PR5_NAME. : PR5_SCND. : PR5 (PR1, PR2, PR3, PR4, PR5, PR6, PR7, PR8) PR5_WAIT. : YES PR5_IN. : AUTO (AUTO, NONE) PR5_BEF. : PR5_STR. : 01 0A 02 0D 0A PR5_CSET. : NONE (NONE, ISO>IBM, 7UK>IBM, 7SW>IBM, 7GE>IBM, 7FR>IBM, 7ND>IBM, DEC>IBM) PR5_FILT.
The Parameter List PR6_AFT. : PR6_DUMP. PR6_SIZE. : NO : A4 (A4, LETTER, LEGAL, EXECUT) PR6_ORNT. : PORTR (PORTR, LANDS, R_PORTR, R_LANDS) PR6_FORM. : 66 0 100 60 30 50 PR6_FONT. : --- Printer7 Menu PR7_OUT. : LPT1 (NONE, LPT1, USB1) PR7_NAME. : PR7_SCND. : PR7 (PR1, PR2, PR3, PR4, PR5, PR6, PR7, PR8) PR7_WAIT. : YES PR7_IN. : AUTO (AUTO, NONE) PR7_BEF. : PR7_STR. : 01 0A 02 0D 0A PR7_CSET. : NONE (NONE, ISO>IBM, 7UK>IBM, 7SW>IBM, 7GE>IBM, 7FR>IBM, 7ND>IBM, DEC>IBM) PR7_FILT.
The Parameter List 7FR>IBM, 7ND>IBM, DEC>IBM) PR8_FILT. : NONE (NONE, POSTSCR, AUTO_PS) PR8_AFT. : PR8_DUMP. PR8_SIZE. : NO : A4 (A4, LETTER, LEGAL, EXECUT) PR8_ORNT. : PORTR (PORTR, LANDS, R_PORTR, R_LANDS) PR8_FORM. : 66 0 100 60 30 50 PR8_FONT. : --- LPT1 Menu L1_CENTR. ECP) : HISPEED (IBM_PC, STNDRD, FAST, HISPEED, HINOACK, L1_BSYTM. : 60 L1_MGM_INFO. : AUTO (DISABLE, AUTO) L1_COMMENT. : L1_BIDIR. L1_READT. : AUTO (DISABLE, AUTO) :3 --- USB1 Menu U1_MGM_INFO.
The Parameter List NetWare Parameter Combinations When NetWare is enabled (i.e. when the NETW_ENB. parameter is set to “yes” in the NetWare Menu), the different settings of the NETW_TRANSPORT_PROTOCOL. and NDPS.
The Parameter List TCP Ports Opened for Raw Printing AXIS 5500 Port Number 9100 9902 9101 Port USB1 USB1 USB1 Via Logical Printer — — — Condition DEFAULT_RAW_TCP. set to 9100 AXIS_PRINT_SYSTEM. Enabled NDPS. Enabled Port Number 9100 9101 9900 9902 9100 9101 Port LPT1 USB1 LPT1 USB1 LPT1 USB1 Via Logical Printer — — — — — — Condition AXIS 5550 Note: DEFAULT_RAW_TCP. set to 9100 AXIS_PRINT_SYSTEM. Enabled NDPS. Enabled The TCP port numbers entered in RTEL_PRx.
The Parameter List Enable SNMP Status Example SNMP Status is enabled through Windows’ printer port settings. You have a three port print server and want to enable SNMP Status for LPT2. The table above tells you to set the SNMP Device Index to 3. Using Windows XP as an example: 1. Go to Start | Printers and Faxes. 2. Select Printer and then Properties. 3. Select Port and mark the Port you would like to change. 4. Click Configure Port... 5.
Glossary Section 17 Glossary AIX AppleTalk ARP Authentication Advanced Interactive eXecutive. A version of the UNIX operating system from IBM that runs on various IBM computers including Mainframe systems. A local area network protocol for communication between Apple Computer products and other computers and peripherals. Address Resolution Protocol. A protocol within the TCP/IP suite of network protocols that allows a host to find the physical address of a node on the same network.
Glossary DHCP Dynamic Host Configuration Protocol. Enables e.g. a print server to automatically obtain an unused IP address from the DHCP server. To fully benefit from this method, the print server also supports DDNS, which is available in Windows 2000 networks. Digital Certificate DNS Dynamic DNS Firmware Flash Memory FTP HTML HTTP HTTPS IP Used to create digital signatures and public/private key pairs for secure Web services. Domain Name System. Resolves host names into IP addresses.
Glossary Linux An open source implementation of UNIX. LLC Logical Link Control. An additional data link layer protocol which operates on top of the MAC protocol defined in the original Ethernet standard (the "Blue Book"). LPD The Line Printer Daemon is a protocol for transferring print jobs between hosts. This is the recommended method for UNIX/Linux systems, but some System V versions do not support LPD.
Glossary the Ethernet Address Table for an entry matching the print server's Ethernet address. If a matching entry is found, the daemon downloads the IP address to the print server. RISC Reduced Instruction Set Computing. A processor designed to increase performance, using a limited set of of assembly language instructions. SAP Service Advertising Protocol. A NetWare network name advertising service that e.g. file servers can use for advertising their existence to network clients.
Glossary WINS Wizard 164 Windows Internet Name Service. A NetBIOS Name Server that maps NetBIOS names to dynamically assigned IP addresses. A special form of user assistance that automates a task through a dialog with the user. Wizards help the user to accomplish tasks that are complex and require experience, and even for the experienced user can help to speed up an operation.
Index Index A Account file. . . . . . . . . . . . . . . . . . . . . . . . . . . . . . . . . . . . . . . . . . . . . . . . . . 96 Admin . . . . . . . . . . . . . . . . . . . . . . . . . . . . . . . . . . . . . . . . . . . . . . . . . . . . . . 89 AIX . . . . . . . . . . . . . . . . . . . . . . . . . . . . . . . . . . . . . . . . . . . . . . . . . . . . . . . 160 AppleTalk . . . . . . . . . . . . . . . . . . . . . . . . . . . . . . . . . . . . . . . . . . . . . . . 42, 160 ASCII to Postscript Conversion . .
Index Configuration methods FTP . . . . . . . . . . . . . . . . . . . . . . . . . . . . . . . . . . . . . . . . . . . . . . . . . . . . . 95 NetWare Administrator . . . . . . . . . . . . . . . . . . . . . . . . . . . . . . . . . . 71, 99 PCONSOLE . . . . . . . . . . . . . . . . . . . . . . . . . . . . . . . . . . . . . . . . . . . . 71, 99 SNMP . . . . . . . . . . . . . . . . . . . . . . . . . . . . . . . . . . . . . . . . . . . . . . . . . . . 98 Telnet . . . . . . . . . . . . . . . . . . . . . . . . . .
Index HTTP . . . . . . . . . . . . . . . . . . . . . . . . . . . . . . . . . . . . . . . . . . . . . . . . . . . . . . 161 HTTPS . . . . . . . . . . . . . . . . . . . . . . . . . . . . . . . . . . . . . . . . . . . . . . . . . 122, 161 I IEEE 1284 Parallel Port . . . . . . . . . . . . . . . . . . . . . . . . . . . . . . . . . . . . . . . . 135 IEEE 1284 parallel port . . . . . . . . . . . . . . . . . . . . . . . . . . . . . . . . . . . . . . . . . 10 Importing a Certificate . . . . . . . . . . . . . . .
Index NDS. . . . . . . . . . . . . . . . . . . . . . . . . . . . . . . . . . . . . . . . . . . . . . . . . . . . 67, 162 NetBIOS/NetBEUI . . . . . . . . . . . . . . . . . . . . . . . . . . . . . . . . . . . . . . . . . . . . 162 NetWare . . . . . . . . . . . . . . . . . . . . . . . . . . . . . . . . . . . . . . . . . . . . . . . . . . . 162 Advanced installation . . . . . . . . . . . . . . . . . . . . . . . . . . . . . . . . . . . . . . . 67 Basic installation . . . . . . . . . . . . . . . . . . . . . . .
Index Printing Bi-directional . . . . . . . . . . . . . . . . . . . . . . . . . . . . . . . . . . . . . . . . . . . . 117 Client/Server. . . . . . . . . . . . . . . . . . . . . . . . . . . . . . . . . . . . . . . . . . . . . 160 Parameter List . . . . . . . . . . . . . . . . . . . . . . . . . . . . . . . . . . . . . . . . . . . 129 Peer-to-Peer. . . . . . . . . . . . . . . . . . . . . . . . . . . . . . . . . . . . . . . . . . . . . 162 Test Page . . . . . . . . . . . . . . . . . . . . . . . . . . . . . . .
Index TCP/IP Restrictions . . . . . . . . . . . . . . . . . . . . . . . . . . . . . . . . . . . . . . . . . . . 120 Tcpmon.ini. . . . . . . . . . . . . . . . . . . . . . . . . . . . . . . . . . . . . . . . . . . . . . . . . . . 29 Technical Assistance . . . . . . . . . . . . . . . . . . . . . . . . . . . . . . . . . . . . . . . . 6, 132 Telnet . . . . . . . . . . . . . . . . . . . . . . . . . . . . . . . . . . . . . . . . . . . . . . . . . . . . . 163 Test Button . . . . . . . . . . . . . . . . . . . . . .