for COMMUNICATIONS MODEL: 24889, 29892 PRODUCT INSTRUCTIONS Before attempting to connect or operate this product, please read these instructions completely.
IMPORTANT SAFEGUARDS 1. Read Instructions - All the safety and operating instructions should be read before the unit is operated. 2. Retain Instructions - The safety and operating instructions should be retained for future reference. 3. Heed Warnings - All warnings on the unit and in the operating instructions should be adhered to. 4. Follow Instructions - All operating and user instructions should be followed. 5. Electrical Connections - Only a qualified electrician should make electrical connections. 6.
! Electrical Specifications Unpacking the Product 24889 Input Power: Power Consumption: Power Output: 24 VAC 1.45Amp Total Consumption 27 Watts Heater/Blower Up to 8 Watts Camera Power Tools Required: Phillips Screwdriver 7/16 Wrench or Socket 24VAC 50Watts Wire Gauge 22 20 18 16 14 12 Distance 55 90 150 230 270 600 Energía De Entrada: De Consumo De Energía: De Salida De Energía: 24 VAC 1.
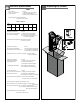
1 2 Remove the tilt mechanism from the bracket. Attach the bracket to the wall and secure appropriately. • Quite el mecanismo de la inclinación del • Una el soporte a la pared y asegúrelo apropia- • • • • • soporte. Enlevez le mécanisme d'inclinaison de la parenthèse. Entfernen Sie die Neigungeinheit vom Haltewinkel. Remova o mecanismo da inclinação do suporte. Rimuova il meccanismo di inclinazione dalla staffa. 3 • • • damente. Attachez la parenthèse au mur et la fixez convenablement.
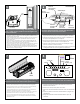
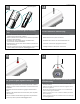
6 External Microphone/ Line Input DC-Iris Control Cable Sled Screw Network Connector and PoE Camera Sled Place camera on sled and align mounting holes on each. Adjust camera parallel to sled and tighten the bolt on the bottom. • • • • • Coloque la cámara fotográfica en el trineo y alinee los agujeros de montaje en cada uno. Ajuste la cámara fotográfica paralela al trineo y apriete el perno en el fondo. Placez l'appareil-photo sur le traîneau et alignez les trous de support sur chacun.
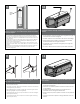
9 10 Adjust Lens Here Adjust the focus and focal length until the desired field of view and focus is obtained. For the 29892 wireless, attach the antenna lead to the camera. • • • • • Ajuste el foco y la longitud focal hasta que se obtenga el campo visual y el foco deseados. Para la radio 29892, ate la antena llevan a la cámara. Ajustez le foyer et la longueur focale jusqu'à ce que le champ visuel et le foyer désirés soit obtenu. Pour la radio 29892, attachez l'antenne mènent à l'appareil-photo.
13 Align to fit grove Slide Sunshield over first grove of housing top. • Resbale arboleda del excedente de Sunshield la primera de la tapa de la cubierta. • Glissez plantation d'excédent de Sunshield la première de dessus de logement. • Schieben Sie erste Waldung des Sunshield Überschusses der Gehäuseoberseite. • Deslize bosque do excesso de Sunshield o primeiro do alto da carcaça. • Faccia scorrere boschetto dell'eccedenza di Sunshield il primo della parte superiore dell'alloggiamento.
17 18 (For Wireless Unit 29892) Hole TOP GROVE Rear View Press down evenly on sun shield, the sun shield will snap into position on top set of groves Align holes and secure with bolt and nut. • Apriete uniformemente en el protector del sol, el protector del sol se encajará a presión hacia la posición respecto al sistema de la tapa de arboledas. • Alinee los agujeros y asegúrelos con el perno y la tuerca.