
User Manual

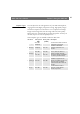
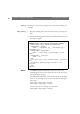

Table Of Contents
- Cover
- Section 1 Introduction
- Section 2 Installing the AXIS 240
- Section 3 Assigning an IP Address
- Section 4 Configuring the AXIS 240
- Section 5 Using the AXIS 240
- Appendix A Troubleshooting
- Appendix B The Parameter List
- Appendix C Updating the Software
- Appendix D Technical Specifications
- Appendix E The Auxiliary IO Port
- Appendix F The RS232 Serial Ports
- Appendix G Camera Applications
- Appendix H CRON Script Command Reference

Section 5: Using the AXIS 240 AXIS 240 Users Manual
44
Including Snapshots in
Web Pages
Follow these steps to integrate live snapshots into your own web pages:
1. Create your web page using your preferred HTML creation tool,
i.e. an ordinary text editor or a dedicated HTML design
application such as Microsoft Internet Assistant, Front Page or
Adobe PageMill.
2. In your Web browser, enter the URL that defines the name or IP
address of your AXIS 240 and the snapshot type that you wish to
create. For example:
3. Add an HTML reference to the snapshot within the target web page,
as detailed below:
Each time anyone visits this page, a new
fullsize.jpg snapshot will
be generated and displayed in the Web browser.
http://camserv/fullsize.jpg
<HTML>
<HEAD>
<TITLE>Sample page</TITLE>
</HEAD>
<BODY>
<H1>Welcome to my camera server demo</H1>
<IMG ALT="Fullsize JPEG Image”
SRC=”http://camserv/fullsize.jpg?camera=1"
WIDTH="320" HEIGHT="240">
</BODY>
</HTML>